
This iteration of the BMP family is technically excellent in the application of available technologies and features, especially when compared to its predecessor, the BMP-1, but some view the BMP-2 is nothing more than a "rehash" of the old and obsolete BMP-1 design. While that is technically true, the sentiment behind such an accusation points to an incorrect mindset. The BMP-2 is a product improved BMP-1, but it is not quite the same thing as its predecessor. Far from it. It is so heavily modified that the only similarities are in the general layout and the powertrain. Even the hull was structurally different due to the use of a new steel. The most obvious difference between the BMP-2 and its predecessor is, of course, the new turret, now armed with a deadly 30mm autocannon. The modifications resulted in an almost entirely different vehicle with greatly expanded capabilities. However, the BMP-2 never got past the lack of a modern thermal imaging system like the M2 Bradley's ISU (Integrated Sighting Unit), and it only got worse as time went on, as the BMP-2 stagnated technologically while its contemporaries continually evolved.

From 1980 to 1989, the factory now known as Kurganmashzavod produced a total of 14,000 BMP-2 models of all types. At the peak of production in 1989, between 1,800 to 1,900 units exited factory gates every year - triple the maximum annual rate of production of the M2 Bradley. These production numbers ensured that many Soviet motorized infantry units were equipped with fully armoured and highly mobile troops transports with more firepower than before. From 1988 to 1991, the production of the BMP-2 ran in parallel with the BMP-3, and in the 1990's, most of the production capacity of the KMZ plant had been redirected towards producing the BMP-3 to fulfill export contracts. Small orders of BMP-2s and BMP-3s were delivered to the Russian Army, but the volume of deliveries was small due to the economic situation of the Russian Federation at the time. In 2005-2006, the Russian Army received its last batch of approximately 40 new-built BMP-2s. Since then, no new BMP-2s have been supplied to the Russian Army, but KMZ still engages in the production of spares and routinely carries out overhaul and modernization work for existing vehicles.
TABLE OF CONTENTS
- Commander's Station
- TKN-3B
- TKN-AI
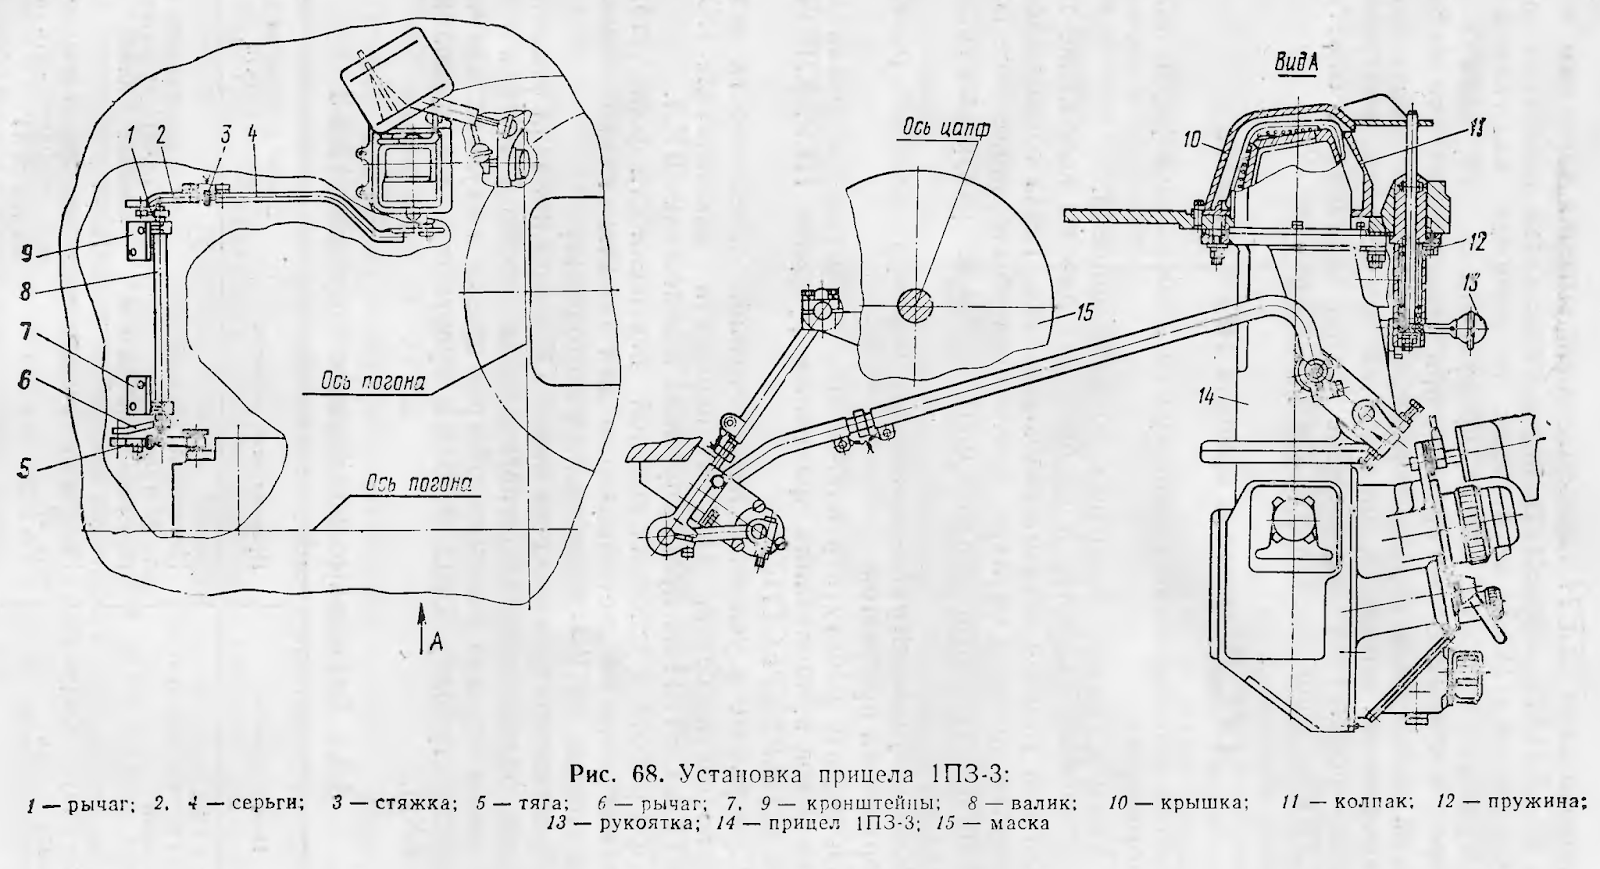
- 1PZ-3
- Communications
- Gunner's Station
- Sighting Complexes
- Stabilizers
- 2A42 Cannon
- Ammunition
- Secondary Weapon
- Supplementary Weapons
- Missiles
- Protection
- Applique Armour
- Fuel Tank Doors
- Smokescreen
- NBC Protection
- Fire Fighting
- Passengers
- Driver Station
- Mobility
- Fuel Endurance
- Water Obstacles
- Distribution
COMMANDER'S STATION

The commander of a BMP-2 is the squad leader of the Soviet motor rifle squad, the same as in a BMP-1. While he has been moved from the hull to the turret, the squad leader fulfills the same role as the commander of a BMP-1. He dismounts along with the passengers when required, leaving the gunner to do double duty in his absence.

The commander has his own hatch, which has an unusual clam shell shape to grant enough space to accommodate the extremely sparse array of periscopes.

The commander of the BMP-2 is only given a miserly two (!) general vision periscopes to supplement his ubiquitous TKN-3B. Not only is that less than what the gunner gets, it's also much less than what the commander's NATO counterparts get. The commander of the Marder 1, for instance, is furnished with a generous array of five periscopes covering 160 degrees frontally. However, it must be mentioned that the cupola rotates, so unlike the gunner seated beside him and the commander of a Marder 1, the commander of a BMP-2 can spin the cupola around to see all 360 degrees around him. It is not as convenient as being able to glance in whichever direction at leisure, but the overall effect is similar, and at least the commander of a BMP-2 has a greater field of view than a 160 degree frontal arc. It would, of course, be much better to have two more periscopes like on the cupolas of T-54 and T-62 tanks. To top it all off, there is a TNPT-1 rear view periscope mounted in the hatch to give the commander immediate rearward awareness. It is useful for directing the driver when buttoned up. In non-combat situations the commander may opt to peek out of his hatch instead.
As usual, all of the periscopes are heated with the RTS-27 heating system to prevent fogging. RTS stands for "Регулятор Tемпературы Стекла" (Regulyator Temperatur' Stekla), which literally means "Glass Temperature Regulator".
Unfortunately, it seems that this system is a common source of complaints, according to forum posts on the Russian internet. The RTS periscope heating system is installed in nearly all Soviet vehicles, including the T-72, T-64, BTR-80, and many, many more. However, none of them have had any complaints about periscopes fogging up, except for the BMP-2 and its predecessor. Based on anecdotal evidence collected from several BMP-2 crew members, both current and former, it seems that the RTS heating system doesn't always work on the BMP-2 for some reason. It has been the source of much grief during the winter, as the periscopes usually fog up so badly that it becomes impossible to see through them. It is possible that this is simply due to the poor condition of training vehicles, but this is only speculation. It seems strange that such a simple system went wrong here when it could function fine in everything else.
TKN-3B

One considerable advantage to the BMP-2 in overall fighting efficiency over its contemporaries is that the commander has the TKN-3B combined active/passive pseudo-binocular periscope at his disposal. Pseudo-binocular meaning that although the device has two eyepieces, the two optic feeds are combined to one aperture, which the viewer sees out of. The TKN-3B has a fixed 5x magnification in the day channel with an angular field of view of 10°, and a fixed 3x magnification in the night channel with an angular field of view of 8°. The periscope can be manipulated up and down for elevation, but the commander's cupola must be manually spun for horizontal viewing.

For tanks like the T-72, the TKN-3B might be a somewhat mediocre tool compared to the PERI-R17 panoramic sight with television feed for the Leopard 2, but for an IFV like the BMP-2, it was rather remarkable. It wasn't stabilised, and featured only rudimentary rangefinding capabilities, and its nightvision capabilities were not competitive by 1980 (the TKN-3 first entered service in 1963), but it at least had nightvision capabilities, and it had a decently high magnification. Night vision came in two flavours; passive light intensification or active infrared. In the passive mode of operation, the TKN-3B uses its light intensification module to amplify ambient light to produce a legible image. This mode is useful down to ambient lighting conditions of at least 0.005 lux, which would be equivalent to an overcast, moonless and starless night. In these conditions, the TKN-3B can be used to identify a tank-type target at a nominal maximum distance of only 400 m due to the resolution limit, but as the amount of ambient light increases such as on starlit or moonlit nights, the distance at which a tank-sized target is discernible can be extended. In dark twilight hours, the TKN-3M may be able to make out the silhouette of a tank at a distance of up to 800 m or more, but the sight is hamstrung again, this time not by the absence of light, but by the low magnification. Any brighter than dawn or dusk, and the image will be oversaturated and unintelligible.
The active mode requires the use of the OU-3GA2, an IR spotlight operating on 110W, connected directly to the BMP-2's 27V electrical system. With active infrared imaging, the commander can reliably spot large objects from a distance of more than a kilometer depending on meteorological conditions, but identifying targets as tanks or trucks or APCs can only be done at around 800 m, but potentially more if the opposing side is also using IR spotlights, in which case, the TKN-3 can be set to the active mode but without turning on the IR spotlight. This is possible because the switch for activating the spotlight is the right thumb button while the operating channel selector is on the TKN-3 itself, meaning that they can be turned on separately.
The problem with IR spotlights as a whole is that although the user can use them to spot for targets, the targets can use them to spot the user too, but from much further away. Because of the diffraction of light waves, anybody observing the user won't just see a dot of light. If you observe a tank with its IR spotlight on, most of the tank would be brightly illuminated from miles away. The diffracted light does have the benefit of lighting up the ground better for the driver to see, though, so the common issue of speed control due to short visibility distance with the complementary IR periscope for the driver is slightly alleviated in battle conditions. If you look at the photo above, you can clearly see what I mean by this. The spotlight (running on a small pocket battery in this case) illuminates the apartment building, but also the most of the ground. If you had an infrared filter on your gunsight or rifle scope, like the PSO-1 for the SVD rifle, you could very easily see the source of light and call out its position.
Shortcomings in the night vision capabilities of the TKN-3B may be solved by the use of illumination rounds fired over enemy positions. This doesn't solve all of its problems, of course, because the low resolution may complicate the quick and proper identification of enemy vehicle types at long distances, and overhead lighting doesn't penetrate dense forest canopies. More recently, IR illumination rounds similar to the British L58A1 have been developed and put into service, which may benefit the TKN-3B greatly. Needless to say, this new type of ammunition is a godsend for the ageing BMP-2s of today..
Rangefinding is accomplished through the use of a stadiametric scale sighted for a target with a height of 2.7 m, which was the average size of the average NATO tank or IFV. The TKN-3B is unstabilized, making it exceedingly difficult to properly identify enemy tanks or other vehicles at extended distances while the BMP-2 is travelling over rough terrain, let alone determine the range. The left thumb button initiated turret traverse for target cuing. The range of elevation is +10° to -5°. The OU-3GA2 spotlight is also directly mechanically linked to the periscope to enable it to elevate with the TKN-3B.
 |
| TKN-3 viewfinder |
The TKN-3B gave the BMP-2 a true hunter-killer capability, something totally foreign to NATO IFVs of the era. By simply placing the crosshairs on the target and pressing left thumb button, whereupon the turret will spin to meet the target. The cupola lacks a contra-rotating motor, but it is light enough and the ball bearings of the cupola are smooth enough that it does not have enough inertia to not spin away with the turret, making it easy for the commander to keep the cupola aimed at the target while the turret spins around to meet it. This was not so easy in the T-62, which gave the commander a steel rung for the commander to hold on to. The fact that this hunter-killer feature exists is of huge importance, as the commander is elevated from a simple observer to an active participant. He could participate even further if required, using his 1PZ-3 multipurpose sight.
TKN-AI

TKN-AI features a pulsed laser spotlight, but evidence shows that it can be replaced with a PL-1-01 laser beamer, presumably to increase the range of vision. The laser spotlight superficially resembles an OU-3 spotlight from a distance, but as you can see in the photo above, the aperture for the IR laser is much, much smaller than the external diameter of the spotlight itself. Both the spotlight and the PL-1-01 beamer can switch from active illumination to pulsed illumination, whereby the IR laser beam is modulated and pulsed to an operating frequency is 5.2 kHz with an illumination pulse duration of 130 ns. This is meant to reduce laser backscatter when viewing through haze or fog. The identification distance for a tank-type target is 1000 meters in the active mode, but it might be possible to increase the detection range by installing the PL-1-01 instead of the spotlight.. The device is also capable of rangefinding using timed laser pulses controlled by the TKN-AI. The claimed accuracy of ranging is 20 m within a range of distances between 200 m and 3000 m.
Besides active infrared imaging, the TKN-AI features a passive mode with a 2+ generation image intensifier module. It is possible to identify a tank-type target at 600 meters in the passive mode, which is slightly better than the 500 m range of the TKN-3B.
Modernized BMP-2s using the TKN-AI are known to have participated in exercises, like the one in the photo below. It can be seen with the characteristic PL-1-01 pulsed laser beamer where the old OU-3 IR spotlight should be.

However, this upgraded device still retains some drawbacks of older IR nightvision devices. Being a rather powerful IR laser projector, an illuminated PL-1-01 can be spotted from great distance with a simple helmet-mounted nightvision monocular or goggles by the target of observation, though the IR beam is also likely to blind the observer at the same time.
The IR beam itself may also be visible if there is smoke or fog around the battlefield as it will diffuse the light of the laser beam and make it visible to anyone equipped with nightvision equipment. If that occurs, then it would be extremely simple for any observer to trace the beam back to its originator, thus revealing the location of the BMP-2, leaving it open to artillery or air attack. The object of the commander's attention will also be alerted as long as he has nightvision equipment, since he would be able to see himself or the area around him illuminated by the laser.

Besides manning the periscopes and managing the vehicle, the commander is also in charge of fending off air attacks. To do this, he is provided with a 1PZ-3 anti-aircraft sight mounted on the turret ceiling in front of his cupola. It can also be used as a backup sight for ground targets if the need arises. When not in use, the aperture window is covered by an armoured hood.


The 1PZ-3 sight is monocular with a very large range of elevation. It features internal electric heating and has two special light filters. The sight can be used without a filter when firing upon ground targets, but if necessary, a "Special" filter or a "Neutral" filter can be applied by turning a lever. The "Special" filter is simply a laser protection filter that protects the operator from being blinded by direct laser illumination, and the "Neutral" filter is a neutral density filter that reduces the amount of light that is transmitted to the operator's eyepiece, thus darkening the image. This makes it easier for the operator to detect and track aircraft in the sky during bright daylight hours, but it can also be used when engaging ground targets if necessary.
The sight lacks independent stabilization, but because of its direct mechanical connection to the stabilized 2A42 cannon in the turret, the sight is stabilized in the vertical plane. However, due to the coarse nature of this type of stabilization, the stabilization precision is not high and the viewfinder image may vibrate when the vehicle is moving on rough ground. The sight can elevate and depress as far as the cannon can, which would be from -5 degrees to +75 degrees in elevation.

The sight has two magnification settings; 1.2x and 4x. The field of view through the sight is 49 degrees in the 1.2x setting and 14 degrees in the 4x setting. The lower magnification was only suitable for engaging aircraft. Shooting at air targets flying at subsonic speeds is theoretically possible at ranges up to 2,500 m and at altitudes up to 2,000 m. In practice, the effective range is much less.
The two images below show the sight under the 1.2x and 4.0x magnification settings.


As far as anti-aircraft sights go, the 1PZ-3 had no outstanding characteristics and contained only the essential markings for leading moving aircraft. The sight also has the secondary purpose of serving as the commander's only optic for ground targets and being the BMP-2's backup gun sight as well, and to that end, its viewfinder provides graduated range scales and simple deflection markings, as shown in the images above. To aim, the operator turns a knob to raise and lower a horizontal line until it matches the desired mark on the fixed range scales. The horizontal line forms a crosshair with the fixed vertical line running down the center of the viewfinder. The operator elevates the autocannon or coaxial machine gun of the BMP-2 until the crosshair is superimposed on the target, and then he can open fire.
The commander may override turret and weapons control at the press of a button and take over using the control handles that he is furnished with.

Here is a screenshot of the reticle of a 1PZ-3, taken from a video of a BMP-2 firing its cannon:

These tools, taken as a whole, mean much more than the sum of their parts. The independent surveillance equipment, target designation, duplicated gunnery controls and independent sighting systems give the commander a level of dominance over his own machine that many of his NATO counterparts did not have. While the commander of an M2 Bradley did have a gunsight extension to see what the gunner sees and a set of gunnery controls to use them with, he did not have a sight of his own, as there was no backup sight, and he did not have his own cupola and he did not have a magnified optic with a stadia rangefinder. The BMP-2 had all of these, and the BMP-2 had a fully matured hunter-killer capability to go with it.
From the introduction of the BMP-2 in 1980 until 1984, the commander was in charge of the R-123M radio, installed at the very rear of the turret shelf (the turret is wider than the turret ring, so there is a wide shelf at the base). Voice transmissions are done using the throat microphone integrated into his tanker's helmet. The throat microphone is reportedly of good quality and much more useful than an open microphone. The commander can listen to both extra-vehicular transmissions or communications from his own crew from the headphones of his tanker helmet.

The R-123 radio had a frequency range of between 20 MHZ to 51.5 MHZ. It could be tuned to any frequency within those limits via a knob, or the commander could switch between four preset frequencies for communications within a platoon. The switching process takes 3 seconds to complete. The radio has a transmitting and receiving range of between 16km to 50km, depending on the antenna used and the type of terrain. The R-123M had a novel glass prism window at the top of the apparatus that displayed the operating frequency. An internal bulb illuminated a dial, imposing it onto the prism where it is displayed. The R-123M had an advanced modular design that enabled it to be repaired quickly by simply swapping out individual modules.
The dismounted squad leader will have an R-392 or R-126 radio to communicate with the commander of the BMP-2 at shorter distances. The squad should be operating 800 meters away from its BMP at the most, though this obviously is dependent on the tactical situation as well.

In 1984, the now-outdated R-123 radio was replaced by the R-173 radio, which had a frequency range of between 30 MHZ to 75.999MHZ. It has 10 preset frequencies. It had an electronic keypad for entering the desired frequency, and an LED display. Its main improvement over older radios is the ability to send encrypted analogue and digital signals.

Sometime in the late 2000's, most BMP-2s had a new and advanced R-168-2UE-2 frequency-hopping encypted radio installed to replace the obsolete R-173, which was found to be susceptible to eavesdropping and jamming during the first Chechen campaign/invasion.

The R-168 family of radios is now standard throughout the Russian ground forces, from infantry platoons to tank companies. It can produce frequency hops 100 times a second, and the data is encrypted as well. It can also send and receive digital data.
The commander can exit the vehicle by two means - the hatch above him, or by spinning the turret to face the rear, and then going out through the passenger compartment. In the latter case, he must swing open the turret basket perimeter shield (shown below) to exit the turret. The last two photos are provided courtesy of Mr. Tim Gow from the excellent megablitzandmore blog for modelers.


Besides the necessary tools and spare parts, there isn't much space inside the vehicle for stowing long term supplies. The turret doesn't have external bins or baskets either, but it does have numerous loops around its rear perimeter, as you can see below.

The loops are meant for securing foliage and camouflage netting on the turret, but the crew can strap their personal effects onto them too.

The gunner's station is relatively sparse. All of the weapon controls are placed directly in front of the gunner, and most of the accessories, including the intercom control box, dome light and the turret traverse lock are arranged around the turret wall. The gunner has three fixed general vision periscopes, two on each side of his primary sight and another aimed to the left. The gunner is also provided with a TNPT-1 rear view periscope in his hatch. This periscope lets him see directly behind the turret. All in all, the gunner has the same number of general vision periscopes as a BMP-1 gunner but

This gives him relatively good visibility and he can take over the vehicle from the commander if the commander dismounts with the passengers. The gunner's has no periscope aimed to the right of the turret, and it was not really possible to provide a view to the right at all because the ATGM launcher already occupied that part of the turret roof. Compared to its direct foreign counterparts, the BMP-2 accommodated its gunner quite well in this respect. The gunner in an M2 Bradley, for instance, has two general vision periscopes flanking the ISU (Integrated Sight Unit) covering the 11 o'clock and 1 o'clock sectors like in the BMP-2, but half of the view from both periscopes is blocked by the large housing for the sight and the view from the left periscope is completely blocked when the TOW launch pod is raised. A Marder 1 gunner had three periscopes, but they only covered the left side of the turret and were evidently only meant to compensate for the commander's inability to see to the left as the view was completely blocked by the external autocannon installation and the gunner's sight.


The BPK-1-42 combined day-night sight was the primary sight for a BMP-2 gunner. It has a fixed magnification of 5.6x in the day channel, and a fixed 5x magnification in the night channel. Rangefinding is accomplished with a stadiametric scale in the lower right corner of the sight view finder. The BPK-1-42 sight has dependent stabilization in the horizontal and vertical planes. The elevation limits of the mirror head of the sight ranges from -8 degrees to +30 degrees. The stabilization system of the weapons provides dependent stabilization to the sight via a simple connection rod.

There are two eyepieces on the sight. The one on the left is the optic for the nightvision channel. Observation and target engagement at night is achieved in either the passive or active modes. The passive mode uses an image intensifier tube to amplify ambient light to a visible level. It is possible to identify tank-type target at distances of up to 600 or 700 meters on a cloudless, starry night with ambient light levels of at least 0.005 lux.
The active mode requires the use of the co-axially mounted OU-5G infrared spotlight for illumination. Although the OU-5G spotlight is only approximately the same size as the OU-3 spotlight used for the commander's TKN-3B periscope and is only rated for a somewhat power of 180 W, its illumination capability is greatly superior as it uses a xenon lamp instead of an incandescent lamp. It has a white light output of 15 million Candelas - half that of the L-4A spotlight used on tanks, which also used a xenon arc lamp but ran on 600 W.

The ribs on the BMP-2 (and BMP-1) measured 25mm in height, 12mm in thickness, and were spaced 200mm apart, but due to the steep angle of the slope of the BMP's engine access panel, the difference in spacing is nullified. One important detail is that the ribs are not exactly vertical, but perpendicular to the engine access panel, so they are sloped inwards at 12 degrees. These measurements and the photos below were provided by Chris Conners, proprietor of the excellent American Fighting Vehicle Database website (afvdb.50megs).


The shape and orientation of the ribs on the engine access panel can be seen in the image below.

The geometry of the access panel itself is surprisingly complex. It is thinnest immediately behind each rib, and gradually thickens as it approaches the next one. The thinnest part of the panel is 10mm and the thickest part is 15.5mm. The effectiveness of the panel against gunfire is unclear, but there can be no doubt that it is at least proofed against 7.62mm bullets of all varieties as well as 12.7mm armour-piercing bullets as well.

This phase diagram taken from "Armour: Materials, Theory, and Design" illustrates the importance of steep sloping to the engine access panel. In this case, a 6.35 mm aluminium alloy plate was used as a target and 6.35 mm-diameter steel-cored bullets as projectiles. A 6.35 mm projectile like this is representative of the steel armour-piercing core of the average 7.62mm rifle bullet. The AP core of a 7.62x54mm Russian B-32 bullet, for instance, has a diameter of 6.1 mm with a weight of 5.39 grams. It has a nominal muzzle velocity of 830 m/s. The AP core of a .30 caliber M2 AP bullet has a diameter of 6.2 mm and weighs 5.17 grams. It has a muzzle velocity of 855 m/s. The AP core of a 7.62x51mm M61 bullet has a diameter of 6.3 mm and weighs 3.8 grams. It has a muzzle velocity of 838 m/s.
Even with such a thin aluminium alloy plate, the armour piercing core simply ricochets without achieving perforation. Depending on the impact velocity, the end result may vary. At 700 m/s, the bullet will ricochet intact, but above that, it will fracture on impact and the fragments ricochet off the plate. As the aluminium plate used in the experiment is highly likely to be 5083 aluminium alloy, inferior to ABT-101 alloy.
The lower glacis is probably the stronger half of the front hull. It is a 15mm plate sloped at 56 degrees - thinner than same plate on the BMP-1 which was 19mm thick sloped at 57 degrees. The reduced thickness was compensated by the increased hardness and strength of the new BT-70Sh steel which raised the effective thickness of the 15mm plate on the BMP-2 to the same level as the BMP-1. In practical terms, this compares favourably to the 32mm plate sloped at 24 degrees that forms lower glacis of the Marder 1, A1 and A2 when attacked with small arms and some autocannons, including the ordnance from the Marder 1. For instance, German DM43 APCR ammunition of the 20x139mm caliber fired from the Marder 1's Rh202 autocannon is able to penetrate 32mm of RHA armour at 0 degrees at 1,000 meters, but its performance drops sharply down to just 8mm of penetration on armour sloped at 60 degrees at the same distance. For the better half of its life during the Cold War, this part of the BMP-2 was therefore frontally immune to 12.7mm machine gun bullets and to 20mm shells and anything in between from close range. The vastly more effective DM63 APDS was introduced sometime in the mid-80's, and that would have been able to defeat the frontal armour of the BMP-2 out to 1,000 meters and more.
Like the BMP-1, the side armour of the BMP-2 is good for a vehicle of its weight if the Marder 1 is used as a reference point. The armour on the sponsons and the firing ports is 13mm thick and vertically sloped at 15 degrees. The armour on the lower side of the hull is 15mm thick and flat. The flotation aids mounted on the sponsons as side skirts are filled with foam and are equivalent to 10mm of steel. The flotation aids protect the tracks and provide additional spaced armour for the hull, but they only cover a third of the area of the hull profile. The sides provide reliable protection from 7.62mm machinegun fire, and resist .50 caliber AP ammunition only from above 200 meters. The field manual FM 7-8 "Rifle Platoon And Squad" from 1980 notes that a .50 caliber machine gun will penetrate the side of a BMP from 200 meters or less.
Besides the physical thickness of armour, the passenger compartment of the vehicle has an extra 7 to 8 degrees of horizontal slope. Combined with the minor vertical sloping on the sponsons, this additional horizontal slope increases the protection for both the passengers and the internal fuel tanks from attacks in the frontal arc of the BMP.

This design quirk lends evidence to the intention of the designers to afford extra protection to the most sensitive assets of the vehicle. It would be extremely incorrect to say that the BMP-2 (and by extension its predecessor) was a "deathtrap" for being designed without consideration for combat survivability. The extra 8 degrees of horizontal slope will do absolutely nothing if the vehicle is struck by an RPG, or if it runs over a large IED, but it will be significant when the BMP is advancing towards a hail of heavy machine gun fire.

The thin strip of sloped armour (above) at the very top of the hull sponsons is no better nor worse than the rest of the side armour. The photo below, courtesy of Mr. Conners once again, gives us an idea of how thick it really is. Knowing that the sponsons are 16mm thick, we can compare that (the straight bit) to the bent flap of steel, which is bent directly from the sloped strip of the overtrack hull. Using pixel scaling, the thickness comes out at 7.13mm. Not very thick, but with its slope of 60 degrees, it is more than enough to deflect 7.62x51mm AP bullets from any distance.


The thickest sections of armour are found at the center of the turret surrounding the gun mantlet. The physical armour thickness reaches its peak at the base of the turret underneath the gun mantlet as the drawing below shows.

The thickness of this part of the turret is unknown, but based on the thickness of the turret roof depicted in the drawing, it is much thicker than the turret cheeks. The turret cheeks form the front half of the circular turret and it has a thickness of 20mm. It is sloped 43 degrees at the front of the turret, declining to 36 degrees at the sides. Ignoring the horizontal slope component from the circular shape of the turret, the cheek armour has a line-of-sight (LOS) thickness of 27.3mm with only its vertical slope of 43 degrees. This is a close equivalent to the turret of the BMP-1, but the BMP-2 turret is slightly tougher as it is built from BT-70Sh steel with a higher hardness and higher yield strength than the 2P high hardness steel of the BMP-1.
Like the hull, the turret armour offers complete immunity from .50 caliber and 14.5mm armour-piercing bullets in its frontal arc and can resist 23mm BZT shells (API-T) from 500 meters.
The rear half of the turret is weaker, having a thickness of just 10mm and sloped at 28 to 20 degrees, with the smallest slope angle at the rearmost point of the turret. From the side, the turret has enough armour to resist 7.62mm armour-piercing bullets at point blank range.

Once opened, the turret hatches serve as armoured shields. As they are about as thick as the turret roof armour is, which is about 13.6mm, they are fully proof against anything less than a 12.7mm bullet. The shield gives the commander full body and arm protection once he is outside, making him a very tricky target for any potential snipers. If the commander would prefer not to have his head above the hatch so conspicuously, he can rotate the cupola a bit to the side to poke his field binoculars out so that everything except his eyes can be sheltered behind the shield-hatch.

The conflict in Ukraine has proven that artillery is still an incredibly important asset, even in an unconventional war. Apparently, the majority of armoured vehicle losses were due to artillery fire. Among the many victims was the BMP-2 below. As you can see, the roof armour was no match for a 122mm high explosive shell.

If you haven't read the bullet penetration test document presented here (link). I have condensed the relevant information to a usable format:
Muzzle Velocity of M2 AP: 876 m/s
V50 of 7.7mm ATI 500-MIL plate at 30°: 627 m/s
V50 of 9.7mm ATI 500-MIL plate at 30°: 723 m/s
V50 of 3.1mm ATI 500-MIL plate at 30°: 787 m/s
This means that at 960 m, .50 cal AP will go through 7.7mm of 534 BHN steel angled at 30 degrees to the vertical. At 600 m, it will go through 9.7mm of the same steel angled at 30 degrees. At 400 meters, the bullet is defeated by 3.1mm of AT 500-MIL plate, indicating the possibility of a catastrophic failure of the steel core by shattering.
Here is the graph generated as part of the test conclusion and discussion.

Keeping in mind that the muzzle velocity of a .50 caliber AP bullet is 2910 ft/s, we can see that the only velocity at which the penetration of the bullet will exceed 13mm (0.51 inches) is just under 2,600 ft/s. Referring to our ballistic chart here (link), we can see that the velocity of 2,450 ft/s corresponds with the distance of around 400 meters. Therefore, the upper side hull armour of the BMP-2 can resist a .50 caliber AP bullet from 400 meters given that the hull is angled slightly by a few degrees. The lower side hull armour is 15mm thick but completely flat, so it is actually slightly weaker. Conversely, the middle of the hull where the flotation aid is present would be immune to .50 cal AP even from point blank range due to the high combined thickness of armour and the spacing of the flotation aid from the hull sponson.
The turret is vertically sloped at 28.5 to 35 degrees and has additional horizontal slope due to its rounded shape, so it is able to resist .50 caliber AP bullet from closer distances. However, the rear of the turret is only 10mm thick and is flatter, so it is only capable of resisting .30 caliber bullets.
Muzzle Velocity of 14.5 B-32: 988 m/s
V50 of 15.6mm of ATI 500-MIL plate at 30 deg: 730 m/s
V50 of 15.4mm of ATI 500-MIL plate at 30 deg: 739 m/s
V50 of 18.8mm of ATI 500-MIL plate at 30 deg: 841 m/s
This means that at 980 m, a 14.5mm B-32 bullet will go through 15.6mm of ATI 500-MIL plate angled at 30 degrees to the vertical. This is almost exactly double the performance of the .50 M2 round for a very small increase in caliber and small increase in overall dimensions. At 915 meters, the 14.5mm B-32 bullet will go through 15.4mm of the same steel at the same slope. At 525 m, the 14.5mm B-32 bullet will go through 18.8mm of the same steel at the same slope.
Here is the graph of thickness against V50:

As you can see, the side hull will be defeated from any distance within 600 meters.
Muzzle Velocity of 14.5mm BS-41 bullet: 1005 m/s
V50 of 24.5mm of ATI 500-MIL plate at 30 deg: 869 m/s
The inherent suitability of a WC (Wolfram-Carbide, or Tungsten Carbide) core for anti-armour purposes is very apparent here. At 435 meters, the BS-41 bullet can perforate 24.5mm of ATI 500-MIL plate steel angled at 30 degrees.

Reading the graph tells us what we already know. The sides of the BMP-2 cannot defend from this type of bullet from a reasonable distance, but the frontal armour of the hull and turret will have no problems even at close range.
Contrary to popular belief, the infamous fuel-filled rear doors were far from being a hazard to the crew. To the contrary, there is evidence that much more thought was put into the design of these doors than commonly believed. The walls of the fuel tank are pressed from rolled sheets of medium hardness steel. According to Victor Malginov, the outer plate of the door is 13mm thick and the inner plate is around 5mm thick. The thickness of the outer plate is the same as the thickness of the rear hull armour, and the doors are slightly sloped at the same angle as the reset of the rear hull armour: 13.5 degrees. This is enough to stop ball ammunition from small arms at point blank range, grenade fragmentation from any distance, and splinters from small mortars. When taken together with the fuel and the inner ~5mm plate, it is clear that the ballistic protection offered by these doors is not worse than the side armour of the vehicle and may even be slightly better.
There is a prevailing myth that the fuel tanks could be set afire if the fuel tanks were hit by incendiary ammunition. The biggest issue with this is that incendiary ammunition simply was not common. Incendiary 7.62x51mm ammunition is rare, and so is incendiary 5.56mm ammunition, and in the latter case, it would not be able to defeat the outer 13mm plate of the fuel tank door in the first place. Even .50 caliber AP-I ammunition is rare compared to ball rounds and the standard APM2 armour piercing round. The standard .30 caliber APM2 armour piercing round also lacks an incendiary filler.

In the event of a penetration from an API bullet, the incendiary element will only ignite fuel just behind the exterior wall, because fuel needs to be oxidized in order to burn, and the only source of oxygen for the fuel that is exposed to the incendiary blast is the fuel just around the entry hole of the bullet, since fuel will leak out from that hole into open air. However, in such a case, the entire tank is completely safe from ignition. Burning fuel will simply leak out of the tank in harmless rivulets. If the interior wall of the fuel tank is perforated as well, the fuel will not be ignited due to a lack of heat, since the incendiary blast is on the other side of the fuel tank. This is because the incendiary element is located in front of the armour piercing core, and the external wall of the door-tank is more than enough to initiate ignition, and the incendiary blast will be partially outside the fuel tank, and partially inside, but due to the spaced effect and the presence of fuel, the blast will not be able to reach the interior side of the fuel tank.
So we know that if fuel is to be ignited, it will only be ignited outside the fuel tank. But what of the steel penetrator core that's still flying straight through the fuel tank? Fluids, including diesel fuel, are more than capable of slowing down or even outright defeating ballistic projectiles given sufficient volumes of it. How much is needed to stop specific bullets is not known, but with two thick armoured walls on either side, it's not hard to imagine that the rear doors could probably resist 7.62x51mm AP rounds without much effort. Large caliber artillery splinters would find themselves quickly stopped due to their irregular shape, but not before punching large holes into the outer walls. The parts of the rear doors cut out for firing ports do not hold fuel, but are compensated with an additional layer of armour welded on top of the door as shown below:

These add-on plates reportedly have a thickness of 6-8mm. As such, the total thickness of steel at this zone would be between 24-26mm, and the protection value is increased by the curvature of the pressed steel door.
Given these facts, it's easy to see how the designers approached the task of increasing protection without increasing weight, as that was critical to the vehicle's amphibious qualities. The outer plate is thick enough to prevent punctures from most threats and the rear doors as a complete unit can resist most shell splinters from large caliber artillery and most small arms fire. The only credible threat within the context of the role of the BMP-2 would be heavy machine guns firing armour piercing ammunition, but in reality, the chances of a BMP-2 exposing its rear end to a heavy machine gun emplacement or a vehicle armed with one is exceedingly low that it may as well be a non-issue.
But for all that, the crew's initiative still plays the most important role. It is important to remember that both rear doors only hold a combined total of 122 liters of fuel out of a net total of 460 liters. In other words, the crew could easily make do without having them filled when in combat. It was never an issue in the first place, since Soviet vehicles have always carried more fuel than most, and even without the contents of the rear doors, the BMP-2 would still carry nearly the same amount as the M113. The rear doors may be filled with water, or soil, or sand to totally nullify the chance of fire and further boost its resilience. The website "Box O' Truth" did their own tests on the effectiveness of sand as a bullet stopping obstacle in their article "The Sands of Truth", which can be found here (link). As it turns out, 7.62x51mm ball ammo won't go through 5 1/2 inches of sand (139.7mm) of sand, nor will 5.56mm SS109 rounds. But what are the dimensions of the rear doors?
Well, they measure about 275mm wide at the widest at the top, tapering down to 172mm wide at the thinnest at the bottom. This site (link) states that a single .50 cal M2 AP round fired from the barrel of an M2 machine gun is capable of penetrating:
Taking 275 to 172 milimeters of sand together with the ~5mm and 13mm steel walls of the rear doors, it appears that the doors have a reasonable chance of shrugging off .50 cal AP bullets at short range. If not, then the occupants are at least fully shielded from 7.62x51mm AP bullets, though they probably wouldn't need the sand for that. Even if the fuel doors were empty, they would still be as good as what some other IFVs have for armour. Take the CV90 as an example:

In conclusion, there is more than enough evidence indicating that the armour on the BMP-2 was far from "paper thin". While it is true that its contemporary the M2 Bradley had greatly superior side armour with its double spaced armour configuration over its one inch thick 5083 aluminium hull, some context is needed before direct comparisons can be drawn. The M2 Bradley had to contend with powerful Soviet 14.5mm machine guns which could be found on the majority of BTR-60 and BTR-70 armoured personnel carriers as well as BRDM armoured cars, whereas the BMP-2 only had to face off against .50 caliber machine guns. Hunnicutt says that the Bradley's side armour is resistant to 14.5mm AP rounds from 200 meters, and it has been shown that the BMP-2's side armour is theoretically resistant to .50 cal AP rounds from around 400 meters. In practical terms, the fact that the side armour of the BMP-2 is nominally weaker is a minor detail. When seen in the appropriate context, the BMP-2 was not worse than its contemporaries in armour protection.
Immediately as the Afghan campaign began in earnest during the turn of the decade, chinks in the BMP-2's armour began to show. Although the vanilla BMP-2 was more than good enough when faced with Kalashnikov fire, it was almost immediately apparent that heavy machine gun fire from Mujahideen ambushes (usually from a DShK) could easily perforate the 16 - 18mm side armour at very close distances. To counter this development, the BMP-2D, also known as the "Afghan BMP" variant was created. It introduced an array of armoured spaced plates mounted over the upper sides of the hull and a steel side skirt draping down from the overtrack sponsons to protect the bottom half of the hull. The top strip on the upper side was also reinforced with an extra sheet of 6mm steel welded on top of it. Contrary to some claims, the front hull armour was not reinforced, only the belly.


The decision to only add protection to the sides and rear of the vehicle and not the front was informed by actual data gathered during the conflict. Ignoring the fact that the front of the vehicle was immune to 12.7mm machine gun fire, real combat damage reports showed that the front was almost never targeted by enemy forces throughout the duration of the war. According to the study "Исследование Боевых Повреждндений Образцов Отечественной БТТ" (Study of Combat Damages To Samples of Domestic BTT), the distribution of hits sustained by BMPs from armour-piercing bullets was 33% to the sides of the hull, 50% to the rear of the hull and 17% to the roof of the hull. The turret did not receive any damage or received a statistically negligible proportion of damage. Thus, additional spaced armour plating was allocated to the side and rear projections of the BMP-2D.

The steel side skirts are 6mm thick, and so are the steel panels on the hull sponsons that were mounted about two inches away from the base armour. The protective mechanism was twofold - it forced the incendiary element of an API bullet to deflagrate early and expend itself in the spaced gap, and it also chips off part of the penetrator core and creates fractures so that when it impacts the high hardness steel armour plate of the hull, the bullet shatters completely. If the bullet impacts at a higher obliquity, the armour piercing core can be shattered completely, thus completely neutralizing it as a threat.

Those two factors, in addition to the thickness of the panels themselves, entirely neutered the threat of 12.7mm and 14.5mm shots across the side of the hull even from close range. Extensive research on the effects of spaced armour with hard but thin sheets on high caliber armour piercing bullets has shown that even sheets as thin as 4.4mm are capable of shattering 12.7mm B-32 steel cored API bullets at shallow angles beginning from 20°, and that the same can be done with 5mm sheets on 14.5mm B-32 steel cored API bullets, or even tungsten carbide-cored BS-41 bullets. Indeed, that was precisely what the famous "bazooka plate" spaced armour on Pz. IV tanks was actually meant for, and not for defence from bazookas. The original double-spaced side hull armour configuration on the M2 Bradley was implemented for the same reason: protection from 14.5mm machine guns at distances as close as 200 meters, although the Bradley's side armour required two layers of spaced steel plates because bullets do not shatter easily on the soft and thin aluminium hull.
In addition to ballistic protection, the new side hull armour contributed to the vehicle's increased survivability from roadside IEDs, which were often composed of a cluster of partially buried artillery shells rigged to explode all at once. The extra steel side skirts would be extremely useful for defeating such shrapnel as artillery shell splinters lack an efficient ballistic shape and would break apart much more readily on non-homogeneous armour than the core of an armour-piercing bullet.
The floor of the hull is 8mm thick in all incarnations of the BMP-1 and BMP-2. It is stamped with reinforcing ribs for added stiffness, both for structural reasons as well as to reduce deflection from the influence of an explosive blast. A small 1.5 kg track-breaking mine exploding under the track would easily rend the track and blow off a roadwheel, but it would not pierce the belly. Heavier anti-tank mines were a much more serious challenge to overcome.
The BMP-2 features a collective NBC protection suite, collective meaning that the interior of the vehicle is fully sealed from the outside environment, so that the crew and passengers do not need to don hazard suits. Beginning in 1984, the BMP-2 received a lining and cladding of anti-radiation pads. The BMP-2 obr. 1986 had the cladding fitted since the beginning of its production.

The turret cladding is called "Nadboi". It is about an inch thick, and most likely made of laminated borated polyethylene fiber sheets. If you look closely at frayed edges (photo below), you can see that it is distinctly fiber-like.
The walls of the turret are entirely covered with it, and so is the roof. "Podboi" is designed to absorb neutrons from a nuclear explosion.
The interior walls of all of the occupied compartments of the vehicle is lined with an anti-radiation lining. It is effective at capturing neutrons, but more importantly, it has the secondary purpose of providing some much needed insulation. This is especially important if the vehicle is coated in burning napalm, seeing as the steel for the roof is only a little more than half an inch thick.

Swedish tests on purchased ex-East German T-72s found that its lining of borated polyethylene was extremely effective at capturing spall, so it should be no different for the BMP-2, although the lining in the BMP-2 is much thinner. The external cladding should also give some small bonuses towards the overall effectiveness of the turret armour. The anti-radiation lining is notably absent from the the rear fuel doors, but this is not a problem. Water is surprisingly effective at absorbing radiation. Presumably diesel fuel is, too.
The protruding bow of the hull is crammed chock full of equipment, including a GO-27 gamma radiation detector. You can see it mounted to the starboard side hull in the photo below, to the left of the steering column.


The GO-27 sensor and automatic sealing system is responsible for detecting nuclear and chemical particles and for initiating the lockdown protocol. Every gap and port exposing the interior of the tank to the outside environment will be sealed, and the ventilation system will be put into supercharge mode.
The automatic fire extinguishing system is only installed in the engine compartment. It operates on four TD-1 thermal sensors placed strategically around the engine to ensure a higher chance of prompt detection. On paper, at least. There are two five-liter fire extinguishers containing halocarbon agent 114B connected to the automatic fire extinguishing system. The fire extinguishers and a single TD-1 thermal sensor can be seen in the photo below (TD-1 is on the left side of the frame, above the green tube)

In addition to that, there is a single handheld OU-5 five liter carbon dioxide fire extinguisher placed in the passenger compartment. Not very effective, to be honest. If the vehicle was hit and the interior was on fire, the first thing to do would be to bail out and run, because any fire would probably escalate into a blaze, because of the centerline fuel tank. Although the BMP-2 is just as well armoured as any other IFV, it is distinctly worse off if the armour were penetrated.

The BMP-2 is the communal steed for the nine men (including the crew) that comprise a typical Soviet motor rifle squad. On paper, the BMP-2 is designed to fit a maximum of ten people, but when employed as per doctrine, there will be one seat left empty. For dismounts, six men would be seated in the passenger compartment behind the turret, and the seventh - the squad leader - sits in the turret as the commander of the vehicle. The seat behind the driver is left empty unless a ten-man squad is deployed. The BMP occupied by the Platoon Leader is the so-called "Platoon Headquarters". This vehicle carries only two passengers, the Platoon Leader and the Assistant Platoon Leader.
The eighth man in a ten-man squad may be a MANPADS gunner attached to the vehicle from company assets, or some other specialist. One rifleman in one of the squads of the platoon may be a designated marksman, and issued an SVD instead of an AK-74. If a ten-man squad is deployed, it is possible to run the BMP-2 with a full three-man crew and have seven dismounts.
The composition of a typical dismount squad is as follows:
The maximum number of troops carried per vehicle is less than the eight passengers carried by the BMP-1 (shown below) by one, but this is not too bad as both the BMP-1 and BMP-2 carry a squad of the same size. The missing seat will result in a BMP-2 platoon carrying fewer specialist personnel like medics. However, this can be remedied by removing one of the riflemen and replacing him with a specialist. Overall, the fighting efficiency of a BMP-2-based Soviet motor rifle platoon increased substantially over one based on the BMP-1, mostly thanks to the higher power of the 2A42 cannon.
The firepower of a Soviet motor rifle platoon is quite similar to a U.S Army mechanized infantry platoon in most regards. The M2 Bradley could seat nine men; six of them being dismounts. As the commander of a Bradley Fighting Vehicle (BFV) does not dismount, a BFV platoon would be numerically inferior to a BMP platoon, but the IFV would be more potent due to having a full crew. However, this can be countered by deploying a ten-man BMP squad. If ten-man squads are deployed in the BMP platoon, the disparity would be even larger, and the BMP platoon would gain additional capabilities due to having a full crew.

A BFV squad should be slightly superior in issuing lead, since they have a belt-fed squad automatic weapon (M249) rather than a magazine-fed one (RPK), but this is offset by the extra rifleman in a BMP squad. With regards to anti-armour and anti-air firepower, a BMP platoon is significantly superior. As you may recall, there is a 9P135M missile launcher mounted at the back of the turret basket of the BMP-2. This 9P135M launcher can be used alongside the missile launcher on the BMP-2 and the RPG-7 carried by the grenadier to seriously increase the anti-armour and anti-bunker capabilities of the squad. In addition to that, the BMP-2 has a means of defence against air attack, as there is an extra seat that may be occupied by a dedicated MANPADS operator. Otherwise, the seat can be used to store extra supplies. The introduction of the M2A1 Bradley equalized the difference in manpower, as it carried seven dismounts as opposed to six, but the BMP squad's advantages in anti-armour and anti-air firepower remain. It was not until much later that the BFV platoon gained a decisive advantage with the introduction of the Javelin and the wide proliferation of the M240B.
The height of the hull is 1,210mm, the width of the hull (not including the sponsons) is 2,250mm and the bench on which three people are supposed to sit on is only around 1,400mm long. After subtracting the thickness of the roof and belly armour, the internal height of the hull at the passenger compartment is 1,197mm. The height of the hull would be considered good in a tank but only because the seats are typically mounted close to the floor and the occupants are provided with a certain amount of legroom. In the case of the BMP-2 (and BMP-1), the low height of the hull forced the seats to be mounted close to the floor but the hull is too narrow to permit the passengers to stretch their legs.

With bulky body armour, personal firearms, hundreds of rounds of ammo or even winter clothing, a ride in the BMP-2 can be very oppressive indeed. For a short trip of half an hour or so, a seasoned soldier should have very little to complain about as it is certainly much better than walking, and on long marches in unattractive weather, it may even be luxurious, but the total lack of stretching room and the shoulder-to-shoulder arrangement becomes incredibly uncomfortable as time drags on. However, according to military historian Kenneth Estes, the BMP-1 actually met all U.S Army ergonomics requirements after evaluations were conducted on captured examples. It could be surmised that the designers sought to provide an acceptable level of comfort without compromising the mass and silhouette of the vehicle and succeeded.
The benches are well padded with thick cushions. The benches are mounted to the floor with a clearance of only about 20 cm, so passengers have to draw their knees up almost to chest level when seated, which is rather disconcerting, truth be told.

The real estate underneath the port side half-bench is perfectly sized for two "spam cans" of 5.45x39mm or 7.62x39mm ammo, or a crate of hand grenades, or a crate of 40mm grenades. The other half of the bench is a fuel tank with a cushion on it, so nothing can be stowed under it. The starboard side half-bench has the fuel pump underneath it, so no luck there.
The back of the seats nearest to the door are shelves. Stored inside is a fuse box, and some relay boxes. The bottom shelf is usually empty. "Spam cans" of ammunition can be stowed here. The photo below shows such a shelf in a BMP-1.

The squad leader is seated behind the driver, where the commander in a BMP-1 would be seated. The squad leader's seat is accessible through the rectangular hatch above it. The squad leader has the "privilege" of being provided with two periscopes. One aimed forward, and one aimed to the forward-left. The (low quality photo) view from the forward periscope is pictured below.

There is nothing else of interest in his station. It's worth noting, however, that being forced to use the hatch the exit the vehicle and not doors like the rest of the passengers makes the squad leader's station a poor place to be, as you'd not only take longer to dismount, you'd be exposed to all and sundry while you are on the hull roof, and you'd have to jump down from quite a height. It's also a lot harder to get out if you are wearing body armour or winter clothing. All this has made the squad leader's seat a rather unpopular one, so unsurprisingly, some BMP-2 operators have opted to cut the squad down to six men and omit the seventh passenger. Instead, his spot is used by the crew to stow their personal effects, plus extra ammunition and first aid kits and anything else that might be needed.
The passengers get one fixed TNPO-170A periscope each, aimed to the side and slightly forwards. The visibility from these periscopes is adequate for providing the passengers with a sense of their surroundings and can help them find targets to fire at from their firing ports.

Both of the rear doors have a single TNPO-170A periscope in them as well. (photo below is of Czech OT-90, but is identical)

The ventilation system of the BMP-2 is composed of four small air inlets located on the edges of the hull roof. Filtration of chemical and biological particles is accomplished by fabric-type filters inside. These ventilators are also responsible for generating an overpressure inside the vehicle when entering NBC-contaminated areas.
This ventilation system also has a heating system and directed air outlets for every passenger (Green) in front of the fume evacuation inlets (Red). The pipes for these systems can be seen here:
As you can see, the air outlets are placed just next to a periscopes. This is approximately eye level, so each passenger gets a weak stream of cool air blown in his face. Heat for the heating system is not generated electrically, but by the circulation of water around the engine. It would get hotter when the vehicle is in motion, and less so when idling.
There is a narrow corridor between the driver's station and the passenger compartment. A similar corridor exists in the BMP-1, but that one is larger due to the smaller turret. Although it is incredibly narrow, it is still possible to pass through this corridor in the BMP-2. The corridor is useful when doing work in the vehicle, as it allows tools and parts to be transferred from the cramped driver's station to the passenger compartment, but otherwise, it is not to be used in normal operations. During combat, it should only be used in case of an emergency where exiting via the driver's hatch or the squad leader's hatch is not possible.

A similar corridor is present in the M2 Bradley.

A simple perimeter shield separates the turret from the passenger compartment, lest any accidents happen to the person sitting closest to the turret.
For the passengers in the passenger compartment, there are two entry and exit paths to choose from: the roof hatches, or the rear doors. The former option admits only one person at a time, and jumping down from almost six feet up isn't the most appealing idea when the vehicle is in motion, and even if the vehicle was static, the roof hatches are mostly used only under unusual circumsmtances, like if the vehicle is sinking in water. They are far more suitable for other things like getting fresh air, shooting at airplanes, and so on. The roof hatches are spring-loaded with torsion bar springs and locked in place with a simple lever. When a passenger turns the locking lever, the hatch springs open and it can be locked in the open position by pushing it further until it is held under spring tension. The less interesting option for dismounting the BMP-2 is, of course, the rear doors.

The infantry was perceived to be most effective if they disembarked at a range where they could use their weapons most effectively. Soviet strategists estimated the ideal disembarking distance to be between 200 and 400 meters. Stopping the vehicle to allow the infantry dismount at such a close distance to the enemy was simply not an option. The only way to stay alive in the absence of adequate cover was to keep moving, and keep shooting, so the infantry must disembark while the vehicle is doing this at a reduced speed. The current accepted convention of a ramp with a single door would not suffice, as the door would be suitable on the move, but would be (and it usually is, even in modern vehicles) too small too allow for the rapid exit of all of the passengers at a reasonable pace, and the wide ramp cannot be deployed on the move. The most optimal configuration for the expected role of the BMP as it was envisioned was a pair of wide doors.
1PZ-3

Besides manning the periscopes and managing the vehicle, the commander is also in charge of fending off air attacks. To do this, he is provided with a 1PZ-3 anti-aircraft sight mounted on the turret ceiling in front of his cupola. It can also be used as a backup sight for ground targets if the need arises. When not in use, the aperture window is covered by an armoured hood.


The 1PZ-3 sight is monocular with a very large range of elevation. It features internal electric heating and has two special light filters. The sight can be used without a filter when firing upon ground targets, but if necessary, a "Special" filter or a "Neutral" filter can be applied by turning a lever. The "Special" filter is simply a laser protection filter that protects the operator from being blinded by direct laser illumination, and the "Neutral" filter is a neutral density filter that reduces the amount of light that is transmitted to the operator's eyepiece, thus darkening the image. This makes it easier for the operator to detect and track aircraft in the sky during bright daylight hours, but it can also be used when engaging ground targets if necessary.
The sight lacks independent stabilization, but because of its direct mechanical connection to the stabilized 2A42 cannon in the turret, the sight is stabilized in the vertical plane. However, due to the coarse nature of this type of stabilization, the stabilization precision is not high and the viewfinder image may vibrate when the vehicle is moving on rough ground. The sight can elevate and depress as far as the cannon can, which would be from -5 degrees to +75 degrees in elevation.
The sight has two magnification settings; 1.2x and 4x. The field of view through the sight is 49 degrees in the 1.2x setting and 14 degrees in the 4x setting. The lower magnification was only suitable for engaging aircraft. Shooting at air targets flying at subsonic speeds is theoretically possible at ranges up to 2,500 m and at altitudes up to 2,000 m. In practice, the effective range is much less.
The two images below show the sight under the 1.2x and 4.0x magnification settings.


As far as anti-aircraft sights go, the 1PZ-3 had no outstanding characteristics and contained only the essential markings for leading moving aircraft. The sight also has the secondary purpose of serving as the commander's only optic for ground targets and being the BMP-2's backup gun sight as well, and to that end, its viewfinder provides graduated range scales and simple deflection markings, as shown in the images above. To aim, the operator turns a knob to raise and lower a horizontal line until it matches the desired mark on the fixed range scales. The horizontal line forms a crosshair with the fixed vertical line running down the center of the viewfinder. The operator elevates the autocannon or coaxial machine gun of the BMP-2 until the crosshair is superimposed on the target, and then he can open fire.
The commander may override turret and weapons control at the press of a button and take over using the control handles that he is furnished with.

Here is a screenshot of the reticle of a 1PZ-3, taken from a video of a BMP-2 firing its cannon:

These tools, taken as a whole, mean much more than the sum of their parts. The independent surveillance equipment, target designation, duplicated gunnery controls and independent sighting systems give the commander a level of dominance over his own machine that many of his NATO counterparts did not have. While the commander of an M2 Bradley did have a gunsight extension to see what the gunner sees and a set of gunnery controls to use them with, he did not have a sight of his own, as there was no backup sight, and he did not have his own cupola and he did not have a magnified optic with a stadia rangefinder. The BMP-2 had all of these, and the BMP-2 had a fully matured hunter-killer capability to go with it.
COMMUNICATIONS
From the introduction of the BMP-2 in 1980 until 1984, the commander was in charge of the R-123M radio, installed at the very rear of the turret shelf (the turret is wider than the turret ring, so there is a wide shelf at the base). Voice transmissions are done using the throat microphone integrated into his tanker's helmet. The throat microphone is reportedly of good quality and much more useful than an open microphone. The commander can listen to both extra-vehicular transmissions or communications from his own crew from the headphones of his tanker helmet.
R-123M

The R-123 radio had a frequency range of between 20 MHZ to 51.5 MHZ. It could be tuned to any frequency within those limits via a knob, or the commander could switch between four preset frequencies for communications within a platoon. The switching process takes 3 seconds to complete. The radio has a transmitting and receiving range of between 16km to 50km, depending on the antenna used and the type of terrain. The R-123M had a novel glass prism window at the top of the apparatus that displayed the operating frequency. An internal bulb illuminated a dial, imposing it onto the prism where it is displayed. The R-123M had an advanced modular design that enabled it to be repaired quickly by simply swapping out individual modules.
The dismounted squad leader will have an R-392 or R-126 radio to communicate with the commander of the BMP-2 at shorter distances. The squad should be operating 800 meters away from its BMP at the most, though this obviously is dependent on the tactical situation as well.
R-173

In 1984, the now-outdated R-123 radio was replaced by the R-173 radio, which had a frequency range of between 30 MHZ to 75.999MHZ. It has 10 preset frequencies. It had an electronic keypad for entering the desired frequency, and an LED display. Its main improvement over older radios is the ability to send encrypted analogue and digital signals.

R-168-2UE-2
Sometime in the late 2000's, most BMP-2s had a new and advanced R-168-2UE-2 frequency-hopping encypted radio installed to replace the obsolete R-173, which was found to be susceptible to eavesdropping and jamming during the first Chechen campaign/invasion.

The R-168 family of radios is now standard throughout the Russian ground forces, from infantry platoons to tank companies. It can produce frequency hops 100 times a second, and the data is encrypted as well. It can also send and receive digital data.
The commander can exit the vehicle by two means - the hatch above him, or by spinning the turret to face the rear, and then going out through the passenger compartment. In the latter case, he must swing open the turret basket perimeter shield (shown below) to exit the turret. The last two photos are provided courtesy of Mr. Tim Gow from the excellent megablitzandmore blog for modelers.


Besides the necessary tools and spare parts, there isn't much space inside the vehicle for stowing long term supplies. The turret doesn't have external bins or baskets either, but it does have numerous loops around its rear perimeter, as you can see below.

The loops are meant for securing foliage and camouflage netting on the turret, but the crew can strap their personal effects onto them too.
GUNNER'S STATION

The gunner's station is relatively sparse. All of the weapon controls are placed directly in front of the gunner, and most of the accessories, including the intercom control box, dome light and the turret traverse lock are arranged around the turret wall. The gunner has three fixed general vision periscopes, two on each side of his primary sight and another aimed to the left. The gunner is also provided with a TNPT-1 rear view periscope in his hatch. This periscope lets him see directly behind the turret. All in all, the gunner has the same number of general vision periscopes as a BMP-1 gunner but

This gives him relatively good visibility and he can take over the vehicle from the commander if the commander dismounts with the passengers. The gunner's has no periscope aimed to the right of the turret, and it was not really possible to provide a view to the right at all because the ATGM launcher already occupied that part of the turret roof. Compared to its direct foreign counterparts, the BMP-2 accommodated its gunner quite well in this respect. The gunner in an M2 Bradley, for instance, has two general vision periscopes flanking the ISU (Integrated Sight Unit) covering the 11 o'clock and 1 o'clock sectors like in the BMP-2, but half of the view from both periscopes is blocked by the large housing for the sight and the view from the left periscope is completely blocked when the TOW launch pod is raised. A Marder 1 gunner had three periscopes, but they only covered the left side of the turret and were evidently only meant to compensate for the commander's inability to see to the left as the view was completely blocked by the external autocannon installation and the gunner's sight.


SIGHTING COMPLEXES
BPK-1-42

The BPK-1-42 combined day-night sight was the primary sight for a BMP-2 gunner. It has a fixed magnification of 5.6x in the day channel, and a fixed 5x magnification in the night channel. Rangefinding is accomplished with a stadiametric scale in the lower right corner of the sight view finder. The BPK-1-42 sight has dependent stabilization in the horizontal and vertical planes. The elevation limits of the mirror head of the sight ranges from -8 degrees to +30 degrees. The stabilization system of the weapons provides dependent stabilization to the sight via a simple connection rod.

The active mode requires the use of the co-axially mounted OU-5G infrared spotlight for illumination. Although the OU-5G spotlight is only approximately the same size as the OU-3 spotlight used for the commander's TKN-3B periscope and is only rated for a somewhat power of 180 W, its illumination capability is greatly superior as it uses a xenon lamp instead of an incandescent lamp. It has a white light output of 15 million Candelas - half that of the L-4A spotlight used on tanks, which also used a xenon arc lamp but ran on 600 W.
Using the IR spotlight, the nominal maximum detection range for a tank-type target is 650-900 meters. The main issue is that by the time the BMP-2 entered service in the early 1980's, active infrared illumination was entirely anachronistic as NATO ground forces had already shifted completely to passive systems including image intensifier technology and thermal imaging technology. On the BPK-1-42, the passive mode has the obvious advantage of not emitting any radiation which might be picked up by the surveillance equipment of enemy forces.
The nightvision optic is equipped with an electric shutter linked to the trigger on the gunner's handgrip, which is in turn linked to the BU-25-2S control console (we will examine this later under the 2A42 section). Every time the cannon fires, the shutter activates and protects the aperture from the blinding flash. This is because the light intensification tube operates on extremely high voltages to amplify ambient light to visible levels. If a bright flash was captured, the intensification tubes would burn out from the huge power surge, or even explode. This would happen behind the thick aluminium casing of the sight casing, but he gunner is not entirely safe. Although the image intensification tube would be destroyed, it would still put the amplified image of the flash on the eyepiece for a split second, potentially blinding him.

The right eyepiece is for daytime use. First, the gunner finds the range to the target using the stadiametric rangefinder. Then, he inputs the range into the sight using a dial located on the right side of the sight housing. The chevron aiming point and the range scales will then drop until the fixed range indicator markings align with the desired range on the range scales. Then, the gunner uses the handgrips and elevates the cannon until the dropped chevron is placed squarely on the target, thus obtaining a ballistic solution. This video is recommended if the written description is insufficiently clear (link). The viewfinder markings may be illuminated by an internal light bulb to facilitate aiming at twilight hours.
Both the active and passive night channels use the same viewfinder, but due to the constricted field of view through the night channel, the range adjustment scales and stadia rangefinder scales were blocked out, leaving only the reticle in the center of the viewfinder. This was permissible because the viewing range of the sight was only 800 meters, so fire correction can be done by using the burst-on-target gunnery method. However, the gunner could still shoot further than 800 meters if the conditions allow it. When using the BPK-1-42 sight at night, the range is set to a battlesight of 800 meters. In this setting, the tip of the center chevron and the upper tip of the windage marks are calibrated for a distance of 800 meters and the bottom end is calibrated for 1,200 meters. Rangefinding can be done knowing the angular values of the chevron and lead lines. By comparing the height and width of the target to these markings, the gunner could then estimate the distance using a formula. However, the probability of achieving a hit with a short burst from the autocannon using only the battlesight technique is quite high due to the short distances involved.
The viewfinder of the sight is shown below. Note the small field of view in the night channel (represented by the small circle around the reticle) compared to the day channel.

The sighting range against ground targets with BT (AP-T) shells is 2,000 meters. With OFZ (HE-I) and OT (F-T) shells, the range is 4,000 m. Obviously, the lack of any serious rangefinding equipment is an serious detriment to the ability of the gunner to quickly and efficiently dispatch armoured threats. Still, it is some consolation that this shortcoming is not something exclusive to the BMP-2, and that all of its chief rivals, namely the Marder 1 and Bradley, are similarly neglected in this department. The Bradley, for example, did not receive a laser rangefinder until the M2A2 ODS modification in 1991, by which time the BMP-2s of the Soviet Army could hardly be considered a threat for obvious reasons.
Nevertheless, the BMP-2 was somewhat disadvantaged in that its 30mm AP-T shells had a much lower muzzle velocity compared to the 20mm and 25mm APDS rounds that the Marder 1 and M2 Bradley used. It would be easier for a Bradley gunner to obtain a first round hit using his stadia rangefinder or by using the gunnery techniques such as battlesight and bracketing thanks to this advantage. The advantage held by the BMP-2 gunner is the high rate of fire of the 2A42. He can use the battlesight technique to fire off a burst without delay after seeing a target, and then rely on the dispersion of the shells to obtain at least one hit. The disadvantage, of course, is the high expenditure of ammunition for a relatively small effect on the target.
The sight aperture is protected by a pane of ballistic glass, but there is also a retractable steel cover that could be opened and closed from the inside of the turret. The steel cover only covers the nightvision channel aperture. This helps to prevent accidental exposure of the nightvision system to bright light in daytime. The decision to not have any protection for the daytime sight aperture is very strange.

In March 1986, the BMP-2 was modernized into the BMP-2 obr. 1986. One of the upgrades was the replacement of the BPK-1-42 with the BPK-2-42. The most noticeable difference is the revision aiming reticl. The daytime sight channel was slightly improved with a fixed 6x magnification to extend the engagement envelope, and the nighttime channel was also slightly improved with a 5.5x magnification. The sight provides an angular field of view of 10° in the daytime channel and the 6°40′ in the night channel. The increased field of view was partly due to the expansion of the windage markings.

All of the BMP-2s used in the Suvorov Attack challenge during the International Army Games 2016 and 2017 were equipped with the PL-1-01 laser beamer instead of IR spotlights. The PL-1-01 is a pulsed laser beamer that can be used for illumination, replacing the previous infrared spotlight. The BPK-2-42 sight is not compatible with the PL-1-01, so it must follow that the original sights have been swapped out for the newer TKN-4GA-01, or TKN-4GA-02, or SOZh. The photo below (Credit to Vitaly Kuzmin) shows the PL-1-01 on the right hand side of the cannon.

The new sight housing lacks the hinged steel cover of the BPK-2-42. The sight housing limits the sight to a frontal view only, which would be strange if the TKN-4GA-01/02 sight was installed, as it has an integrated auxiliary high elevation sight for anti-aircraft purposes. This is evidence that the SOZh may have been installed instead of a TKN-4GA series model sight. Another indication that SOZh has been installed instead of a TKN-4GA model lies in the fact that the 1PZ-3 anti-aircraft sight remains intact.


The BMP-2 uses the 2E36 stabilizer complex. The stabilizer was continually upgraded throughout its military service life, evolving into the 2E36-1, and later into the 2E36-4. The BMD-3, which uses the same turret as the BMP-2, is equipped with the 2E36-5. The BMD-2, which does not share the same turret as the BMP-2 or the BMD-3, has the same fire control system as the BMP-2 and is equipped with the 2E36-1 stabilizer variant. The relatively recent BMD-2M upgrade is equipped with the most modern iteration of the series - the 2E36-6, and the similarly recent BMP-2M is probably equipped with a similar type.
The layout of the components of the stabilizer inside the turret is shown in the drawing below.

The 2E36 complex has two modes of operation; automatic and semi-automatic. In the automatic mode, the stabilizer operates in the traditional sense, obeying prompts from the gunner and keeping the turret and gun stabilized at a point determined by the gunner. The gun elevation limit is -4 degrees to +30 degrees in this mode.
The semi-automatic mode, on the other hand, is primarily meant for anti-aircraft purposes where the maximum gun elevation angle of +75 degrees may be needed. The gun cannot be elevated by the gunner to more than the maximum elevation limit of the BPK-1/2-42 sight of +30 degrees, so the commander must take over. Using the commander's override, full control of the horizontal and vertical drives are handed over to the commander, who is then relieved from his regular duties and instead must take over as gunner, while the gunner does his best to take the place of the commander. The stabilization accuracy is reduced and the precision of the weapon elevation drive is sacrificed but is overcharged to increase the rate of elevation, enabling the commander to track speedy maneuvering aircraft at low altitudes and close range more easily. This includes ground attack aircraft passing overhead or at closer ranges, where the relative speed of the aircraft in question is higher than if it was many hundreds of meters away. At longer distances, the elevation angle necessary to engage an aircraft at a certain altitude is less than if the aircraft is closer and the relative speed of the aircraft is also lower, so turret rotation speed is less important but more precision is required. In that case the gunner may continue to make use of the stabilizer in the automatic mode, as the maximum elevation of the BPK sight is more than sufficient for engaging low-flying aircraft at relatively close range.

At a cruising speed of 25 km/h to 35 km/h, the stabilizer is reportedly capable of maintaining its orientation with an average stabilization accuracy of less than 1 mil, meaning that the angular deviation of the gun from the point of aim does not exceed 1 mil.
Maximum Traversal Speed: 30°/sec
Minimum Traversal Speed: 0.07°/sec
Maximum Elevation Speed: 30°/sec
Minimum Elevation Speed: 0.07°/sec
The turret traverse motor is the EDM-20. It is shown in the photo below. It runs on 400W. The elevation motor is the EDM-14, and it runs on 180W.

There are two gyroscopic tachometers installed. One for the horizontal plane and another for the vertical. They measure any changes in the orientation of the turret and weapons and sends commands to the stabilizer motors to apply the necessary corrections to keep the weapons oriented in the same direction as before the turret turns.
The gunner uses the same make and type of control handles that the commander is furnished with. The stabilizer is turned on via the control handles.
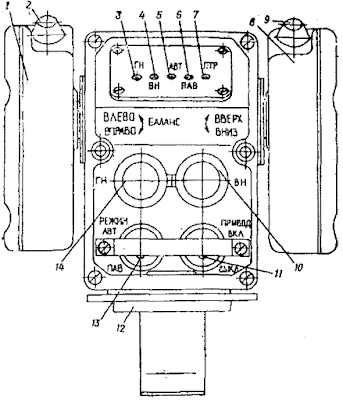

If the stabilizers fail or if the power supply is cut off, there is a set of manual controls in the form of a pair of flywheels familiar to all Soviet AFVs. The turret rotation flywheel is located on the turret ring to the left of the gunner, for his left hand. The weapons elevation flywheel is located behind the BPK sight, used with his right hand. The handle for the elevation flywheel has two electric solenoid triggers, one for the co-axial machine gun, and the other for the cannon. In order to use the manual controls, the stabilizer must be off or set to the "manual" mode of operation and the manual controls must be engaged. In the manual mode, the elevation limits of the gun are -5 degrees to +75 degrees.

The armament of the BMP-2 is installed in the large steel turret. It is composed of a 2A42 automatic autocannon and a PKTM coaxial machine gun. It was necessary to widen the turret ring to 1,740mm in order to accommodate the two-man turret. Interestingly enough, the turret ring diameter of the BMP-2 is larger than the M2 Bradley which has a turret ring diameter of 1,500mm. The turret weighs 1,370 kg empty and the weight of the turret when fully loaded is 2,561 kg. The turret has an external diameter of 2,155mm.


The 2A42 cannon was the subject of a rivalry between the GRAU and Kurganmashzavod. In short, GRAU insisted on keeping a 73mm cannon, and favoured the 2A41 presented by the ChTZ (Chelyabinsk Tractor Plant). Kurganmashzavod insisted on the 2A42 developed by the KBP design bureau. In one attempt to persuade military officials to adopt the Object 681 with the 2A41 73mm smoothbore cannon, a comparison trial was organized. The target was a T-72 tank, and the distance was 1,200 meters. The Object 681 opened fire first (on the side of the tank), and not one single round penetrated the tank. One went over, one fell short, and the other successfully impacted the side skirt, but the reinforced plastic side skirt flexed in such a way that the round did nothing. Then, the Object 675 - the BMP-2 prototype - stepped up. It let off three bursts of 8 rounds in the high rate of fire mode. All external equipment including periscopes and the gunsights were completely destroyed, and the roof mounted anti-aircraft machine gun was rent from its mount, landing 15 m away from the tank.
Later on during its acceptance trials, the BMP-2 fired on a combat loaded T-55 (modernized) and T-72 from the side, again with 3 x 8 round bursts on the high rate of fire mode. The T-55 had its anti-aircraft mount, IR searchlight, and externally mounted laser rangefinder shredded away. The 100mm cannon was hit and penetrated in two places. The external fuel tanks mounted on the overtrack fenders ignited and burned outside the tank, but the gunsight was unharmed and tank was in a drivable state. A total firepower kill was achieved due to the damaged cannon. The T-72 also had its anti-aircraft machine gun ripped off, and its optical devices were damaged. The fender fuel tanks were hit and the inferno damaged the turret seals (compromised the sealing of the NBC system) and some of the burning fuel leaked to engine compartment and damaged the engine, though the automatic fire suppression system worked. It was counted as a mobility and firepower kill. These results were published in Sergey Suvorov's volumes on the BMP-1 and BMP-2.
This is only an anecdote, of course, not a scientific study on the ammunition expenditure required to disable a tank. From these demonstrations, it appears that a BMP-2 may mission-kill a tank at a distance of 1,200 meters using only 24 rounds out of its combat reserve of 500. According to the official results of the effectiveness of the 2A42 cannons from the state trials of the BMPT, an average of 24 rounds are needed to eliminate a generic IFV-type target at a distance of 2,000 meters or more using AP ammunition, while 24 rounds of HE ammunition are needed to eliminate an ATGM team in a trench at 1,500 meters or more and 29 rounds are needed to eliminate a full infantry squad in a trench at the same distance.
The maximum number of shots that the gunner is allowed to fire continuously on full auto in the high rate of fire mode is 50 shots, equivalent to around five full seconds of continuous shooting. Another 50 rounds of short bursts in the high rate of fire mode is allowed after that, after which the barrel must be left to cool completely to prevent any lasting damage. Firing on the low rate of fire mode, if done in short bursts, can be done until the entire ammunition supply is depleted.
The accuracy of the 2A42 cannon is typical for a weapon of its class. The technical dispersion of AP-T (BT) rounds fired from the 2A42 is 0.4 mils in both the horizontal and vertical axes, and the technical dispersion of HE-I and HE-T (OFZ, OT) rounds is 0.5 mils in both axes. For comparison, it is stated in an official Orbital ATK marketing brochure that the 25mm M791 APDS round fired from the M242 chain gun has a dispersion of 0.3 mils in both axes while the M792 HE-T round has a dispersion of 0.55 mils in both axes. As for the 30mm RARDEN cannon, it is stated on page 278 of Jane's Ammunition Handbook 2009 that its dispersion is 0.5 mils.
Accuracy degrades as the cannon heats up, and as the cannon can fire so quickly, it also heats up more rapidly than other cannons. Stresses will also be very high on the barrel if the gunner habitually fires in the highest rate of fire in long bursts, leading to a short barrel life. According to the manufacturer and a Belorussian military textbook, the guaranteed service life of the 2A42 is 6,000 shots. A simple upgrade involving the replacement of 10% of the parts in the 2A42 can increase the service life by 50% to 9,000 shots. This upgrade took place in 1995 and is now the new performance standard for the 2A42 cannons in the Russian Army. As mentioned before, the cannon is equipped with a barrel swap-out system to enable quick replacement of worn barrels in the field without special tools or heavy machinery, so this feature is obviously quite useful to the crew and technicians maintaining the vehicle.


In addition to the high effectiveness of the gun on ground targets, the high elevation of 75 degrees enables the gunner to effortlessly engage targets located on elevated positions and fast, low flying aircraft, even if they are flying almost directly overhead. The high anti-aircraft potential should not be underestimated; the air forces of NATO nations played a critical role in ground operations and still do, and the surge of interest in the concept and technology of attack helicopters in the late 60's and 70's had led to the birth of an entirely new class of air power that was exceptionally lethal to ground assets. Even though its own development was plagued with challenge after challenge and delay after delay, the BMP-2 was introduced just in time to become a sufficiently relevant part of the BMP fleet of the Soviet Army by the time the vaunted AH-64 Apache and A-10 Warthogs arrived on the scene in the mid-80's, even if it was only by a lucky coincidence.

As of 2015, BMP-2 gunners in motorized rifle units in the Western Military District had target distances for gunnery training extended to 1.9 km. New targets representing armoured vehicles were also introduced and new tactics were practiced. The new exercise was reportedly established due to the introduction of newer weapons, presumably referring to modernized BMP-2s equipped with the new fire control system.

Due to the recoil forces generated when firing the cannon, early prototypes of the BMP-2 had problems with the stabilization system. Special modifications were successfully applied to allow the stabilizer to properly realign the cannon after each shot.
All said and done, the accuracy of the 2A42 is at least on par with the Rh202, which had a long but disproportionately thin barrel, and wasn't very accurate on full auto either. Overall, the 2A42 is best compared not to the Rh202 but to the Oerlikon KCB. The calibers are the same, and the rates of fire are the same. However, the KCB has an L/75 barrel, while the 2A42 has an L/80 barrel. The weight of 2A42 is 115 kg, while KCB weighs 138 kg.
The vehicle's entire ammunition load of 500 rounds is stowed in curving containers affixed to the turret floor, on which the seats for the gunner and commander are mounted. Of those 500 rounds, there are 340 HEI and HEI-T rounds in one compartment of the container and 160 AP-T rounds in the other. The ratio between these two ammunition types was designed based on the expected frequency of use.


A ready supply of 500 rounds is considered to be quite large, especially for a 30mm autocannon. For comparison, the M2 Bradley carries just 70 rounds of APDS and 230 rounds of HE in its ammunition containers, making it vastly inferior to the BMP-2. However, it is necessary to mention that the Bradley also carries a reserve supply of another 600 rounds whereas the BMP-2 does not have any reserve ammunition. The caveat is that the reserve ammunition is packed into individual containers and stowed loosely and because of this, the reserve supply is effectively useless during combat because it is not possible to transfer it into the M242 autocannon feed system in a reasonable time even with the help of the passengers, so the main advantage it brings for the Bradley is a reduced reliance on ammunition resupplies.
Another comparable example is the original Marder 1 which carried 420 rounds of 20mm ammunition divided into 345 rounds of HE and 75 rounds of APCR, which was fed to the Rh202 autocannon in a single belt in the original Marder 1 or fed via a dual-feed system beginning with the Marder 1A1 model. Another 830 rounds were carried as a reserve supply and because they were stowed in loose containers, it was also not useful during combat.
However, when the BMP-2 is compared to the British FV510 "Warrior", the BMP-2 has a very clear advantage. The FV510 only provides 45 ready rounds for its RARDEN autocannon with another 205 rounds in reserve stowage. The distribution of ammunition types is unknown, but assuming that half or more than half of the ammunition is of the HE variety and the remainder is APDS, then the FV510 may only have 20 or fewer APDS rounds available in its ready racks. Needless to say, this severely restricts the firepower of the vehicle and limits its ability to act as a force multiplier compared to the BMP-2.

 As you can see in the photo above, the conformal ammunition container forms a cresent shape on the turret basket floor. Ammunition from the parallel containers are fed into separate spiraling guides that lead to the autocannon. The guides twist and turn so that the ammunition is oriented properly to load into the cannon. When replenishing the containers, the ammunition belts are pulled up to the receiver of the 2A42 by an MU-431 electric motor. Then, the belts are loaded into the feed system by hand and secured with a stopper in each feed channel. From there, the belt feed is entirely self-driven by the action of the bolt carrier as the autocannon is fired.
The top covers of the containers are clipped on with tension latches. They must be removed to load belts into the containers.
Empty links are collected in a metal bin underneath the cannon. Shell casings are ejected out of the turret.

Although it may be a very useful weapon, the 2A42 is still far from perfect. The gas-based operating system of the cannon has a rather negative influence on the accumulation of fumes in the receiver, and as the receiver is mounted in a flame-proof box that isn't particularly air-tight, the result is that the turret is usually flooded with almost comical volumes of smoke after firing off a few dozen or so rounds. Throwing open the hatches normally solves this problem, but as the crew can hardly be expected to do that in combat, there is a powerful ventilator fan installed in the turret roof on the gunner's side. The ventilator is connected to the flame-proof box containing the 2A42, and was designed to work together with the crew compartment ventilation blower to suppress the release of fumes into the fighting compartment as much as possible. The exhaust vent is located just beside the BPK-2-42 sight aperture and in front of one of the TNPO-170A periscopes, as you can see in the photo below.

The ventilator fan is connected to the box enveloping the receiver of the cannon via a flexible hose, so that the fumes are sucked out as efficiently as possible and with minimal disruption to air pressure in the fighting compartment. Like all of the other weapons-related equipment in the turret, the ventilator is controlled from the BU-25-2S control box. When a toggle switch on the control box for the ventilator is flipped to the "СНАРЯЖ" position, the system is turned on and the fan is automatically activated to extract fumes. Depending on the selected rate of fire, the ventilator will work in the normal mode or the "forced" mode. The ventilator is activated whenever the trigger button on the gunner's handgrips is pressed and runs for another 0.65 seconds after the trigger is released. Using the cannon in the 'low' setting is the least taxing on the ventilator system.
The ventilator is sufficient when firing the cannon in the low rate of fire mode, but it cannot extract fumes at the rate that they are produced when multiple bursts are fired in the high rate of fire mode. In order to reduce the concentration of fumes in the fighting compartment, the electronic firing system is programmed to limit a burst to 8 rounds in the 'high' setting, and 48 rounds in the 'low' setting. Fumes can exit the flameproof box through the imperfect seals around the edges of the access doors (which are for maintenance purposes, e.g. lubrication). It is possible to bypass the burst fire limitation by using the manual trigger.
The photo on the left shows the gap for the vent, which is on the right side of the flameproof box. The photo on the right shows the rear door of the box opened, with the seal and its spring visible.


But despite the powerful ventilator, and despite disciplined control of ammunition expenditure, the fighting compartment just always gets flooded with fumes. One early attempt in the history of the BMP-2 to bypass this problem entirely was to mount the cannon externally, in the style of the Marder 1.

Besides completely eliminating the ingress of fumes, this type of turret had a smaller profile and also reduced the height of the occupied space. So why was this vastly superior design rejected in the end? Apparently, the turret was not airtight enough, so it was not safe in an NBC environment. The final production turret design itself had some initial issues with the fume ventilator not being airtight enough as well, although that was eventually solved when the vehicle entered mass production.
The maximum range of a 30x165mm projectile of any type is a little over 10 km, but this does not matter in combat as the maximum effective range of the armour-piercing shells is not more than 2,000 meters against lightly armoured targets, and the high explosive shells cannot be used effectively against targets further than 4,000 meters because the self-destruct fuze is designed to detonate at that range. The firing table below is for 30mm HE-I shells.
This page contains a detailed examination of each 30mm cartridge available to the BMP-2 during its service in the Soviet Army, and later, in the Russian Army.
The graphs below, taken from "The Soviet Light Armored Vehicle Threat To The AAAV", shows the estimated penetration power of Soviet 30mm AP, APDS and APFSDS shells. The estimate for the penetration power of the AP round is essentially correct, but the estimate for the APDS round is slightly above the actual capabilities of the Soviet 3UBR8 round.

A pyrotechnic charge is used to instantaneously cock the cannon and ready it for firing. However, if a pyrotechnic charge is not loaded, then the gunner can still manually cock the gun by repeatedly working a lever attached to the cannon receiver. The process is laborious and time consuming (due to the heavy recoil springs necessary to withstand the tremendous recoil forces), but it does have its own advantages. Although such eccentricities would not be necessary in an electrically operated chaingun, a chaingun requires external power to fire. If the power source was interrupted, a chaingun would be rendered useless. Due to its gas-powered nature, the 2A42 can still be fired with the vehicle operating in "degraded mode", meaning to have a knocked out engine and no battery power, with all operations reverted to manual control. The advantage is that if the BMP-2 were to be hit by an RPG in the engine compartment, or if it ran over a large mine, the surviving gunner could still aid the squad of passengers in holding off the ambushing enemy until help arrives using entirely manual controls. However, one wonders if the trade offs are really worth this extra feature.
Selecting the ammunition type and checking the ammunition reserve is done from the BU-25-2S control box located between the commander's and gunner's seats, to the right of the PKTM ammunition container. Ammunition reserves for both the 2A42 cannon and the PKTM machine gun is shown on a small digital display, along with the ammunition type currently selected for the 2A42. Switching between ammo types is done by flicking a toggle switch. The commander may use the console if he is taking over from the gunner.

The BU-25-2S control box is actually the weapons management complex of the BMP-2. It checks the ready to fire status of the 2A42 and displays it (a ready light is illuminated), and allows the gunner to select the desired rate of fire. It is also used to index ammunition types and quantity during the loading procedure.
Famous YouTube person msylvain59 has acquired a BU-25-2S control box for his own personal collection. You can see his disassembly video here: msylvain59 video. His video is extremely informative, even though he did not know what it was. As was pointed out in his video, the hinged cover of the control box has two built-in light bulbs pointed inward. There is a brightness adjustment dial (a potentiometer) to increase or decrease the brightness of the bulbs. The presence of a light source to illuminate the control box is extremely useful at night.
Loading small sections of ammo belts can be done by hand, but loading the full load of 500 rounds requires the help of mechanical advantage, which is provided by a special loading rig.


The PKTM is fed from a single belt of 2,000 rounds in the same manner as the BMP-1. The container for this very long belt is mounted on the floor of the turret to the right of the gunner's seat, as shown below.
The PKTM fires the 7.62x54mm cartridge. 7BZ-3 API (armour-piercing incendiary) rounds with the B-32 bullet and 7T2 API-T (armour-piercing incendiary tracer) rounds with the T-46 bullet are linked in a 4:1 ratio in the belt. The machine gun has a cyclic rate of fire of 700 to 800 rounds per minute. A 250-round box of 7.62x54mmR ammunition is provided in a continuous belt. The co-axial machine gun can be fired either by depressing the trigger button on the gunner's handgrips, or by pressing the emergecy manual trigger button located on the trigger unit installed at the back the receiver of the machine gun. Since the gunner has the 30mm cannon to play with, the PKTM is mostly used in situations where the firepower of the cannon might be overkill.

There is a firing port for each passenger. In total, there are six ports on the sides of the hull along the passenger compartment, and another near the driver's station for the seventh passenger.
There are two types of firing port. Squared ones, and teardrop-shaped ones. The square ports are aimed aggressively forward to take better advantage of the firepower of the PKM machine gun, and the teardrop ports are aimed more to the sides. These are meant for AK rifles. The AK firing ports are much simpler and even foreign rifles like the G3 and M16 can fit inside. However, the clip-on cuff designed to fit around the barrel and gas tube of Kalashnikov rifles will not be able to fit other types of weapons, so they will have to be removed.

Firing ports may be useful in some very specific situations, but modern conflicts show us that anything running on wheels or tracks is subject to an RPG attack, so the moment that enemy contact is imminent, the best course of action - as proven through decades of unconventional warfare experience - is for the passengers to dismount and eliminate any attackers while the IFV lays down suppressive fire of its own. Although the passengers could theoretically suppress ambushers from their firing ports, nobody wants to be inside when an RPG hits, and the limited field of view from the firing ports makes the job too difficult to guarantee that this won't happen. However, if there was a need to use them, and the situation is appropriate, they can be quite useful. See this video (link) to see some soldiers fire out of the firing ports of their bulletproof BTR-80 at an unseen enemy.


There is a fume evacuation system compatible with AK-type weapons, Once installed in the firing port, the operator is to clap the sheet steel casing deflector (the AK spits spent brass out with extreme violence) on the top cover before firing. There is an air hose on the deflector, and once the evacuation system - powered by a moderately powerful (164W) MBP-3N suction fan, one per each side of the hull - is turned on, gunpowder fumes will be sucked out and vented off outside via a small outlet on the side of the hull, one on each side.


A single RPG-7 may be carried aboard the BMP-2 in the passenger compartment. There is also a special rack for a "Strela" or "Igla" MANPADS launcher for self defence from aerial attack. One of the passengers can stick himself out of one of the roof hatchs and use it against an imminent threat, but crew members can also use the MANPADS launcher if the passengers have dismounted. This is shown in the photo below.


The photos below show the roof hatches of BMP-1s being used for air defence:


It is also possible to fire an RPG from a hatch:


The "Konkurs" missile system was integral to the BMP-2 as the primary vehicular ATGM system. It could be fired and reloaded under armour. "Fagot" missiles could also be used from the BMP-2 missile launcher, but they were not standard issue. Due to advances in missile technology, the 500-meter deadzone of the "Malyutka" missiles from the original BMP-1 was eliminated, and this also indirectly meant that the BMP-2 possessed the same short range tank killer capability as the BMP-1 had with its 73mm low-pressure cannon. The BMP-1 received its own drop-in 9P135M missile launcher late in 1979 as part of the BMP-1P modernization that allowed it to use "Konkurs" and "Fagot" missiles, but subsequently lost the ability to fire missiles from under armour.


Launching the missiles is done from the proprietary 9P56M launch post on the turret roof. It is visible as an armoured box with a launch rail. It contains a 9Sh119M1 sight taken from the more familiar 9P135M man-portable launch unit from the 9K111 system, compatible with both "Fagot" and "Konkurs" missiles. The sight contains an infrared spin-scan missile tracking system in its head and a periscopic optical day channel that protrudes into the turret with an eyepiece for the gunner.
The nightvision optic is equipped with an electric shutter linked to the trigger on the gunner's handgrip, which is in turn linked to the BU-25-2S control console (we will examine this later under the 2A42 section). Every time the cannon fires, the shutter activates and protects the aperture from the blinding flash. This is because the light intensification tube operates on extremely high voltages to amplify ambient light to visible levels. If a bright flash was captured, the intensification tubes would burn out from the huge power surge, or even explode. This would happen behind the thick aluminium casing of the sight casing, but he gunner is not entirely safe. Although the image intensification tube would be destroyed, it would still put the amplified image of the flash on the eyepiece for a split second, potentially blinding him.

The right eyepiece is for daytime use. First, the gunner finds the range to the target using the stadiametric rangefinder. Then, he inputs the range into the sight using a dial located on the right side of the sight housing. The chevron aiming point and the range scales will then drop until the fixed range indicator markings align with the desired range on the range scales. Then, the gunner uses the handgrips and elevates the cannon until the dropped chevron is placed squarely on the target, thus obtaining a ballistic solution. This video is recommended if the written description is insufficiently clear (link). The viewfinder markings may be illuminated by an internal light bulb to facilitate aiming at twilight hours.
Both the active and passive night channels use the same viewfinder, but due to the constricted field of view through the night channel, the range adjustment scales and stadia rangefinder scales were blocked out, leaving only the reticle in the center of the viewfinder. This was permissible because the viewing range of the sight was only 800 meters, so fire correction can be done by using the burst-on-target gunnery method. However, the gunner could still shoot further than 800 meters if the conditions allow it. When using the BPK-1-42 sight at night, the range is set to a battlesight of 800 meters. In this setting, the tip of the center chevron and the upper tip of the windage marks are calibrated for a distance of 800 meters and the bottom end is calibrated for 1,200 meters. Rangefinding can be done knowing the angular values of the chevron and lead lines. By comparing the height and width of the target to these markings, the gunner could then estimate the distance using a formula. However, the probability of achieving a hit with a short burst from the autocannon using only the battlesight technique is quite high due to the short distances involved.
The viewfinder of the sight is shown below. Note the small field of view in the night channel (represented by the small circle around the reticle) compared to the day channel.

The sighting range against ground targets with BT (AP-T) shells is 2,000 meters. With OFZ (HE-I) and OT (F-T) shells, the range is 4,000 m. Obviously, the lack of any serious rangefinding equipment is an serious detriment to the ability of the gunner to quickly and efficiently dispatch armoured threats. Still, it is some consolation that this shortcoming is not something exclusive to the BMP-2, and that all of its chief rivals, namely the Marder 1 and Bradley, are similarly neglected in this department. The Bradley, for example, did not receive a laser rangefinder until the M2A2 ODS modification in 1991, by which time the BMP-2s of the Soviet Army could hardly be considered a threat for obvious reasons.
Nevertheless, the BMP-2 was somewhat disadvantaged in that its 30mm AP-T shells had a much lower muzzle velocity compared to the 20mm and 25mm APDS rounds that the Marder 1 and M2 Bradley used. It would be easier for a Bradley gunner to obtain a first round hit using his stadia rangefinder or by using the gunnery techniques such as battlesight and bracketing thanks to this advantage. The advantage held by the BMP-2 gunner is the high rate of fire of the 2A42. He can use the battlesight technique to fire off a burst without delay after seeing a target, and then rely on the dispersion of the shells to obtain at least one hit. The disadvantage, of course, is the high expenditure of ammunition for a relatively small effect on the target.
The sight aperture is protected by a pane of ballistic glass, but there is also a retractable steel cover that could be opened and closed from the inside of the turret. The steel cover only covers the nightvision channel aperture. This helps to prevent accidental exposure of the nightvision system to bright light in daytime. The decision to not have any protection for the daytime sight aperture is very strange.
BPK-2-42

In March 1986, the BMP-2 was modernized into the BMP-2 obr. 1986. One of the upgrades was the replacement of the BPK-1-42 with the BPK-2-42. The most noticeable difference is the revision aiming reticl. The daytime sight channel was slightly improved with a fixed 6x magnification to extend the engagement envelope, and the nighttime channel was also slightly improved with a 5.5x magnification. The sight provides an angular field of view of 10° in the daytime channel and the 6°40′ in the night channel. The increased field of view was partly due to the expansion of the windage markings.

SOZh
All of the BMP-2s used in the Suvorov Attack challenge during the International Army Games 2016 and 2017 were equipped with the PL-1-01 laser beamer instead of IR spotlights. The PL-1-01 is a pulsed laser beamer that can be used for illumination, replacing the previous infrared spotlight. The BPK-2-42 sight is not compatible with the PL-1-01, so it must follow that the original sights have been swapped out for the newer TKN-4GA-01, or TKN-4GA-02, or SOZh. The photo below (Credit to Vitaly Kuzmin) shows the PL-1-01 on the right hand side of the cannon.

The new sight housing lacks the hinged steel cover of the BPK-2-42. The sight housing limits the sight to a frontal view only, which would be strange if the TKN-4GA-01/02 sight was installed, as it has an integrated auxiliary high elevation sight for anti-aircraft purposes. This is evidence that the SOZh may have been installed instead of a TKN-4GA series model sight. Another indication that SOZh has been installed instead of a TKN-4GA model lies in the fact that the 1PZ-3 anti-aircraft sight remains intact.

STABILIZERS, GUNNER'S CONTROLS
The BMP-2 uses the 2E36 stabilizer complex. The stabilizer was continually upgraded throughout its military service life, evolving into the 2E36-1, and later into the 2E36-4. The BMD-3, which uses the same turret as the BMP-2, is equipped with the 2E36-5. The BMD-2, which does not share the same turret as the BMP-2 or the BMD-3, has the same fire control system as the BMP-2 and is equipped with the 2E36-1 stabilizer variant. The relatively recent BMD-2M upgrade is equipped with the most modern iteration of the series - the 2E36-6, and the similarly recent BMP-2M is probably equipped with a similar type.
The layout of the components of the stabilizer inside the turret is shown in the drawing below.

The 2E36 complex has two modes of operation; automatic and semi-automatic. In the automatic mode, the stabilizer operates in the traditional sense, obeying prompts from the gunner and keeping the turret and gun stabilized at a point determined by the gunner. The gun elevation limit is -4 degrees to +30 degrees in this mode.
The semi-automatic mode, on the other hand, is primarily meant for anti-aircraft purposes where the maximum gun elevation angle of +75 degrees may be needed. The gun cannot be elevated by the gunner to more than the maximum elevation limit of the BPK-1/2-42 sight of +30 degrees, so the commander must take over. Using the commander's override, full control of the horizontal and vertical drives are handed over to the commander, who is then relieved from his regular duties and instead must take over as gunner, while the gunner does his best to take the place of the commander. The stabilization accuracy is reduced and the precision of the weapon elevation drive is sacrificed but is overcharged to increase the rate of elevation, enabling the commander to track speedy maneuvering aircraft at low altitudes and close range more easily. This includes ground attack aircraft passing overhead or at closer ranges, where the relative speed of the aircraft in question is higher than if it was many hundreds of meters away. At longer distances, the elevation angle necessary to engage an aircraft at a certain altitude is less than if the aircraft is closer and the relative speed of the aircraft is also lower, so turret rotation speed is less important but more precision is required. In that case the gunner may continue to make use of the stabilizer in the automatic mode, as the maximum elevation of the BPK sight is more than sufficient for engaging low-flying aircraft at relatively close range.
At a cruising speed of 25 km/h to 35 km/h, the stabilizer is reportedly capable of maintaining its orientation with an average stabilization accuracy of less than 1 mil, meaning that the angular deviation of the gun from the point of aim does not exceed 1 mil.
Automatic Mode
Maximum Traversal Speed: 30°/sec
Minimum Traversal Speed: 0.07°/sec
Maximum Elevation Speed: 30°/sec
Minimum Elevation Speed: 0.07°/sec
Semi-Automatic Mode
Maximum Traversal Speed: 30°/sec
Minimum Traversal Speed: 0.1°/sec
Maximum Elevation Speed: 35°/sec
Minimum Elevation Speed: 0.1°/secThe turret traverse motor is the EDM-20. It is shown in the photo below. It runs on 400W. The elevation motor is the EDM-14, and it runs on 180W.
There are two gyroscopic tachometers installed. One for the horizontal plane and another for the vertical. They measure any changes in the orientation of the turret and weapons and sends commands to the stabilizer motors to apply the necessary corrections to keep the weapons oriented in the same direction as before the turret turns.
The gunner uses the same make and type of control handles that the commander is furnished with. The stabilizer is turned on via the control handles.


If the stabilizers fail or if the power supply is cut off, there is a set of manual controls in the form of a pair of flywheels familiar to all Soviet AFVs. The turret rotation flywheel is located on the turret ring to the left of the gunner, for his left hand. The weapons elevation flywheel is located behind the BPK sight, used with his right hand. The handle for the elevation flywheel has two electric solenoid triggers, one for the co-axial machine gun, and the other for the cannon. In order to use the manual controls, the stabilizer must be off or set to the "manual" mode of operation and the manual controls must be engaged. In the manual mode, the elevation limits of the gun are -5 degrees to +75 degrees.
ARMAMENT

The armament of the BMP-2 is installed in the large steel turret. It is composed of a 2A42 automatic autocannon and a PKTM coaxial machine gun. It was necessary to widen the turret ring to 1,740mm in order to accommodate the two-man turret. Interestingly enough, the turret ring diameter of the BMP-2 is larger than the M2 Bradley which has a turret ring diameter of 1,500mm. The turret weighs 1,370 kg empty and the weight of the turret when fully loaded is 2,561 kg. The turret has an external diameter of 2,155mm.
2A42


The BMP-2 is armed with the 2A42 dual-feed open-bolt gas-operated autocannon chambered for the Soviet 30x165mm cartridge. The cannon features a forward ejection system to eject spent shell casings and a quick-detach barrel assembly for ease of replacement in field conditions. The cannon weighs a total of 115 kg and is 3,027mm in length, not including the metal box surrounding the receiver inside the turret of the BMP-2. The barrel weighs 38.5 kg and measures 2,416mm in length, or 80.5 calibers.
According to its technical manual and the website of the manufacturer, the 2A42 generates a recoil force of 40 to 50 kN. Despite its larger caliber and greater muzzle energy, this recoil force is directly comparable to the M242 Bushmaster chain gun which generates a recoil force of 40 kN. This is due to a combination of a larger and more effective muzzle brake combined with the more developed short-stroke recoiling barrel mechanism. The M242 has the same features, but they are not as developed. Case in point - upon firing, the barrel of the 2A42 recoils backwards by 30mm (35mm maximum), and although the M242 barrel also recoils backwards, its recoil stroke is only 14mm (18mm maximum). In both autocannons, the bolt only unlocks at the end of the short recoil stroke of the barrel, at which point the gas pressure has fallen sufficiently that it is safe for the chamber to be unsealed by the bolt. The increased delay is created by the rearward velocity of the barrel, which begins moving immediately upon firing, decreasing the relative velocity of the bolt carrier, which beings moving only after the projectile has traveled past the gas port. For a more direct comparison, the 30mm RARDEN autocannon produces a recoil force of 13.34 kN - less than half that of the 2A42. This is, of course, due to the long-stroke recoil operating mechanism of the RARDEN wherein the barrel and bolt recoil together as a single unit for a distance of around 300mm, thus greatly damping the recoil force.
As it is an open-bolt autocannon, the bolt assembly has to be retracted until it engages with the sear before firing can commence. This is done by hand with a special cocking ratchet before engaging in combat, but in combat conditions, the gunner can instead activate a pyrotechnic squib that will cycle the action instantaneously. Three squibs are available.
The use of an open-bolt operating mechanism means that the barrel is left open on both ends so that there is airflow into the chamber when the cannon is not being fired, which is an important safety feature because a cartridge left in the chamber after intensive firing can cook off. It is also a minor performance factor because the additional cooling helps prevent the barrel from overheating and warping. It also ensures that the next shot is strictly dependent on the gunner's choice because the cannon only loads the next round available in the feed mechanism when the trigger is pulled and the bolt goes into battery.
The barrel of the 2A42 is rather unusual as there is a triangular segment just ahead of the first few inches of the tube, which is noticeable in the photo above and especially clear in the picture below. On the left side of the barrel is the gas tube, which is concealed under a rigid retangular box.

This triangular segment is a part of the gas system for the long stroke gas piston situated inside a gas tube installed next to the barrel. Unlike most modern autocannons of Western origin, the 2A42 works on a gas operating principle to cycle rounds and operate the linked ammunition feeding system, which is partly visible in the photo below. Upon firing, the barrel has a recoil stroke of between 30mm and 35mm. This helps to delay the opening of the bolt until the pressure is low enough while simultaneously damping the recoil forces on the mounting cradle. The flat part of the triangular portion of the barrel interfaces with tracks on the rigid rectangular box so that the barrel assembly can reciprocate predictably and precisely with each recoil stroke.

From the diagram below and on the right, the bolt assembly of the 2A42 seems to resemble the rotating bolt assembly of a PK or PKM machine gun, and this is not too far off from the truth. The bolt has two locking lugs and is rotated via an angled trough cut into the bolt carrier, as you can see in the diagram on the right. Inside the hollow gas piston is a captive recoil spring, which provides the necessary energy to return the bolt assembly into battery after each shot. The bolt carrier is fundamentally the same as in any Kalashnikov rifle, with the only exceptions being the additional mechanisms for the ratchet cocking mechanism (the gunner must use a ratchet lever to manually operate the bolt assembly due to the extremely strong recoil spring), and the electrical firing system, along with a spring-loaded deflector to push spent shell casings to the side and into the ejection chute. The spring-loaded deflector can be seen in the diagram on the left below. It is in front of the bolt breech face, so that after the bolt extracts a spent shell casing and the bolt assembly travels back by the required distance, the deflector springs out and pushes the empty casing away.


The empty casing is then pushed forward by the bolt when it goes into battery for the next shot. This supplies enough momentum to the empty casing for it to travel the rest of the way down the ejection chute and out the ejection port, seen in the drawing below.

It is possible to conduct field disassembly of the 2A42 from inside the turret of the BMP-2 without special tools. This allows the crew to replace broken parts or troubleshoot the cannon without taking it out of its mounting cradle, which can only be done with special machinery. A video of the cannon being disassembled from inside a BMP-2 is available here (link). A second video from the same uploader shows the removal of the barrel assembly by hand (link). The way the barrel assembly is extricated shows that the rectangular box around the gas tube is indeed a rigid structure to support the recoiling action of the barrel, and you can see how the gas tube and spent casing ejection port come out along with the barrel, hence the term "barrel assembly". Of course, in order to carry out a field disassembly of the cannon, it must be removed from its mount in the turret. The photo below shows the 2A42 after a field disassembly.

The feed system is mechanical, and resembles a Degtyarev-style machine gun belt feed mechanism. After initially traveling a short distance in its recoil stroke, a lug on the bolt carrier connects with a prong-shaped feed lever and cranks it rearward, driving one of the feed pawls to advance an ammunition belt by one step. As the bolt carrier reverses direction and begins its return stroke, the lug cranks the prong forward and drives the feed pawl back to its initial position, readying it for the next round, and one of the locking lugs on the bolt pushes on the base of the leading round in the belt, chambering it. The switching of the belt feed is done mechanically by turning a lever on the back of the receiver, switching the feed lever to drive one feed pawl instead of the other, while also mechanically blocking the electronic round count sensor for the de-selected belt. The belt feed switch lever must be turned by hand by one of the two turret crew members in the BMP-2. When loading the BMP-2, one of the belts is selected with the switch lever before the bolt carrier is cocked back, so that the belt will be advanced into the feeding position and the gun will be ready to chamber a round. If the gun is switched to feed from the opposite belt, the gun will chamber a round from the current belt before advancing the opposite belt, and only then will it begin to chamber rounds from the opposite belt.
According to its technical manual and the website of the manufacturer, the 2A42 generates a recoil force of 40 to 50 kN. Despite its larger caliber and greater muzzle energy, this recoil force is directly comparable to the M242 Bushmaster chain gun which generates a recoil force of 40 kN. This is due to a combination of a larger and more effective muzzle brake combined with the more developed short-stroke recoiling barrel mechanism. The M242 has the same features, but they are not as developed. Case in point - upon firing, the barrel of the 2A42 recoils backwards by 30mm (35mm maximum), and although the M242 barrel also recoils backwards, its recoil stroke is only 14mm (18mm maximum). In both autocannons, the bolt only unlocks at the end of the short recoil stroke of the barrel, at which point the gas pressure has fallen sufficiently that it is safe for the chamber to be unsealed by the bolt. The increased delay is created by the rearward velocity of the barrel, which begins moving immediately upon firing, decreasing the relative velocity of the bolt carrier, which beings moving only after the projectile has traveled past the gas port. For a more direct comparison, the 30mm RARDEN autocannon produces a recoil force of 13.34 kN - less than half that of the 2A42. This is, of course, due to the long-stroke recoil operating mechanism of the RARDEN wherein the barrel and bolt recoil together as a single unit for a distance of around 300mm, thus greatly damping the recoil force.
As it is an open-bolt autocannon, the bolt assembly has to be retracted until it engages with the sear before firing can commence. This is done by hand with a special cocking ratchet before engaging in combat, but in combat conditions, the gunner can instead activate a pyrotechnic squib that will cycle the action instantaneously. Three squibs are available.
The use of an open-bolt operating mechanism means that the barrel is left open on both ends so that there is airflow into the chamber when the cannon is not being fired, which is an important safety feature because a cartridge left in the chamber after intensive firing can cook off. It is also a minor performance factor because the additional cooling helps prevent the barrel from overheating and warping. It also ensures that the next shot is strictly dependent on the gunner's choice because the cannon only loads the next round available in the feed mechanism when the trigger is pulled and the bolt goes into battery.
The barrel of the 2A42 is rather unusual as there is a triangular segment just ahead of the first few inches of the tube, which is noticeable in the photo above and especially clear in the picture below. On the left side of the barrel is the gas tube, which is concealed under a rigid retangular box.

This triangular segment is a part of the gas system for the long stroke gas piston situated inside a gas tube installed next to the barrel. Unlike most modern autocannons of Western origin, the 2A42 works on a gas operating principle to cycle rounds and operate the linked ammunition feeding system, which is partly visible in the photo below. Upon firing, the barrel has a recoil stroke of between 30mm and 35mm. This helps to delay the opening of the bolt until the pressure is low enough while simultaneously damping the recoil forces on the mounting cradle. The flat part of the triangular portion of the barrel interfaces with tracks on the rigid rectangular box so that the barrel assembly can reciprocate predictably and precisely with each recoil stroke.
From the diagram below and on the right, the bolt assembly of the 2A42 seems to resemble the rotating bolt assembly of a PK or PKM machine gun, and this is not too far off from the truth. The bolt has two locking lugs and is rotated via an angled trough cut into the bolt carrier, as you can see in the diagram on the right. Inside the hollow gas piston is a captive recoil spring, which provides the necessary energy to return the bolt assembly into battery after each shot. The bolt carrier is fundamentally the same as in any Kalashnikov rifle, with the only exceptions being the additional mechanisms for the ratchet cocking mechanism (the gunner must use a ratchet lever to manually operate the bolt assembly due to the extremely strong recoil spring), and the electrical firing system, along with a spring-loaded deflector to push spent shell casings to the side and into the ejection chute. The spring-loaded deflector can be seen in the diagram on the left below. It is in front of the bolt breech face, so that after the bolt extracts a spent shell casing and the bolt assembly travels back by the required distance, the deflector springs out and pushes the empty casing away.


The empty casing is then pushed forward by the bolt when it goes into battery for the next shot. This supplies enough momentum to the empty casing for it to travel the rest of the way down the ejection chute and out the ejection port, seen in the drawing below.

It is possible to conduct field disassembly of the 2A42 from inside the turret of the BMP-2 without special tools. This allows the crew to replace broken parts or troubleshoot the cannon without taking it out of its mounting cradle, which can only be done with special machinery. A video of the cannon being disassembled from inside a BMP-2 is available here (link). A second video from the same uploader shows the removal of the barrel assembly by hand (link). The way the barrel assembly is extricated shows that the rectangular box around the gas tube is indeed a rigid structure to support the recoiling action of the barrel, and you can see how the gas tube and spent casing ejection port come out along with the barrel, hence the term "barrel assembly". Of course, in order to carry out a field disassembly of the cannon, it must be removed from its mount in the turret. The photo below shows the 2A42 after a field disassembly.

The feed system is mechanical, and resembles a Degtyarev-style machine gun belt feed mechanism. After initially traveling a short distance in its recoil stroke, a lug on the bolt carrier connects with a prong-shaped feed lever and cranks it rearward, driving one of the feed pawls to advance an ammunition belt by one step. As the bolt carrier reverses direction and begins its return stroke, the lug cranks the prong forward and drives the feed pawl back to its initial position, readying it for the next round, and one of the locking lugs on the bolt pushes on the base of the leading round in the belt, chambering it. The switching of the belt feed is done mechanically by turning a lever on the back of the receiver, switching the feed lever to drive one feed pawl instead of the other, while also mechanically blocking the electronic round count sensor for the de-selected belt. The belt feed switch lever must be turned by hand by one of the two turret crew members in the BMP-2. When loading the BMP-2, one of the belts is selected with the switch lever before the bolt carrier is cocked back, so that the belt will be advanced into the feeding position and the gun will be ready to chamber a round. If the gun is switched to feed from the opposite belt, the gun will chamber a round from the current belt before advancing the opposite belt, and only then will it begin to chamber rounds from the opposite belt.
The 2A42 has variable rate of fire settings for either semi automatic, 'low' for 250 rounds per minute or 'high' for about 550 rounds per minute, although the cannon can in fact achieve a rate of fire of 800 rounds per minute on the 'high' setting if it gets hot enough. Whether this is deliberate or not is hazy, since KBP, the manufacturer of the cannon, specifically lists the rate of fire in the 'high' setting to be "550 to 800 RPM". According to the BMP-2 manual, the main rate of fire setting for engaging ground targets is the low setting. In order to save ammunition when firing in the low rate of fire setting on ground targets, the following burst lengths are recommended:
The main rate of fire setting for engaging air targets is the high setting, and the recommended burst length is 17-50 shots.
Setting the rate of fire can be done electronically via the BU-25-2S control box or manually via a lever on the receiver of the cannon itself. The relatively high rate of fire of 2A42 is very useful during engagements with anything from aircraft to large concentrations of infantry, or even when attacking a well-fortified position, as the cannon would be very effective at suppressing enemy troops. The 2A42 is irreplaceable during engagements with irregular forces operating under unconventional tactics, as was the case in both Afghanistan and Chechnya, where the BMP-2 was quite consistently rated more highly than the BMP-1 in usefulness. Under such difficult circumstances, the ability to rapidly suppress likely hiding spots and areas of interest with powerful cannon shells is absolutely invaluable for preserving the vehicle itself as well as the lives of the dismounts.
At a range of up to 500 m - 2-3 shots
At a range of up to 1,000 m - 4-5 shots
At a range of up to 1,500 m - 8-10 shots
The main rate of fire setting for engaging air targets is the high setting, and the recommended burst length is 17-50 shots.
Setting the rate of fire can be done electronically via the BU-25-2S control box or manually via a lever on the receiver of the cannon itself. The relatively high rate of fire of 2A42 is very useful during engagements with anything from aircraft to large concentrations of infantry, or even when attacking a well-fortified position, as the cannon would be very effective at suppressing enemy troops. The 2A42 is irreplaceable during engagements with irregular forces operating under unconventional tactics, as was the case in both Afghanistan and Chechnya, where the BMP-2 was quite consistently rated more highly than the BMP-1 in usefulness. Under such difficult circumstances, the ability to rapidly suppress likely hiding spots and areas of interest with powerful cannon shells is absolutely invaluable for preserving the vehicle itself as well as the lives of the dismounts.

The 2A42 cannon was the subject of a rivalry between the GRAU and Kurganmashzavod. In short, GRAU insisted on keeping a 73mm cannon, and favoured the 2A41 presented by the ChTZ (Chelyabinsk Tractor Plant). Kurganmashzavod insisted on the 2A42 developed by the KBP design bureau. In one attempt to persuade military officials to adopt the Object 681 with the 2A41 73mm smoothbore cannon, a comparison trial was organized. The target was a T-72 tank, and the distance was 1,200 meters. The Object 681 opened fire first (on the side of the tank), and not one single round penetrated the tank. One went over, one fell short, and the other successfully impacted the side skirt, but the reinforced plastic side skirt flexed in such a way that the round did nothing. Then, the Object 675 - the BMP-2 prototype - stepped up. It let off three bursts of 8 rounds in the high rate of fire mode. All external equipment including periscopes and the gunsights were completely destroyed, and the roof mounted anti-aircraft machine gun was rent from its mount, landing 15 m away from the tank.
Later on during its acceptance trials, the BMP-2 fired on a combat loaded T-55 (modernized) and T-72 from the side, again with 3 x 8 round bursts on the high rate of fire mode. The T-55 had its anti-aircraft mount, IR searchlight, and externally mounted laser rangefinder shredded away. The 100mm cannon was hit and penetrated in two places. The external fuel tanks mounted on the overtrack fenders ignited and burned outside the tank, but the gunsight was unharmed and tank was in a drivable state. A total firepower kill was achieved due to the damaged cannon. The T-72 also had its anti-aircraft machine gun ripped off, and its optical devices were damaged. The fender fuel tanks were hit and the inferno damaged the turret seals (compromised the sealing of the NBC system) and some of the burning fuel leaked to engine compartment and damaged the engine, though the automatic fire suppression system worked. It was counted as a mobility and firepower kill. These results were published in Sergey Suvorov's volumes on the BMP-1 and BMP-2.
This is only an anecdote, of course, not a scientific study on the ammunition expenditure required to disable a tank. From these demonstrations, it appears that a BMP-2 may mission-kill a tank at a distance of 1,200 meters using only 24 rounds out of its combat reserve of 500. According to the official results of the effectiveness of the 2A42 cannons from the state trials of the BMPT, an average of 24 rounds are needed to eliminate a generic IFV-type target at a distance of 2,000 meters or more using AP ammunition, while 24 rounds of HE ammunition are needed to eliminate an ATGM team in a trench at 1,500 meters or more and 29 rounds are needed to eliminate a full infantry squad in a trench at the same distance.
The maximum number of shots that the gunner is allowed to fire continuously on full auto in the high rate of fire mode is 50 shots, equivalent to around five full seconds of continuous shooting. Another 50 rounds of short bursts in the high rate of fire mode is allowed after that, after which the barrel must be left to cool completely to prevent any lasting damage. Firing on the low rate of fire mode, if done in short bursts, can be done until the entire ammunition supply is depleted.
ACCURACY
The accuracy of the 2A42 cannon is typical for a weapon of its class. The technical dispersion of AP-T (BT) rounds fired from the 2A42 is 0.4 mils in both the horizontal and vertical axes, and the technical dispersion of HE-I and HE-T (OFZ, OT) rounds is 0.5 mils in both axes. For comparison, it is stated in an official Orbital ATK marketing brochure that the 25mm M791 APDS round fired from the M242 chain gun has a dispersion of 0.3 mils in both axes while the M792 HE-T round has a dispersion of 0.55 mils in both axes. As for the 30mm RARDEN cannon, it is stated on page 278 of Jane's Ammunition Handbook 2009 that its dispersion is 0.5 mils.
Accuracy degrades as the cannon heats up, and as the cannon can fire so quickly, it also heats up more rapidly than other cannons. Stresses will also be very high on the barrel if the gunner habitually fires in the highest rate of fire in long bursts, leading to a short barrel life. According to the manufacturer and a Belorussian military textbook, the guaranteed service life of the 2A42 is 6,000 shots. A simple upgrade involving the replacement of 10% of the parts in the 2A42 can increase the service life by 50% to 9,000 shots. This upgrade took place in 1995 and is now the new performance standard for the 2A42 cannons in the Russian Army. As mentioned before, the cannon is equipped with a barrel swap-out system to enable quick replacement of worn barrels in the field without special tools or heavy machinery, so this feature is obviously quite useful to the crew and technicians maintaining the vehicle.


In addition to the high effectiveness of the gun on ground targets, the high elevation of 75 degrees enables the gunner to effortlessly engage targets located on elevated positions and fast, low flying aircraft, even if they are flying almost directly overhead. The high anti-aircraft potential should not be underestimated; the air forces of NATO nations played a critical role in ground operations and still do, and the surge of interest in the concept and technology of attack helicopters in the late 60's and 70's had led to the birth of an entirely new class of air power that was exceptionally lethal to ground assets. Even though its own development was plagued with challenge after challenge and delay after delay, the BMP-2 was introduced just in time to become a sufficiently relevant part of the BMP fleet of the Soviet Army by the time the vaunted AH-64 Apache and A-10 Warthogs arrived on the scene in the mid-80's, even if it was only by a lucky coincidence.

As of 2015, BMP-2 gunners in motorized rifle units in the Western Military District had target distances for gunnery training extended to 1.9 km. New targets representing armoured vehicles were also introduced and new tactics were practiced. The new exercise was reportedly established due to the introduction of newer weapons, presumably referring to modernized BMP-2s equipped with the new fire control system.
Due to the recoil forces generated when firing the cannon, early prototypes of the BMP-2 had problems with the stabilization system. Special modifications were successfully applied to allow the stabilizer to properly realign the cannon after each shot.
All said and done, the accuracy of the 2A42 is at least on par with the Rh202, which had a long but disproportionately thin barrel, and wasn't very accurate on full auto either. Overall, the 2A42 is best compared not to the Rh202 but to the Oerlikon KCB. The calibers are the same, and the rates of fire are the same. However, the KCB has an L/75 barrel, while the 2A42 has an L/80 barrel. The weight of 2A42 is 115 kg, while KCB weighs 138 kg.
The vehicle's entire ammunition load of 500 rounds is stowed in curving containers affixed to the turret floor, on which the seats for the gunner and commander are mounted. Of those 500 rounds, there are 340 HEI and HEI-T rounds in one compartment of the container and 160 AP-T rounds in the other. The ratio between these two ammunition types was designed based on the expected frequency of use.


Another comparable example is the original Marder 1 which carried 420 rounds of 20mm ammunition divided into 345 rounds of HE and 75 rounds of APCR, which was fed to the Rh202 autocannon in a single belt in the original Marder 1 or fed via a dual-feed system beginning with the Marder 1A1 model. Another 830 rounds were carried as a reserve supply and because they were stowed in loose containers, it was also not useful during combat.
However, when the BMP-2 is compared to the British FV510 "Warrior", the BMP-2 has a very clear advantage. The FV510 only provides 45 ready rounds for its RARDEN autocannon with another 205 rounds in reserve stowage. The distribution of ammunition types is unknown, but assuming that half or more than half of the ammunition is of the HE variety and the remainder is APDS, then the FV510 may only have 20 or fewer APDS rounds available in its ready racks. Needless to say, this severely restricts the firepower of the vehicle and limits its ability to act as a force multiplier compared to the BMP-2.
The feed system of the 2A42 is very strong as it is designed to pull a belt of 30mm rounds from the bottom of the turret up to the level of the cannon receiver. The feed mechanism includes a gearbox which consists of a worm gear (a worm and a worm wheel), a delivery clutch and spur gears. When switching between the low and high rates of fire, the gearbox changes the gear ratio of the pulling mechanism to adjust its speed.


The top covers of the containers are clipped on with tension latches. They must be removed to load belts into the containers.
Empty links are collected in a metal bin underneath the cannon. Shell casings are ejected out of the turret.
Although it may be a very useful weapon, the 2A42 is still far from perfect. The gas-based operating system of the cannon has a rather negative influence on the accumulation of fumes in the receiver, and as the receiver is mounted in a flame-proof box that isn't particularly air-tight, the result is that the turret is usually flooded with almost comical volumes of smoke after firing off a few dozen or so rounds. Throwing open the hatches normally solves this problem, but as the crew can hardly be expected to do that in combat, there is a powerful ventilator fan installed in the turret roof on the gunner's side. The ventilator is connected to the flame-proof box containing the 2A42, and was designed to work together with the crew compartment ventilation blower to suppress the release of fumes into the fighting compartment as much as possible. The exhaust vent is located just beside the BPK-2-42 sight aperture and in front of one of the TNPO-170A periscopes, as you can see in the photo below.

The ventilator fan is connected to the box enveloping the receiver of the cannon via a flexible hose, so that the fumes are sucked out as efficiently as possible and with minimal disruption to air pressure in the fighting compartment. Like all of the other weapons-related equipment in the turret, the ventilator is controlled from the BU-25-2S control box. When a toggle switch on the control box for the ventilator is flipped to the "СНАРЯЖ" position, the system is turned on and the fan is automatically activated to extract fumes. Depending on the selected rate of fire, the ventilator will work in the normal mode or the "forced" mode. The ventilator is activated whenever the trigger button on the gunner's handgrips is pressed and runs for another 0.65 seconds after the trigger is released. Using the cannon in the 'low' setting is the least taxing on the ventilator system.
 |
| Ventilator |
The ventilator is sufficient when firing the cannon in the low rate of fire mode, but it cannot extract fumes at the rate that they are produced when multiple bursts are fired in the high rate of fire mode. In order to reduce the concentration of fumes in the fighting compartment, the electronic firing system is programmed to limit a burst to 8 rounds in the 'high' setting, and 48 rounds in the 'low' setting. Fumes can exit the flameproof box through the imperfect seals around the edges of the access doors (which are for maintenance purposes, e.g. lubrication). It is possible to bypass the burst fire limitation by using the manual trigger.
The photo on the left shows the gap for the vent, which is on the right side of the flameproof box. The photo on the right shows the rear door of the box opened, with the seal and its spring visible.


But despite the powerful ventilator, and despite disciplined control of ammunition expenditure, the fighting compartment just always gets flooded with fumes. One early attempt in the history of the BMP-2 to bypass this problem entirely was to mount the cannon externally, in the style of the Marder 1.
Besides completely eliminating the ingress of fumes, this type of turret had a smaller profile and also reduced the height of the occupied space. So why was this vastly superior design rejected in the end? Apparently, the turret was not airtight enough, so it was not safe in an NBC environment. The final production turret design itself had some initial issues with the fume ventilator not being airtight enough as well, although that was eventually solved when the vehicle entered mass production.
30mm AMMUNITION
The maximum range of a 30x165mm projectile of any type is a little over 10 km, but this does not matter in combat as the maximum effective range of the armour-piercing shells is not more than 2,000 meters against lightly armoured targets, and the high explosive shells cannot be used effectively against targets further than 4,000 meters because the self-destruct fuze is designed to detonate at that range. The firing table below is for 30mm HE-I shells.
This page contains a detailed examination of each 30mm cartridge available to the BMP-2 during its service in the Soviet Army, and later, in the Russian Army.
The graphs below, taken from "The Soviet Light Armored Vehicle Threat To The AAAV", shows the estimated penetration power of Soviet 30mm AP, APDS and APFSDS shells. The estimate for the penetration power of the AP round is essentially correct, but the estimate for the APDS round is slightly above the actual capabilities of the Soviet 3UBR8 round.

AMMUNITION MANAGEMENT
A pyrotechnic charge is used to instantaneously cock the cannon and ready it for firing. However, if a pyrotechnic charge is not loaded, then the gunner can still manually cock the gun by repeatedly working a lever attached to the cannon receiver. The process is laborious and time consuming (due to the heavy recoil springs necessary to withstand the tremendous recoil forces), but it does have its own advantages. Although such eccentricities would not be necessary in an electrically operated chaingun, a chaingun requires external power to fire. If the power source was interrupted, a chaingun would be rendered useless. Due to its gas-powered nature, the 2A42 can still be fired with the vehicle operating in "degraded mode", meaning to have a knocked out engine and no battery power, with all operations reverted to manual control. The advantage is that if the BMP-2 were to be hit by an RPG in the engine compartment, or if it ran over a large mine, the surviving gunner could still aid the squad of passengers in holding off the ambushing enemy until help arrives using entirely manual controls. However, one wonders if the trade offs are really worth this extra feature.
Selecting the ammunition type and checking the ammunition reserve is done from the BU-25-2S control box located between the commander's and gunner's seats, to the right of the PKTM ammunition container. Ammunition reserves for both the 2A42 cannon and the PKTM machine gun is shown on a small digital display, along with the ammunition type currently selected for the 2A42. Switching between ammo types is done by flicking a toggle switch. The commander may use the console if he is taking over from the gunner.

The BU-25-2S control box is actually the weapons management complex of the BMP-2. It checks the ready to fire status of the 2A42 and displays it (a ready light is illuminated), and allows the gunner to select the desired rate of fire. It is also used to index ammunition types and quantity during the loading procedure.
Famous YouTube person msylvain59 has acquired a BU-25-2S control box for his own personal collection. You can see his disassembly video here: msylvain59 video. His video is extremely informative, even though he did not know what it was. As was pointed out in his video, the hinged cover of the control box has two built-in light bulbs pointed inward. There is a brightness adjustment dial (a potentiometer) to increase or decrease the brightness of the bulbs. The presence of a light source to illuminate the control box is extremely useful at night.
Loading small sections of ammo belts can be done by hand, but loading the full load of 500 rounds requires the help of mechanical advantage, which is provided by a special loading rig.


PKTM COAXIAL MACHINE GUN
The PKTM is fed from a single belt of 2,000 rounds in the same manner as the BMP-1. The container for this very long belt is mounted on the floor of the turret to the right of the gunner's seat, as shown below.
 |
| Not the thing he has his finger on. It's the big long box to its left that, coincidentally, looks about wide enough for 7.62x54mm bullets |
The PKTM fires the 7.62x54mm cartridge. 7BZ-3 API (armour-piercing incendiary) rounds with the B-32 bullet and 7T2 API-T (armour-piercing incendiary tracer) rounds with the T-46 bullet are linked in a 4:1 ratio in the belt. The machine gun has a cyclic rate of fire of 700 to 800 rounds per minute. A 250-round box of 7.62x54mmR ammunition is provided in a continuous belt. The co-axial machine gun can be fired either by depressing the trigger button on the gunner's handgrips, or by pressing the emergecy manual trigger button located on the trigger unit installed at the back the receiver of the machine gun. Since the gunner has the 30mm cannon to play with, the PKTM is mostly used in situations where the firepower of the cannon might be overkill.
SUPPLEMENTARY WEAPONS

There is a firing port for each passenger. In total, there are six ports on the sides of the hull along the passenger compartment, and another near the driver's station for the seventh passenger.
There are two types of firing port. Squared ones, and teardrop-shaped ones. The square ports are aimed aggressively forward to take better advantage of the firepower of the PKM machine gun, and the teardrop ports are aimed more to the sides. These are meant for AK rifles. The AK firing ports are much simpler and even foreign rifles like the G3 and M16 can fit inside. However, the clip-on cuff designed to fit around the barrel and gas tube of Kalashnikov rifles will not be able to fit other types of weapons, so they will have to be removed.

Firing ports may be useful in some very specific situations, but modern conflicts show us that anything running on wheels or tracks is subject to an RPG attack, so the moment that enemy contact is imminent, the best course of action - as proven through decades of unconventional warfare experience - is for the passengers to dismount and eliminate any attackers while the IFV lays down suppressive fire of its own. Although the passengers could theoretically suppress ambushers from their firing ports, nobody wants to be inside when an RPG hits, and the limited field of view from the firing ports makes the job too difficult to guarantee that this won't happen. However, if there was a need to use them, and the situation is appropriate, they can be quite useful. See this video (link) to see some soldiers fire out of the firing ports of their bulletproof BTR-80 at an unseen enemy.


There is a fume evacuation system compatible with AK-type weapons, Once installed in the firing port, the operator is to clap the sheet steel casing deflector (the AK spits spent brass out with extreme violence) on the top cover before firing. There is an air hose on the deflector, and once the evacuation system - powered by a moderately powerful (164W) MBP-3N suction fan, one per each side of the hull - is turned on, gunpowder fumes will be sucked out and vented off outside via a small outlet on the side of the hull, one on each side.


A single RPG-7 may be carried aboard the BMP-2 in the passenger compartment. There is also a special rack for a "Strela" or "Igla" MANPADS launcher for self defence from aerial attack. One of the passengers can stick himself out of one of the roof hatchs and use it against an imminent threat, but crew members can also use the MANPADS launcher if the passengers have dismounted. This is shown in the photo below.


The photos below show the roof hatches of BMP-1s being used for air defence:
It is also possible to fire an RPG from a hatch:

MISSILES
The "Konkurs" missile system was integral to the BMP-2 as the primary vehicular ATGM system. It could be fired and reloaded under armour. "Fagot" missiles could also be used from the BMP-2 missile launcher, but they were not standard issue. Due to advances in missile technology, the 500-meter deadzone of the "Malyutka" missiles from the original BMP-1 was eliminated, and this also indirectly meant that the BMP-2 possessed the same short range tank killer capability as the BMP-1 had with its 73mm low-pressure cannon. The BMP-1 received its own drop-in 9P135M missile launcher late in 1979 as part of the BMP-1P modernization that allowed it to use "Konkurs" and "Fagot" missiles, but subsequently lost the ability to fire missiles from under armour.
9P56M MISSILE LAUNCHER


Launching the missiles is done from the proprietary 9P56M launch post on the turret roof. It is visible as an armoured box with a launch rail. It contains a 9Sh119M1 sight taken from the more familiar 9P135M man-portable launch unit from the 9K111 system, compatible with both "Fagot" and "Konkurs" missiles. The sight contains an infrared spin-scan missile tracking system in its head and a periscopic optical day channel that protrudes into the turret with an eyepiece for the gunner.
Because the missile guidance principle is semi-automatic, all the gunner has to do is lay the sights on the target. The sight has a 10x magnification and a field of view of 4.75 degrees. With a 7-8 power optic, a gunner is not only able to spot tanks, armoured personnel carriers and trucks from 4 km but also resolve the image in sufficient detail to differentiate between different types of armoured vehicles. As such, the 9.5x magnification power of the 9Sh119M1 sight was broadly sufficient for the 4 km maximum range of the "Konkurs" missile. Moreover, because the 9Sh119M1 on the turret roof was installed on an independently rotating launcher, the gunner had access to a higher magnification optic than the primary sight (5.6x) in a convenient position for reconnaissance in a turret defilade position, thus effectively extending the viewing range of the BMP-2.
The images below show the 9P56M launch post, consisting of the 9Sh119M1 sight in its armoured housing, a launch rail on top of the armoured housing, and the flywheels for aiming the launch post.


The 9Sh119M1 sighting unit is pictured below, shown from the gunner's perspective. The 9S474 control unit, responsible for signal processing and generating steering commands, was mounted on a bracket behind the commander's seat. It was powered through the vehicle's electrical network. The 9P56M launch post was complete with a set of flywheels to control its elevation and traverse, with a launch button.


The periscopic aperture windows of the 9Sh119M1 sight are housed in the armoured box atop the turret as the photo below shows. The bottom eye of the sight is the gunner's viewing window, and the upper eye is the automatic missile tracking optic. To select between day and night operating modes, the gunner must reach out and manually flip a switch on the left side of the armoured housing connected to the corresponding switch on the 9Sh119M1 sight head. The same must be done if the gunner wishes to apply a high-contrast light filter on the aperture window of the sight.


The viewfinder for the 9Sh119M1 sighting unit is pictured below. It has a stadiametric rangefinder calibrated for a target with a height of 2.5 meters, marked for targets up to distance of 4 km. This was intended for the gunner to determine if the target was within the maximum range of the "Konkurs" missile. If it wasn't, the gunner could avoid wasting a shot on a faraway target. If the gunner is using this sight for turret defilade reconnaissance, it is also useful for measuring the range to the target before the BMP-2 drives up into a hull defilade position to open fire.

The traverse and elevation flywheels are used to lay the crosshairs of the viewfinder on the target by rotating the launcher and elevating the periscopic head of the sight inside its armoured housing. The sight depression limit is -5 degrees and the elevation limit is +15 degrees. When loading the launcher, the traverse mechanism clutch is disengaged and the launcher can be rotated freely by hand so that the gunner is not forced to slowly crank the launcher into position to reload. The practical firing arc of the missile launcher is 60 degrees, or 30 degrees to either side. The launcher can be rotated in a total arc of 185 degrees, with hard stops to prevent further rotation.


The decision to use the sight from the 9P135M missile launcher inside the turret was quite ingenious, though not a new one, as the 9P148 tank destroyer also had the same design feature. Unlike the BMP-1P, FV510 "Warrior" and Marder 1 series, all of which used the more expedient solution of mounting a standard portable missile launcher externally on the turret roof, this unique arrangement allowed the BMP-2 to have a lower profile without requiring the dismounting of the missile launcher and also ensured that the launcher was protected from gunfire and shell fragments. Most importantly, it also allowed missiles to be fired from under armour in a turret defilade position, ensuring the full protection of the gunner and the vehicle itself from return fire. All that said, the disadvantage of this arrangement is that the gunner guides the ATGMs with manual geared controls, which are relatively precise, but not as convenient as having powered controls.
The 9P56M launcher includes a jamming detection and warning system, in addition to an emergency MCLOS backup control mode in case the automatic missile tracking system is jammed or loses visual contact with the missile for some other reason. In the MCLOS backup mode, the launcher is locked in place and The lack of powered electrical control systems is not a disadvantage, as the entire turret can be turned to aim the launcher, whereby only fine adjustments are made to the launcher using the flywheels, so that the effect is much the same as being able to control the missile launcher using the BMP's electric handgrips. The manpack-based 9P135M launcher is capable of aiming -20 degrees down and +20 degrees up, but due to the constricted opening of the armour box of the 9Sh119M1, the range of vertical elevation is reduced.

The BMP-2 carries an extra tripod, which can be assembled with the dismounted sight to form a complete 9P135M launcher. This provided the dismounted infantry with the possibility of setting up an ATGM position in a more favourable location, separate from the BMP-2. This could be done if, for example, a good firing position is identified, but it can only be accessed by foot, or if the squad wishes to increase the depth of a defensive belt by placing the ATGM position far behind the rest of the squad. A 9S451 control unit was stowed behind the center console, and a 9P56 tripod was stowed on the left rear corner of the passenger compartment, splayed out and mounted to the wall.
The images below show the 9P56M launch post, consisting of the 9Sh119M1 sight in its armoured housing, a launch rail on top of the armoured housing, and the flywheels for aiming the launch post.


The 9Sh119M1 sighting unit is pictured below, shown from the gunner's perspective. The 9S474 control unit, responsible for signal processing and generating steering commands, was mounted on a bracket behind the commander's seat. It was powered through the vehicle's electrical network. The 9P56M launch post was complete with a set of flywheels to control its elevation and traverse, with a launch button.


The periscopic aperture windows of the 9Sh119M1 sight are housed in the armoured box atop the turret as the photo below shows. The bottom eye of the sight is the gunner's viewing window, and the upper eye is the automatic missile tracking optic. To select between day and night operating modes, the gunner must reach out and manually flip a switch on the left side of the armoured housing connected to the corresponding switch on the 9Sh119M1 sight head. The same must be done if the gunner wishes to apply a high-contrast light filter on the aperture window of the sight.

The viewfinder for the 9Sh119M1 sighting unit is pictured below. It has a stadiametric rangefinder calibrated for a target with a height of 2.5 meters, marked for targets up to distance of 4 km. This was intended for the gunner to determine if the target was within the maximum range of the "Konkurs" missile. If it wasn't, the gunner could avoid wasting a shot on a faraway target. If the gunner is using this sight for turret defilade reconnaissance, it is also useful for measuring the range to the target before the BMP-2 drives up into a hull defilade position to open fire.

The traverse and elevation flywheels are used to lay the crosshairs of the viewfinder on the target by rotating the launcher and elevating the periscopic head of the sight inside its armoured housing. The sight depression limit is -5 degrees and the elevation limit is +15 degrees. When loading the launcher, the traverse mechanism clutch is disengaged and the launcher can be rotated freely by hand so that the gunner is not forced to slowly crank the launcher into position to reload. The practical firing arc of the missile launcher is 60 degrees, or 30 degrees to either side. The launcher can be rotated in a total arc of 185 degrees, with hard stops to prevent further rotation.


The decision to use the sight from the 9P135M missile launcher inside the turret was quite ingenious, though not a new one, as the 9P148 tank destroyer also had the same design feature. Unlike the BMP-1P, FV510 "Warrior" and Marder 1 series, all of which used the more expedient solution of mounting a standard portable missile launcher externally on the turret roof, this unique arrangement allowed the BMP-2 to have a lower profile without requiring the dismounting of the missile launcher and also ensured that the launcher was protected from gunfire and shell fragments. Most importantly, it also allowed missiles to be fired from under armour in a turret defilade position, ensuring the full protection of the gunner and the vehicle itself from return fire. All that said, the disadvantage of this arrangement is that the gunner guides the ATGMs with manual geared controls, which are relatively precise, but not as convenient as having powered controls.
The 9P56M launcher includes a jamming detection and warning system, in addition to an emergency MCLOS backup control mode in case the automatic missile tracking system is jammed or loses visual contact with the missile for some other reason. In the MCLOS backup mode, the launcher is locked in place and The lack of powered electrical control systems is not a disadvantage, as the entire turret can be turned to aim the launcher, whereby only fine adjustments are made to the launcher using the flywheels, so that the effect is much the same as being able to control the missile launcher using the BMP's electric handgrips. The manpack-based 9P135M launcher is capable of aiming -20 degrees down and +20 degrees up, but due to the constricted opening of the armour box of the 9Sh119M1, the range of vertical elevation is reduced.

The BMP-2 carries an extra tripod, which can be assembled with the dismounted sight to form a complete 9P135M launcher. This provided the dismounted infantry with the possibility of setting up an ATGM position in a more favourable location, separate from the BMP-2. This could be done if, for example, a good firing position is identified, but it can only be accessed by foot, or if the squad wishes to increase the depth of a defensive belt by placing the ATGM position far behind the rest of the squad. A 9S451 control unit was stowed behind the center console, and a 9P56 tripod was stowed on the left rear corner of the passenger compartment, splayed out and mounted to the wall.
By pulling the 9Sh119M1 sight from the housing and mounting it together with the control unit and the tripod, a complete 9P135M launcher could be assembled. The 9P135M folds up into a very compact package, and it weighs only 22.5 kg total with the tripod, but unlike the onboard 9S474 control unit, its 9S451 control unit was powered by a thermal battery attached to each "Fagot" or "Konkurs" missile container. The capacity of the battery was not enough for a "Konkurs" missile to travel 4 km, so there was a distinct firepower difference between using the system in its mounted and dismounted forms.
The same capability to convert the missile control system into a 9P135M man-pack launcher was present in the 9P148 tank destroyer, but a portable external battery was provided for its 9S451 unit, and a plug-in interference detection unit was also provided.
This is what a Konkurs missile looks like:
Before the missile leaves the tube, the 9B61 gyroscope must be given about half a second to power up to its operating speed of 10,000 revs/min. This is the source of the whirring sound you might hear just before the missile speeds away with a bang.
Launching the missile is accomplished along the lines of a typical recoiless rifle design with an expulsion charge (a "gas generator") installed in the very rear of the missile tube to provide the initial push. The charge is contained inside a metal housing of a smaller diameter than the missile tube. About half a second after the launch operator presses the trigger to fire, the missile is ejected from a restraining cup attached to its rear (you can see it in the photo above). Then, a substantial charge of stick powder burns inside the gas generator and releases the gasses into the empty chamber between the missile and the gas generator, and the thrust from the rear turns the gas generator into a rocket nozzle and propels the missile forwards. Residual pressure within the gas generator is vented out from the rear of the missile tube via twelve small vent holes.

The gas generator kicks the missile out of the tube at a speed of 60 m/s. The rocket engine is not ignited until the missile has left the container and traveled about 15 meters. First, the 9Ch237-1 electric ignition cartridge for the main engine ignites the black powder ignition booster charge for the sustainer motor. This ignites the 9Ch179-1 solid fuel in the main engine, packed in a green rubber heat resistant pouch which accelerates the missile, already travelling at 60 m/s, to a speed of 250 m/s and maintains it at around 208 m/s throughout the rest of the flight. The Fagot and Faktoria missiles are ejected at about the same speed, and accelerate to a slightly lower maximum speed of 240 m/s before falling to a cruising speed of 186 m/s.
The "Fagot" missile, which we do not really want to examine in too much detail, is ejected out in the same fashion, though with a proportionately smaller gas generator. As you can see in the photo below, the gas generator for the Fagot missile tube has just six vent holes.


A standard combat load consists of four missiles. There is a stowage rack for three missiles on the starboard side hull wall next to the turret basket. To facilitate quick loading, there is a missile ready rack in the middle of the turret next to the commander's seat, directly behind the BU-25-2S control panel. When the first missile is loaded onto the launcher by either the gunner or commander, the commander immediately replenishes this ready rack from the reserve rack on the hull wall to the right of the turret basket. This allows the following reload process to be carried out as quickly as possible regardless of the turret orientation by either the gunner or commander.


If an additional missile is mounted on the launcher before combat, a total number of five missiles can be carried, but this is prohibited under Army regulations as it can be dangerous to drive with a live missile loaded on the launcher, since the launch tube is only a fiberglass container that offers no ballistic protection. Air bursting artillery shells and concentrated machine gun fire can damage the missile, set the rocket fuel alight and render it unsafe to handle. Generally speaking, a missile is only loaded when combat is imminent or a target has already been spotted.

Depending on whether the commander is present in the turret, reloading the missile launcher can be done by the gunner alone, or it can be a cooperative effort between the gunner and the commander. The passengers are not involved in the reloading process. The process of loading the missile itself can be done under armour from either the gunner's hatch or the commander's hatch.


If the commander is present in the turret, the loading process can be faster. Firstly, the commander must then order the gunner to rotate the 9P56M launcher to the 9 o'clock position, and then he must open his hatch, tilt the empty missile container upwards to a vertical orientation and then release it from the launcher by pressing the red button on the underside of the launch tube. He can then throw the container off the side of the turret. Then, he will have to reach down to the missile stowage rack beside him to obtain one. The new missile is installed by pushing it up the vacated missile launch rail. Once that is done, the launcher is turned to its original orientation by the gunner. If the commander is absent from the turret, the gunner must turn the turret to the 3 o'clock or 6 o'clock positions in order to reach the missile rack, but other than that, the process is the same. These steps cannot be carried out if the flywheels are not disengaged as the traverse and elevation gears block external forces from moving the launcher, but because the 9Sh119M1 sight is placed direct in the middle of the turret between the gunner and commander, it is possible for either crew member to carry out the entire loading process independently of one another.


The need to open at least one of the turret hatches to reload the missile launcher was unavoidable, so it is not possible to carry out the process while also maintaining an NBC protection seal. However, this reloading method is still quite good as it provides almost complete protection to the crew members and it can be done without the assistance of the passengers.
Each missile tube being a full 1.26 meters in length, maneuvering one around the inside of the BMP-2 turret is no mean feat. As such, the minimum rate of fire - that is, the speed of reload plus the time taken when firing on a target at the maximum range of 4,000 m - is about three shots per two minutes, or 1.5 RPM. The maximum firing rate can be as high as 3 RPM using the "Konkurs" under the most optimal conditions (short range, highly proficient crew). It should be understood that these rate of fire figures include firing a missile that has already been loaded beforehand.
Overall, it can be considered quite fast compared to the Marder 1, but not compared to the M2 Bradley with its two-shot missile pod. However, the missile launcher on the Bradley cannot be reloaded if all passengers have dismounted, and the Marder 1's MILAN missile launcher cannot be loaded under armour. The BMP-2 allows both. The "Fagot" missile and its small size and low weight make it a more attractive option than the "Konkurs" in this context, but the reduced firing range and lethality make it an unreasonable choice.

The original Konkurs missile entered service in the Soviet Army in 1974. The maximum range of this missile is 4 km, and the minimum range is 75 meters, as dictated by the distance-armed fuse. The missile features the 9N131 shaped charge warhead with a wave shaper. Weighing in at 2.75 kg, the 112mm warhead creates a shaped charge jet with a velocity of 11 km/s.

An infrared lamp is installed in the tail of the missile to act as a tracking point for the optronics system of the launcher. Throughout its 4-kilometer long maximum firing range, guidance commands are transmitted through a very fine wire. The spool fits around the tail of the missile and gradually unravels as the missile speeds off. The spool weighs 740 grams. The missile stays steady in flight thanks to a 9B61 gyroscope unit which detects course deviations and sends corrections to the four small steering fins at the nose of the missile.
Mass of Missile: 14.6 kg
Mass of Missile and Launch Container: 25.3 kg
Missile Diameter: 135mm
Warhead Diameter 112mm Warhead Mass: 2.75 kg
Minimum Penetration: 560mm RHA
Average Penetration: 600-650mm RHA
Missile Cruising Speed: 208 m/s
Rate of Spin: 5 - 7 RPM
The missile has a maximum diameter of 135mm, but tapers down to a smaller diameter, which is why the warhead has a diameter of only 112mm. The taper is between the warhead and the rocket motor, and the tapered portion is just an aerodynamic fairing as you can see in the drawing below.

In many ways, the Konkurs was superior to other missile systems of the first half of the 70's like the MILAN, and its performance was still highly competitive by the time the ITOW appeared eight years after it. In fact, the Konkurs was directly comparable to the ITOW in performance, only that it was slower, but this was balanced out by a much lighter overall weight and a slightly better maximum flight range. However, even if the Konkurs could be rightly held in high esteem as an extremely effective system throughout the 70's, the appearance of the next generation of NATO tanks in the early 1980's had a great impact on the value of the missile on the modern battlefield. For instance, the M1 Abrams was designed with protection from 127mm anti-tank missiles in a frontal arc of 50 degrees. On the hull and turret, its armour reached 750mm RHA in effective thickness in this frontal arc. The Konkurs missile would not have been an effective weapon against a tank with this level of protection.

Tandem warhead descendant of the original Konkurs. Due to internal disagreements and repeated delays, the Konkurs-M only entered service in the late 80's. Ignoring the precursor warhead, the greatly increased penetration power of the missile was achieved with the increased diameter of the shaped charge (the missile is essentially a cylinder with blunt ends) and the increased standoff distance.
Mass of Missile: 16.5 kg
Mass of Missile and Launch Container: 26.5 kg
Missile Diameter: 135mm
Warhead Diameter: 135mm
Warhead Mass: 4.75 kg
Diameter of Precursor Warhead: 60mm
Minimum Penetration: 750mm RHA behind ERA
Average Penetration: 800-900mm RHA behind ERA
Missile Cruising Speed: 206 m/s
Rate of Spin: 5 - 7 RPM
The new warhead of the Konkurs-M did not only incorporate an additional precursor in front of the original 9N113 warhead, but was an entirely new design. The shaped charge was revised and is much heavier, and together with the precursor warhead, this raised the mass of the missile to 16.5 kg.

The Fagot missile entered service before the Konkurs and was originally meant only as a man-portable missile system, but as the missile launcher in the BMP-2 is almost identical to the universal 9P135M launcher, the BMP-2 may fire Fagot missiles as well. The minimum firing distance is 70 meters, and the maximum guided distance is 2,000 meters. Although quite capable of defeating any tank armour from the era in which it was introduced, it became somewhat obsolete like the Konkurs in the early 80's. Nevertheless, it would still be capable of defeating the new generation of NATO main battle tanks from the sides and rear.

Total Weight (With Missile Tube): 12.9kg
Missile Weight: 7.7 kg
Missile Diameter: 119mm
Minimum Penetration: 400mm RHA
Average Penetration: 460-500mm RHA
Average Flight Velocity: 186 m/s
As usual, the missile was steered with four small steering fins, but unlike some other missiles developed in the USSR, the "Fagot" used a electromechanical control system to move the steering fins. The main advantage of an electromechanical control system over a pneumatic system is that the responsiveness of the missile during flight is uniform until the battery is fully expended, whereas the power of a pneumatic system declines with use until the air pressure drops below the usable level. This is not as pertinent of an issue with a SACLOS missile like the Fagot as it is for an MCLOS missile where the gunner must manually control the missile, but it still makes some difference. The steering system is shown in the drawing below.

The Faktoria, sometimes referred to as the "Fagot-M" is an updated Fagot missile, introduced in 1980. The maximum firing range was increased to 2,500 meters, and the armour penetration capability was raised to at least 460mm RHA, while simultaneously cutting down the weight of the missile by a small amount to 12.9 kg. The cruising speed was very slightly reduced to 180 m/s.
Total Weight (With Missile Tube): 13.2kg
Missile Weight: 8.0 kg
Missile Diameter: 120mm
Warhead Mass: 1.76 kg
Explosive Charge Mass: 1.0 kg
Penetration: 550mm RHA
Average Flight Velocity: 180 m/s
Alhough the steel hull appears to be outwardly identical to the hull of the BMP-1, the BMP-2 uses a more advanced Cr-Ni-Mo steel alloy designated BT-70Sh. This new steel was used for the two-man turret as well. BT-70Sh is almost exactly equivalent to ATI 500-MIL steel as indicated by the material properties described in this patent for BT-70Sh. BT-70Sh steel has a hardness of 534 BHN when processed to the type of thin plates used on the BMP-2. It becomes exponentially more difficult to treat steel to a high hardness past a certain thickness while maintaining the other mechanical characteristics of the metal using the available thermomechanical techniques at the time, and thinner plates are typically much easier to process.
The use of the new steel allowed the designers to compensate for the increased overall weight of the vehicle compared to the BMP-1 while maintaining the same level of protection by decreasing the thickness of the sides of the hull by a few millimeters. The sides of the hull remained proofed against 7.62mm armour-piercing bullets and the frontal arc remained proofed against 23mm armour-piercing shells from 500 meters. Furthermore, the frontal arc of 120 degrees was also immune to 12.7mm armour-piercing bullets.
The research paper here (link) is important in understanding value of the BMP-2's armour protection, as there is little direct information on the armour of the BMP-2 from original Soviet sources. Reading this document in its entirety is recommended, but an understanding of V50 is needed to correctly interpret the results. The contents of this document pertains to the testing of ATI 500-MIL high strength steel plate of the ATI brand name using three different caliber of common machine gun ammunition: .308 cal M2 AP, .50 cal M2 AP, 14.5mm B-32 AP, and 14.5mm BS-41 AP (WC core). Range is a factor of velocity, and since the V50 figures in the document are velocity values and not ones for range, we must find out the range for ourselves with this range-velocity chart here (link). There are charts for .50 cal M2 AP and 14.5mm M-44 Ball (ballistically equivalent to B-32).
The front of the hull was split into two halves. The lower glacis is totally devoid of anything of inerest, but the upper glacis was dominated by the peculiar armoured aluminium engine access panel. This panel is made from armour-grade aluminium alloy, but as nobody ever mentioned what alloy it is, we can assume that it is most likely made from the same ABT-101 aluminium alloy used in the BMD-1 and BMD-2 airborne IFVs. ABT-101 has a hardness of 145 BHN, and it is much stronger than aluminium alloy 5083 used in armoured vehicles like the M113 and the M2 Bradley. But besides the strangeness of having aluminium in a predominantly steel hull, the most noteworthy feature pf the engine access panel is the seven ribs running across it laterally. If viewed head-on, they line up such that they form a seamless virtual "wall", as shown in the photo below.

These ribs are a crucial component of the protective qualities of the engine access panel. It achieves this with a combination of its own innately unique properties and the benefit of increasing the stiffness of the plate, which is accomplished without significantly increasing the mass of the plate. Original research on the usefulness of protruding ribs as a way to defeat ballistic threats was done parallel to Swedish efforts in the same vein during the mid-60's. The Russians applied the concept to the BMP in 1966, and the Swedes to the Stridsvagn 103.
This is what a Konkurs missile looks like:
 |
| Photo credit to Military-Today |
Before the missile leaves the tube, the 9B61 gyroscope must be given about half a second to power up to its operating speed of 10,000 revs/min. This is the source of the whirring sound you might hear just before the missile speeds away with a bang.
Launching the missile is accomplished along the lines of a typical recoiless rifle design with an expulsion charge (a "gas generator") installed in the very rear of the missile tube to provide the initial push. The charge is contained inside a metal housing of a smaller diameter than the missile tube. About half a second after the launch operator presses the trigger to fire, the missile is ejected from a restraining cup attached to its rear (you can see it in the photo above). Then, a substantial charge of stick powder burns inside the gas generator and releases the gasses into the empty chamber between the missile and the gas generator, and the thrust from the rear turns the gas generator into a rocket nozzle and propels the missile forwards. Residual pressure within the gas generator is vented out from the rear of the missile tube via twelve small vent holes.
The gas generator kicks the missile out of the tube at a speed of 60 m/s. The rocket engine is not ignited until the missile has left the container and traveled about 15 meters. First, the 9Ch237-1 electric ignition cartridge for the main engine ignites the black powder ignition booster charge for the sustainer motor. This ignites the 9Ch179-1 solid fuel in the main engine, packed in a green rubber heat resistant pouch which accelerates the missile, already travelling at 60 m/s, to a speed of 250 m/s and maintains it at around 208 m/s throughout the rest of the flight. The Fagot and Faktoria missiles are ejected at about the same speed, and accelerate to a slightly lower maximum speed of 240 m/s before falling to a cruising speed of 186 m/s.
The "Fagot" missile, which we do not really want to examine in too much detail, is ejected out in the same fashion, though with a proportionately smaller gas generator. As you can see in the photo below, the gas generator for the Fagot missile tube has just six vent holes.

LOADING THE MISSILES
A standard combat load consists of four missiles. There is a stowage rack for three missiles on the starboard side hull wall next to the turret basket. To facilitate quick loading, there is a missile ready rack in the middle of the turret next to the commander's seat, directly behind the BU-25-2S control panel. When the first missile is loaded onto the launcher by either the gunner or commander, the commander immediately replenishes this ready rack from the reserve rack on the hull wall to the right of the turret basket. This allows the following reload process to be carried out as quickly as possible regardless of the turret orientation by either the gunner or commander.


If an additional missile is mounted on the launcher before combat, a total number of five missiles can be carried, but this is prohibited under Army regulations as it can be dangerous to drive with a live missile loaded on the launcher, since the launch tube is only a fiberglass container that offers no ballistic protection. Air bursting artillery shells and concentrated machine gun fire can damage the missile, set the rocket fuel alight and render it unsafe to handle. Generally speaking, a missile is only loaded when combat is imminent or a target has already been spotted.

Depending on whether the commander is present in the turret, reloading the missile launcher can be done by the gunner alone, or it can be a cooperative effort between the gunner and the commander. The passengers are not involved in the reloading process. The process of loading the missile itself can be done under armour from either the gunner's hatch or the commander's hatch.


If the commander is present in the turret, the loading process can be faster. Firstly, the commander must then order the gunner to rotate the 9P56M launcher to the 9 o'clock position, and then he must open his hatch, tilt the empty missile container upwards to a vertical orientation and then release it from the launcher by pressing the red button on the underside of the launch tube. He can then throw the container off the side of the turret. Then, he will have to reach down to the missile stowage rack beside him to obtain one. The new missile is installed by pushing it up the vacated missile launch rail. Once that is done, the launcher is turned to its original orientation by the gunner. If the commander is absent from the turret, the gunner must turn the turret to the 3 o'clock or 6 o'clock positions in order to reach the missile rack, but other than that, the process is the same. These steps cannot be carried out if the flywheels are not disengaged as the traverse and elevation gears block external forces from moving the launcher, but because the 9Sh119M1 sight is placed direct in the middle of the turret between the gunner and commander, it is possible for either crew member to carry out the entire loading process independently of one another.


The need to open at least one of the turret hatches to reload the missile launcher was unavoidable, so it is not possible to carry out the process while also maintaining an NBC protection seal. However, this reloading method is still quite good as it provides almost complete protection to the crew members and it can be done without the assistance of the passengers.
Each missile tube being a full 1.26 meters in length, maneuvering one around the inside of the BMP-2 turret is no mean feat. As such, the minimum rate of fire - that is, the speed of reload plus the time taken when firing on a target at the maximum range of 4,000 m - is about three shots per two minutes, or 1.5 RPM. The maximum firing rate can be as high as 3 RPM using the "Konkurs" under the most optimal conditions (short range, highly proficient crew). It should be understood that these rate of fire figures include firing a missile that has already been loaded beforehand.
Overall, it can be considered quite fast compared to the Marder 1, but not compared to the M2 Bradley with its two-shot missile pod. However, the missile launcher on the Bradley cannot be reloaded if all passengers have dismounted, and the Marder 1's MILAN missile launcher cannot be loaded under armour. The BMP-2 allows both. The "Fagot" missile and its small size and low weight make it a more attractive option than the "Konkurs" in this context, but the reduced firing range and lethality make it an unreasonable choice.
9M113 "Konkurs"

The original Konkurs missile entered service in the Soviet Army in 1974. The maximum range of this missile is 4 km, and the minimum range is 75 meters, as dictated by the distance-armed fuse. The missile features the 9N131 shaped charge warhead with a wave shaper. Weighing in at 2.75 kg, the 112mm warhead creates a shaped charge jet with a velocity of 11 km/s.
An infrared lamp is installed in the tail of the missile to act as a tracking point for the optronics system of the launcher. Throughout its 4-kilometer long maximum firing range, guidance commands are transmitted through a very fine wire. The spool fits around the tail of the missile and gradually unravels as the missile speeds off. The spool weighs 740 grams. The missile stays steady in flight thanks to a 9B61 gyroscope unit which detects course deviations and sends corrections to the four small steering fins at the nose of the missile.
Mass of Missile: 14.6 kg
Mass of Missile and Launch Container: 25.3 kg
Missile Diameter: 135mm
Warhead Diameter 112mm Warhead Mass: 2.75 kg
Minimum Penetration: 560mm RHA
Average Penetration: 600-650mm RHA
Missile Cruising Speed: 208 m/s
Rate of Spin: 5 - 7 RPM
The missile has a maximum diameter of 135mm, but tapers down to a smaller diameter, which is why the warhead has a diameter of only 112mm. The taper is between the warhead and the rocket motor, and the tapered portion is just an aerodynamic fairing as you can see in the drawing below.

In many ways, the Konkurs was superior to other missile systems of the first half of the 70's like the MILAN, and its performance was still highly competitive by the time the ITOW appeared eight years after it. In fact, the Konkurs was directly comparable to the ITOW in performance, only that it was slower, but this was balanced out by a much lighter overall weight and a slightly better maximum flight range. However, even if the Konkurs could be rightly held in high esteem as an extremely effective system throughout the 70's, the appearance of the next generation of NATO tanks in the early 1980's had a great impact on the value of the missile on the modern battlefield. For instance, the M1 Abrams was designed with protection from 127mm anti-tank missiles in a frontal arc of 50 degrees. On the hull and turret, its armour reached 750mm RHA in effective thickness in this frontal arc. The Konkurs missile would not have been an effective weapon against a tank with this level of protection.
9M113M "Konkurs-M"

Tandem warhead descendant of the original Konkurs. Due to internal disagreements and repeated delays, the Konkurs-M only entered service in the late 80's. Ignoring the precursor warhead, the greatly increased penetration power of the missile was achieved with the increased diameter of the shaped charge (the missile is essentially a cylinder with blunt ends) and the increased standoff distance.
Mass of Missile: 16.5 kg
Mass of Missile and Launch Container: 26.5 kg
Missile Diameter: 135mm
Warhead Diameter: 135mm
Warhead Mass: 4.75 kg
Diameter of Precursor Warhead: 60mm
Minimum Penetration: 750mm RHA behind ERA
Average Penetration: 800-900mm RHA behind ERA
Missile Cruising Speed: 206 m/s
Rate of Spin: 5 - 7 RPM
The new warhead of the Konkurs-M did not only incorporate an additional precursor in front of the original 9N113 warhead, but was an entirely new design. The shaped charge was revised and is much heavier, and together with the precursor warhead, this raised the mass of the missile to 16.5 kg.
9M111 "Fagot"

The Fagot missile entered service before the Konkurs and was originally meant only as a man-portable missile system, but as the missile launcher in the BMP-2 is almost identical to the universal 9P135M launcher, the BMP-2 may fire Fagot missiles as well. The minimum firing distance is 70 meters, and the maximum guided distance is 2,000 meters. Although quite capable of defeating any tank armour from the era in which it was introduced, it became somewhat obsolete like the Konkurs in the early 80's. Nevertheless, it would still be capable of defeating the new generation of NATO main battle tanks from the sides and rear.
Total Weight (With Missile Tube): 12.9kg
Missile Weight: 7.7 kg
Missile Diameter: 119mm
Minimum Penetration: 400mm RHA
Average Penetration: 460-500mm RHA
Average Flight Velocity: 186 m/s
As usual, the missile was steered with four small steering fins, but unlike some other missiles developed in the USSR, the "Fagot" used a electromechanical control system to move the steering fins. The main advantage of an electromechanical control system over a pneumatic system is that the responsiveness of the missile during flight is uniform until the battery is fully expended, whereas the power of a pneumatic system declines with use until the air pressure drops below the usable level. This is not as pertinent of an issue with a SACLOS missile like the Fagot as it is for an MCLOS missile where the gunner must manually control the missile, but it still makes some difference. The steering system is shown in the drawing below.
9M111M "Faktoria"
The Faktoria, sometimes referred to as the "Fagot-M" is an updated Fagot missile, introduced in 1980. The maximum firing range was increased to 2,500 meters, and the armour penetration capability was raised to at least 460mm RHA, while simultaneously cutting down the weight of the missile by a small amount to 12.9 kg. The cruising speed was very slightly reduced to 180 m/s.
Total Weight (With Missile Tube): 13.2kg
Missile Weight: 8.0 kg
Missile Diameter: 120mm
Warhead Mass: 1.76 kg
Explosive Charge Mass: 1.0 kg
Penetration: 550mm RHA
Average Flight Velocity: 180 m/s
PROTECTION
Alhough the steel hull appears to be outwardly identical to the hull of the BMP-1, the BMP-2 uses a more advanced Cr-Ni-Mo steel alloy designated BT-70Sh. This new steel was used for the two-man turret as well. BT-70Sh is almost exactly equivalent to ATI 500-MIL steel as indicated by the material properties described in this patent for BT-70Sh. BT-70Sh steel has a hardness of 534 BHN when processed to the type of thin plates used on the BMP-2. It becomes exponentially more difficult to treat steel to a high hardness past a certain thickness while maintaining the other mechanical characteristics of the metal using the available thermomechanical techniques at the time, and thinner plates are typically much easier to process.
The use of the new steel allowed the designers to compensate for the increased overall weight of the vehicle compared to the BMP-1 while maintaining the same level of protection by decreasing the thickness of the sides of the hull by a few millimeters. The sides of the hull remained proofed against 7.62mm armour-piercing bullets and the frontal arc remained proofed against 23mm armour-piercing shells from 500 meters. Furthermore, the frontal arc of 120 degrees was also immune to 12.7mm armour-piercing bullets.
The research paper here (link) is important in understanding value of the BMP-2's armour protection, as there is little direct information on the armour of the BMP-2 from original Soviet sources. Reading this document in its entirety is recommended, but an understanding of V50 is needed to correctly interpret the results. The contents of this document pertains to the testing of ATI 500-MIL high strength steel plate of the ATI brand name using three different caliber of common machine gun ammunition: .308 cal M2 AP, .50 cal M2 AP, 14.5mm B-32 AP, and 14.5mm BS-41 AP (WC core). Range is a factor of velocity, and since the V50 figures in the document are velocity values and not ones for range, we must find out the range for ourselves with this range-velocity chart here (link). There are charts for .50 cal M2 AP and 14.5mm M-44 Ball (ballistically equivalent to B-32).
The front of the hull was split into two halves. The lower glacis is totally devoid of anything of inerest, but the upper glacis was dominated by the peculiar armoured aluminium engine access panel. This panel is made from armour-grade aluminium alloy, but as nobody ever mentioned what alloy it is, we can assume that it is most likely made from the same ABT-101 aluminium alloy used in the BMD-1 and BMD-2 airborne IFVs. ABT-101 has a hardness of 145 BHN, and it is much stronger than aluminium alloy 5083 used in armoured vehicles like the M113 and the M2 Bradley. But besides the strangeness of having aluminium in a predominantly steel hull, the most noteworthy feature pf the engine access panel is the seven ribs running across it laterally. If viewed head-on, they line up such that they form a seamless virtual "wall", as shown in the photo below.

These ribs are a crucial component of the protective qualities of the engine access panel. It achieves this with a combination of its own innately unique properties and the benefit of increasing the stiffness of the plate, which is accomplished without significantly increasing the mass of the plate. Original research on the usefulness of protruding ribs as a way to defeat ballistic threats was done parallel to Swedish efforts in the same vein during the mid-60's. The Russians applied the concept to the BMP in 1966, and the Swedes to the Stridsvagn 103.
At very high armour obliquity, the predominant factor in protection lies in the prevention of back surface failure. To capitalize on this, aluminium or titanium can be used, enabling a plate of greater thickness to be used as compared to steel.
The image below, taken from the NII Stali website, shows a simulator of the BMP-2 upper glacis plate after a test with a 23mm BZT round (API-T). The rib is destroyed at the point of impact, but the shell ricocheted after passing through the rib and it merely clipped the second rib on its edge.

The ribs on the BMP-2 (and BMP-1) measured 25mm in height, 12mm in thickness, and were spaced 200mm apart, but due to the steep angle of the slope of the BMP's engine access panel, the difference in spacing is nullified. One important detail is that the ribs are not exactly vertical, but perpendicular to the engine access panel, so they are sloped inwards at 12 degrees. These measurements and the photos below were provided by Chris Conners, proprietor of the excellent American Fighting Vehicle Database website (afvdb.50megs).


The shape and orientation of the ribs on the engine access panel can be seen in the image below.

The geometry of the access panel itself is surprisingly complex. It is thinnest immediately behind each rib, and gradually thickens as it approaches the next one. The thinnest part of the panel is 10mm and the thickest part is 15.5mm. The effectiveness of the panel against gunfire is unclear, but there can be no doubt that it is at least proofed against 7.62mm bullets of all varieties as well as 12.7mm armour-piercing bullets as well.
This phase diagram taken from "Armour: Materials, Theory, and Design" illustrates the importance of steep sloping to the engine access panel. In this case, a 6.35 mm aluminium alloy plate was used as a target and 6.35 mm-diameter steel-cored bullets as projectiles. A 6.35 mm projectile like this is representative of the steel armour-piercing core of the average 7.62mm rifle bullet. The AP core of a 7.62x54mm Russian B-32 bullet, for instance, has a diameter of 6.1 mm with a weight of 5.39 grams. It has a nominal muzzle velocity of 830 m/s. The AP core of a .30 caliber M2 AP bullet has a diameter of 6.2 mm and weighs 5.17 grams. It has a muzzle velocity of 855 m/s. The AP core of a 7.62x51mm M61 bullet has a diameter of 6.3 mm and weighs 3.8 grams. It has a muzzle velocity of 838 m/s.
Even with such a thin aluminium alloy plate, the armour piercing core simply ricochets without achieving perforation. Depending on the impact velocity, the end result may vary. At 700 m/s, the bullet will ricochet intact, but above that, it will fracture on impact and the fragments ricochet off the plate. As the aluminium plate used in the experiment is highly likely to be 5083 aluminium alloy, inferior to ABT-101 alloy.
The lower glacis is probably the stronger half of the front hull. It is a 15mm plate sloped at 56 degrees - thinner than same plate on the BMP-1 which was 19mm thick sloped at 57 degrees. The reduced thickness was compensated by the increased hardness and strength of the new BT-70Sh steel which raised the effective thickness of the 15mm plate on the BMP-2 to the same level as the BMP-1. In practical terms, this compares favourably to the 32mm plate sloped at 24 degrees that forms lower glacis of the Marder 1, A1 and A2 when attacked with small arms and some autocannons, including the ordnance from the Marder 1. For instance, German DM43 APCR ammunition of the 20x139mm caliber fired from the Marder 1's Rh202 autocannon is able to penetrate 32mm of RHA armour at 0 degrees at 1,000 meters, but its performance drops sharply down to just 8mm of penetration on armour sloped at 60 degrees at the same distance. For the better half of its life during the Cold War, this part of the BMP-2 was therefore frontally immune to 12.7mm machine gun bullets and to 20mm shells and anything in between from close range. The vastly more effective DM63 APDS was introduced sometime in the mid-80's, and that would have been able to defeat the frontal armour of the BMP-2 out to 1,000 meters and more.
Like the BMP-1, the side armour of the BMP-2 is good for a vehicle of its weight if the Marder 1 is used as a reference point. The armour on the sponsons and the firing ports is 13mm thick and vertically sloped at 15 degrees. The armour on the lower side of the hull is 15mm thick and flat. The flotation aids mounted on the sponsons as side skirts are filled with foam and are equivalent to 10mm of steel. The flotation aids protect the tracks and provide additional spaced armour for the hull, but they only cover a third of the area of the hull profile. The sides provide reliable protection from 7.62mm machinegun fire, and resist .50 caliber AP ammunition only from above 200 meters. The field manual FM 7-8 "Rifle Platoon And Squad" from 1980 notes that a .50 caliber machine gun will penetrate the side of a BMP from 200 meters or less.
Besides the physical thickness of armour, the passenger compartment of the vehicle has an extra 7 to 8 degrees of horizontal slope. Combined with the minor vertical sloping on the sponsons, this additional horizontal slope increases the protection for both the passengers and the internal fuel tanks from attacks in the frontal arc of the BMP.
This design quirk lends evidence to the intention of the designers to afford extra protection to the most sensitive assets of the vehicle. It would be extremely incorrect to say that the BMP-2 (and by extension its predecessor) was a "deathtrap" for being designed without consideration for combat survivability. The extra 8 degrees of horizontal slope will do absolutely nothing if the vehicle is struck by an RPG, or if it runs over a large IED, but it will be significant when the BMP is advancing towards a hail of heavy machine gun fire.

The thin strip of sloped armour (above) at the very top of the hull sponsons is no better nor worse than the rest of the side armour. The photo below, courtesy of Mr. Conners once again, gives us an idea of how thick it really is. Knowing that the sponsons are 16mm thick, we can compare that (the straight bit) to the bent flap of steel, which is bent directly from the sloped strip of the overtrack hull. Using pixel scaling, the thickness comes out at 7.13mm. Not very thick, but with its slope of 60 degrees, it is more than enough to deflect 7.62x51mm AP bullets from any distance.

TURRET

The thickest sections of armour are found at the center of the turret surrounding the gun mantlet. The physical armour thickness reaches its peak at the base of the turret underneath the gun mantlet as the drawing below shows.

The thickness of this part of the turret is unknown, but based on the thickness of the turret roof depicted in the drawing, it is much thicker than the turret cheeks. The turret cheeks form the front half of the circular turret and it has a thickness of 20mm. It is sloped 43 degrees at the front of the turret, declining to 36 degrees at the sides. Ignoring the horizontal slope component from the circular shape of the turret, the cheek armour has a line-of-sight (LOS) thickness of 27.3mm with only its vertical slope of 43 degrees. This is a close equivalent to the turret of the BMP-1, but the BMP-2 turret is slightly tougher as it is built from BT-70Sh steel with a higher hardness and higher yield strength than the 2P high hardness steel of the BMP-1.
Like the hull, the turret armour offers complete immunity from .50 caliber and 14.5mm armour-piercing bullets in its frontal arc and can resist 23mm BZT shells (API-T) from 500 meters.
The rear half of the turret is weaker, having a thickness of just 10mm and sloped at 28 to 20 degrees, with the smallest slope angle at the rearmost point of the turret. From the side, the turret has enough armour to resist 7.62mm armour-piercing bullets at point blank range.

Once opened, the turret hatches serve as armoured shields. As they are about as thick as the turret roof armour is, which is about 13.6mm, they are fully proof against anything less than a 12.7mm bullet. The shield gives the commander full body and arm protection once he is outside, making him a very tricky target for any potential snipers. If the commander would prefer not to have his head above the hatch so conspicuously, he can rotate the cupola a bit to the side to poke his field binoculars out so that everything except his eyes can be sheltered behind the shield-hatch.

The conflict in Ukraine has proven that artillery is still an incredibly important asset, even in an unconventional war. Apparently, the majority of armoured vehicle losses were due to artillery fire. Among the many victims was the BMP-2 below. As you can see, the roof armour was no match for a 122mm high explosive shell.

PERFORMANCE AGAINST MACHINE GUNS
If you haven't read the bullet penetration test document presented here (link). I have condensed the relevant information to a usable format:
Muzzle Velocity of M2 AP: 876 m/s
V50 of 7.7mm ATI 500-MIL plate at 30°: 627 m/s
V50 of 9.7mm ATI 500-MIL plate at 30°: 723 m/s
V50 of 3.1mm ATI 500-MIL plate at 30°: 787 m/s
This means that at 960 m, .50 cal AP will go through 7.7mm of 534 BHN steel angled at 30 degrees to the vertical. At 600 m, it will go through 9.7mm of the same steel angled at 30 degrees. At 400 meters, the bullet is defeated by 3.1mm of AT 500-MIL plate, indicating the possibility of a catastrophic failure of the steel core by shattering.
Here is the graph generated as part of the test conclusion and discussion.

Keeping in mind that the muzzle velocity of a .50 caliber AP bullet is 2910 ft/s, we can see that the only velocity at which the penetration of the bullet will exceed 13mm (0.51 inches) is just under 2,600 ft/s. Referring to our ballistic chart here (link), we can see that the velocity of 2,450 ft/s corresponds with the distance of around 400 meters. Therefore, the upper side hull armour of the BMP-2 can resist a .50 caliber AP bullet from 400 meters given that the hull is angled slightly by a few degrees. The lower side hull armour is 15mm thick but completely flat, so it is actually slightly weaker. Conversely, the middle of the hull where the flotation aid is present would be immune to .50 cal AP even from point blank range due to the high combined thickness of armour and the spacing of the flotation aid from the hull sponson.
The turret is vertically sloped at 28.5 to 35 degrees and has additional horizontal slope due to its rounded shape, so it is able to resist .50 caliber AP bullet from closer distances. However, the rear of the turret is only 10mm thick and is flatter, so it is only capable of resisting .30 caliber bullets.
14.5mm B-32 Steel Cored Armour Piercing bullets
Muzzle Velocity of 14.5 B-32: 988 m/s
V50 of 15.6mm of ATI 500-MIL plate at 30 deg: 730 m/s
V50 of 15.4mm of ATI 500-MIL plate at 30 deg: 739 m/s
V50 of 18.8mm of ATI 500-MIL plate at 30 deg: 841 m/s
This means that at 980 m, a 14.5mm B-32 bullet will go through 15.6mm of ATI 500-MIL plate angled at 30 degrees to the vertical. This is almost exactly double the performance of the .50 M2 round for a very small increase in caliber and small increase in overall dimensions. At 915 meters, the 14.5mm B-32 bullet will go through 15.4mm of the same steel at the same slope. At 525 m, the 14.5mm B-32 bullet will go through 18.8mm of the same steel at the same slope.
Here is the graph of thickness against V50:

As you can see, the side hull will be defeated from any distance within 600 meters.
14.5mm BS-41 Tungsten-Carbide (WC) Armour Piercing bullets
Muzzle Velocity of 14.5mm BS-41 bullet: 1005 m/s
V50 of 24.5mm of ATI 500-MIL plate at 30 deg: 869 m/s
The inherent suitability of a WC (Wolfram-Carbide, or Tungsten Carbide) core for anti-armour purposes is very apparent here. At 435 meters, the BS-41 bullet can perforate 24.5mm of ATI 500-MIL plate steel angled at 30 degrees.

Reading the graph tells us what we already know. The sides of the BMP-2 cannot defend from this type of bullet from a reasonable distance, but the frontal armour of the hull and turret will have no problems even at close range.
FUEL TANK DOORS
Contrary to popular belief, the infamous fuel-filled rear doors were far from being a hazard to the crew. To the contrary, there is evidence that much more thought was put into the design of these doors than commonly believed. The walls of the fuel tank are pressed from rolled sheets of medium hardness steel. According to Victor Malginov, the outer plate of the door is 13mm thick and the inner plate is around 5mm thick. The thickness of the outer plate is the same as the thickness of the rear hull armour, and the doors are slightly sloped at the same angle as the reset of the rear hull armour: 13.5 degrees. This is enough to stop ball ammunition from small arms at point blank range, grenade fragmentation from any distance, and splinters from small mortars. When taken together with the fuel and the inner ~5mm plate, it is clear that the ballistic protection offered by these doors is not worse than the side armour of the vehicle and may even be slightly better.
There is a prevailing myth that the fuel tanks could be set afire if the fuel tanks were hit by incendiary ammunition. The biggest issue with this is that incendiary ammunition simply was not common. Incendiary 7.62x51mm ammunition is rare, and so is incendiary 5.56mm ammunition, and in the latter case, it would not be able to defeat the outer 13mm plate of the fuel tank door in the first place. Even .50 caliber AP-I ammunition is rare compared to ball rounds and the standard APM2 armour piercing round. The standard .30 caliber APM2 armour piercing round also lacks an incendiary filler.

In the event of a penetration from an API bullet, the incendiary element will only ignite fuel just behind the exterior wall, because fuel needs to be oxidized in order to burn, and the only source of oxygen for the fuel that is exposed to the incendiary blast is the fuel just around the entry hole of the bullet, since fuel will leak out from that hole into open air. However, in such a case, the entire tank is completely safe from ignition. Burning fuel will simply leak out of the tank in harmless rivulets. If the interior wall of the fuel tank is perforated as well, the fuel will not be ignited due to a lack of heat, since the incendiary blast is on the other side of the fuel tank. This is because the incendiary element is located in front of the armour piercing core, and the external wall of the door-tank is more than enough to initiate ignition, and the incendiary blast will be partially outside the fuel tank, and partially inside, but due to the spaced effect and the presence of fuel, the blast will not be able to reach the interior side of the fuel tank.
So we know that if fuel is to be ignited, it will only be ignited outside the fuel tank. But what of the steel penetrator core that's still flying straight through the fuel tank? Fluids, including diesel fuel, are more than capable of slowing down or even outright defeating ballistic projectiles given sufficient volumes of it. How much is needed to stop specific bullets is not known, but with two thick armoured walls on either side, it's not hard to imagine that the rear doors could probably resist 7.62x51mm AP rounds without much effort. Large caliber artillery splinters would find themselves quickly stopped due to their irregular shape, but not before punching large holes into the outer walls. The parts of the rear doors cut out for firing ports do not hold fuel, but are compensated with an additional layer of armour welded on top of the door as shown below:

These add-on plates reportedly have a thickness of 6-8mm. As such, the total thickness of steel at this zone would be between 24-26mm, and the protection value is increased by the curvature of the pressed steel door.
Given these facts, it's easy to see how the designers approached the task of increasing protection without increasing weight, as that was critical to the vehicle's amphibious qualities. The outer plate is thick enough to prevent punctures from most threats and the rear doors as a complete unit can resist most shell splinters from large caliber artillery and most small arms fire. The only credible threat within the context of the role of the BMP-2 would be heavy machine guns firing armour piercing ammunition, but in reality, the chances of a BMP-2 exposing its rear end to a heavy machine gun emplacement or a vehicle armed with one is exceedingly low that it may as well be a non-issue.
But for all that, the crew's initiative still plays the most important role. It is important to remember that both rear doors only hold a combined total of 122 liters of fuel out of a net total of 460 liters. In other words, the crew could easily make do without having them filled when in combat. It was never an issue in the first place, since Soviet vehicles have always carried more fuel than most, and even without the contents of the rear doors, the BMP-2 would still carry nearly the same amount as the M113. The rear doors may be filled with water, or soil, or sand to totally nullify the chance of fire and further boost its resilience. The website "Box O' Truth" did their own tests on the effectiveness of sand as a bullet stopping obstacle in their article "The Sands of Truth", which can be found here (link). As it turns out, 7.62x51mm ball ammo won't go through 5 1/2 inches of sand (139.7mm) of sand, nor will 5.56mm SS109 rounds. But what are the dimensions of the rear doors?
Well, they measure about 275mm wide at the widest at the top, tapering down to 172mm wide at the thinnest at the bottom. This site (link) states that a single .50 cal M2 AP round fired from the barrel of an M2 machine gun is capable of penetrating:
Sand
355.6mm at 200m
304.8mm at 600m
152.4mm at 1500m
Taking 275 to 172 milimeters of sand together with the ~5mm and 13mm steel walls of the rear doors, it appears that the doors have a reasonable chance of shrugging off .50 cal AP bullets at short range. If not, then the occupants are at least fully shielded from 7.62x51mm AP bullets, though they probably wouldn't need the sand for that. Even if the fuel doors were empty, they would still be as good as what some other IFVs have for armour. Take the CV90 as an example:

In conclusion, there is more than enough evidence indicating that the armour on the BMP-2 was far from "paper thin". While it is true that its contemporary the M2 Bradley had greatly superior side armour with its double spaced armour configuration over its one inch thick 5083 aluminium hull, some context is needed before direct comparisons can be drawn. The M2 Bradley had to contend with powerful Soviet 14.5mm machine guns which could be found on the majority of BTR-60 and BTR-70 armoured personnel carriers as well as BRDM armoured cars, whereas the BMP-2 only had to face off against .50 caliber machine guns. Hunnicutt says that the Bradley's side armour is resistant to 14.5mm AP rounds from 200 meters, and it has been shown that the BMP-2's side armour is theoretically resistant to .50 cal AP rounds from around 400 meters. In practical terms, the fact that the side armour of the BMP-2 is nominally weaker is a minor detail. When seen in the appropriate context, the BMP-2 was not worse than its contemporaries in armour protection.
BMP-2D APPLIQUE ARMOUR
Immediately as the Afghan campaign began in earnest during the turn of the decade, chinks in the BMP-2's armour began to show. Although the vanilla BMP-2 was more than good enough when faced with Kalashnikov fire, it was almost immediately apparent that heavy machine gun fire from Mujahideen ambushes (usually from a DShK) could easily perforate the 16 - 18mm side armour at very close distances. To counter this development, the BMP-2D, also known as the "Afghan BMP" variant was created. It introduced an array of armoured spaced plates mounted over the upper sides of the hull and a steel side skirt draping down from the overtrack sponsons to protect the bottom half of the hull. The top strip on the upper side was also reinforced with an extra sheet of 6mm steel welded on top of it. Contrary to some claims, the front hull armour was not reinforced, only the belly.


The decision to only add protection to the sides and rear of the vehicle and not the front was informed by actual data gathered during the conflict. Ignoring the fact that the front of the vehicle was immune to 12.7mm machine gun fire, real combat damage reports showed that the front was almost never targeted by enemy forces throughout the duration of the war. According to the study "Исследование Боевых Повреждндений Образцов Отечественной БТТ" (Study of Combat Damages To Samples of Domestic BTT), the distribution of hits sustained by BMPs from armour-piercing bullets was 33% to the sides of the hull, 50% to the rear of the hull and 17% to the roof of the hull. The turret did not receive any damage or received a statistically negligible proportion of damage. Thus, additional spaced armour plating was allocated to the side and rear projections of the BMP-2D.
The steel side skirts are 6mm thick, and so are the steel panels on the hull sponsons that were mounted about two inches away from the base armour. The protective mechanism was twofold - it forced the incendiary element of an API bullet to deflagrate early and expend itself in the spaced gap, and it also chips off part of the penetrator core and creates fractures so that when it impacts the high hardness steel armour plate of the hull, the bullet shatters completely. If the bullet impacts at a higher obliquity, the armour piercing core can be shattered completely, thus completely neutralizing it as a threat.

Those two factors, in addition to the thickness of the panels themselves, entirely neutered the threat of 12.7mm and 14.5mm shots across the side of the hull even from close range. Extensive research on the effects of spaced armour with hard but thin sheets on high caliber armour piercing bullets has shown that even sheets as thin as 4.4mm are capable of shattering 12.7mm B-32 steel cored API bullets at shallow angles beginning from 20°, and that the same can be done with 5mm sheets on 14.5mm B-32 steel cored API bullets, or even tungsten carbide-cored BS-41 bullets. Indeed, that was precisely what the famous "bazooka plate" spaced armour on Pz. IV tanks was actually meant for, and not for defence from bazookas. The original double-spaced side hull armour configuration on the M2 Bradley was implemented for the same reason: protection from 14.5mm machine guns at distances as close as 200 meters, although the Bradley's side armour required two layers of spaced steel plates because bullets do not shatter easily on the soft and thin aluminium hull.
In addition to ballistic protection, the new side hull armour contributed to the vehicle's increased survivability from roadside IEDs, which were often composed of a cluster of partially buried artillery shells rigged to explode all at once. The extra steel side skirts would be extremely useful for defeating such shrapnel as artillery shell splinters lack an efficient ballistic shape and would break apart much more readily on non-homogeneous armour than the core of an armour-piercing bullet.
The floor of the hull is 8mm thick in all incarnations of the BMP-1 and BMP-2. It is stamped with reinforcing ribs for added stiffness, both for structural reasons as well as to reduce deflection from the influence of an explosive blast. A small 1.5 kg track-breaking mine exploding under the track would easily rend the track and blow off a roadwheel, but it would not pierce the belly. Heavier anti-tank mines were a much more serious challenge to overcome.
SMOKESCREEN
The BMP-2 can either lay its own smokescreen by injecting a fine mist of diesel fuel into the exhaust manifold outlet, or make use of its smoke grenade launchers. The former option is an an ingenious, inexpensive, extremely useful and near-inexhaustible source of anti-IR smoke cover - a little-known fact is that since the smoke generated from this method will be the same temperature as the exhaust, it is hot enough to mask the vehicle's thermal signature. The only shortcoming of this system is the time taken to envelop the vehicle, but it is often used in platoon formations, so that a single tank or BMP can produce enough smoke to cover the entire platoon and its surroundings. A large number of battlefield maneuvers revolve around the use of this method of smoke generation for concealment. However, the exhaust manifold outlet will eventually cool when enough heat is absorbed by the diesel fuel, so there is a limit to how long the driver is allowed to use this feature. One potential hazard is that residual fuel particles in the exhaust manifold may catch fire when it gets heated up again after cooling.

But aside from this, the BMP-2 was equipped with the 902V Tucha smoke grenade system.
NBC PROTECTION
The BMP-2 features a collective NBC protection suite, collective meaning that the interior of the vehicle is fully sealed from the outside environment, so that the crew and passengers do not need to don hazard suits. Beginning in 1984, the BMP-2 received a lining and cladding of anti-radiation pads. The BMP-2 obr. 1986 had the cladding fitted since the beginning of its production.
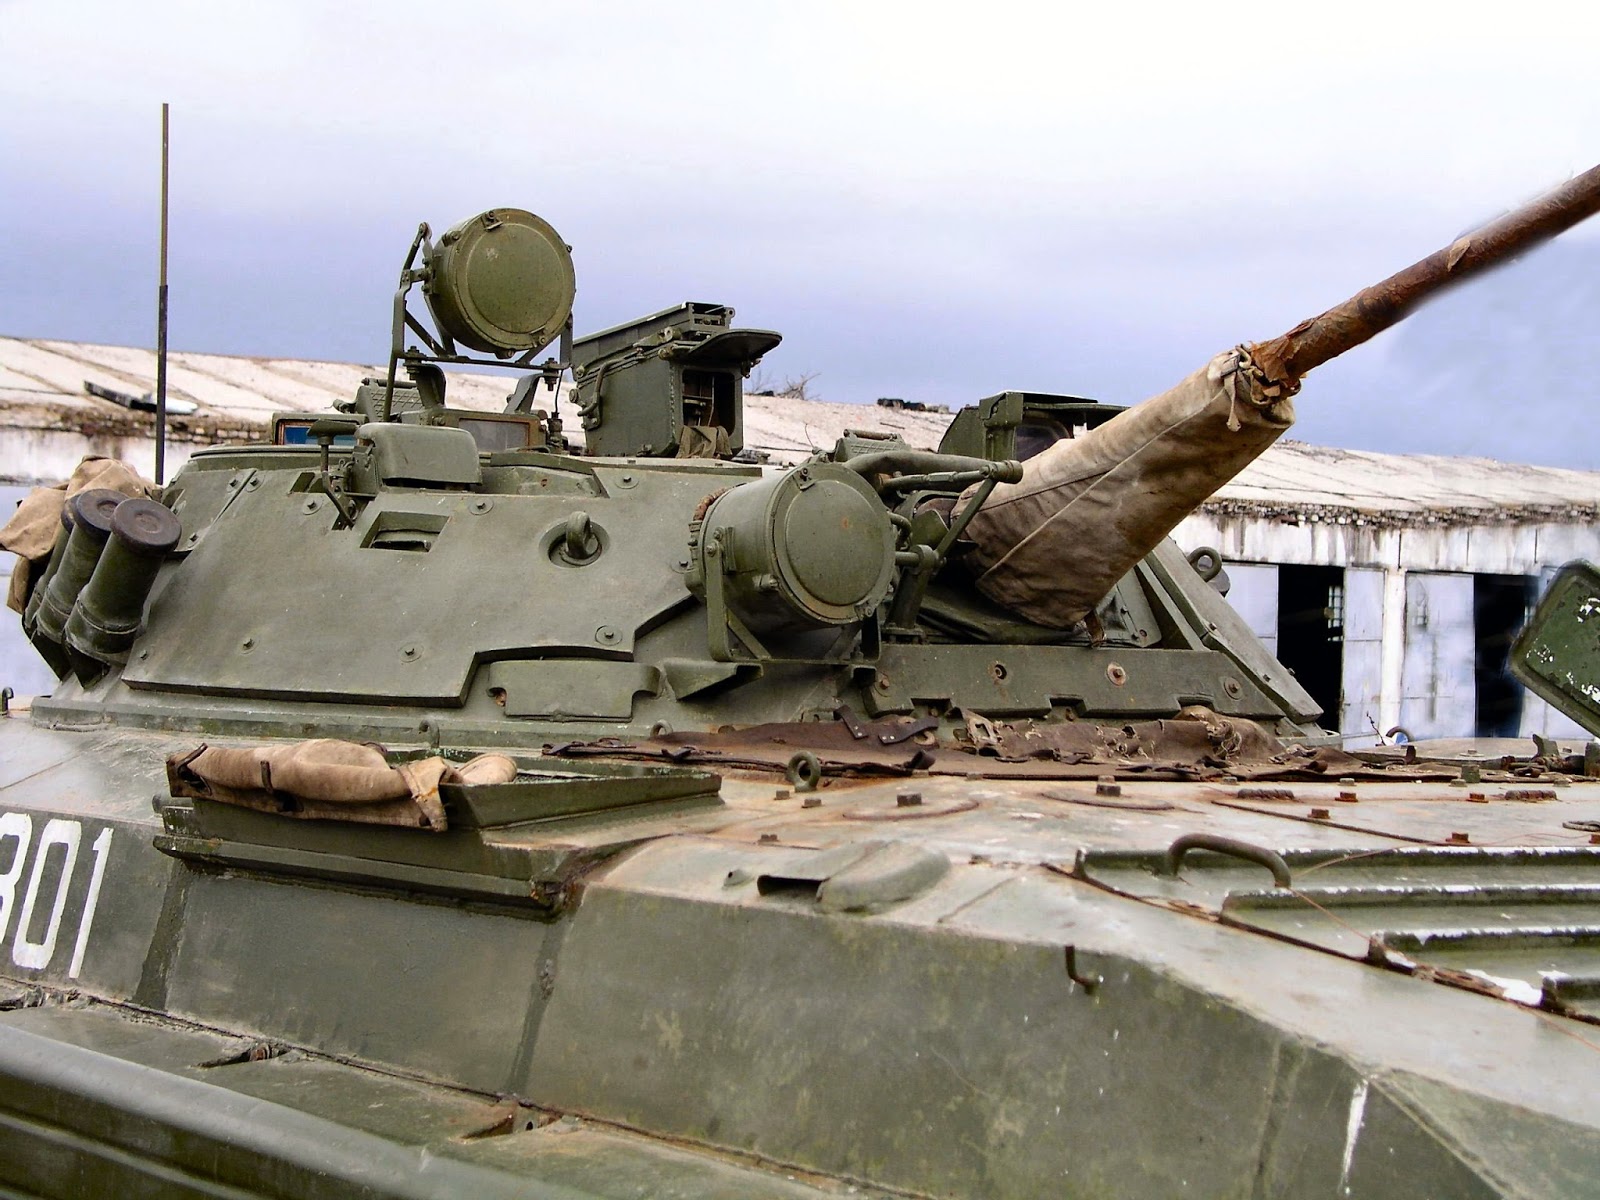
The turret cladding is called "Nadboi". It is about an inch thick, and most likely made of laminated borated polyethylene fiber sheets. If you look closely at frayed edges (photo below), you can see that it is distinctly fiber-like.
The walls of the turret are entirely covered with it, and so is the roof. "Podboi" is designed to absorb neutrons from a nuclear explosion.
The interior walls of all of the occupied compartments of the vehicle is lined with an anti-radiation lining. It is effective at capturing neutrons, but more importantly, it has the secondary purpose of providing some much needed insulation. This is especially important if the vehicle is coated in burning napalm, seeing as the steel for the roof is only a little more than half an inch thick.

Swedish tests on purchased ex-East German T-72s found that its lining of borated polyethylene was extremely effective at capturing spall, so it should be no different for the BMP-2, although the lining in the BMP-2 is much thinner. The external cladding should also give some small bonuses towards the overall effectiveness of the turret armour. The anti-radiation lining is notably absent from the the rear fuel doors, but this is not a problem. Water is surprisingly effective at absorbing radiation. Presumably diesel fuel is, too.
The protruding bow of the hull is crammed chock full of equipment, including a GO-27 gamma radiation detector. You can see it mounted to the starboard side hull in the photo below, to the left of the steering column.

The GO-27 sensor and automatic sealing system is responsible for detecting nuclear and chemical particles and for initiating the lockdown protocol. Every gap and port exposing the interior of the tank to the outside environment will be sealed, and the ventilation system will be put into supercharge mode.
FIREFIGHTING
The automatic fire extinguishing system is only installed in the engine compartment. It operates on four TD-1 thermal sensors placed strategically around the engine to ensure a higher chance of prompt detection. On paper, at least. There are two five-liter fire extinguishers containing halocarbon agent 114B connected to the automatic fire extinguishing system. The fire extinguishers and a single TD-1 thermal sensor can be seen in the photo below (TD-1 is on the left side of the frame, above the green tube)

In addition to that, there is a single handheld OU-5 five liter carbon dioxide fire extinguisher placed in the passenger compartment. Not very effective, to be honest. If the vehicle was hit and the interior was on fire, the first thing to do would be to bail out and run, because any fire would probably escalate into a blaze, because of the centerline fuel tank. Although the BMP-2 is just as well armoured as any other IFV, it is distinctly worse off if the armour were penetrated.
PASSENGERS

The BMP-2 is the communal steed for the nine men (including the crew) that comprise a typical Soviet motor rifle squad. On paper, the BMP-2 is designed to fit a maximum of ten people, but when employed as per doctrine, there will be one seat left empty. For dismounts, six men would be seated in the passenger compartment behind the turret, and the seventh - the squad leader - sits in the turret as the commander of the vehicle. The seat behind the driver is left empty unless a ten-man squad is deployed. The BMP occupied by the Platoon Leader is the so-called "Platoon Headquarters". This vehicle carries only two passengers, the Platoon Leader and the Assistant Platoon Leader.
The eighth man in a ten-man squad may be a MANPADS gunner attached to the vehicle from company assets, or some other specialist. One rifleman in one of the squads of the platoon may be a designated marksman, and issued an SVD instead of an AK-74. If a ten-man squad is deployed, it is possible to run the BMP-2 with a full three-man crew and have seven dismounts.
The composition of a typical dismount squad is as follows:
1 x Squad leader, BMP-2 Commander (Sergeant) (AK-74)
1 x Grenadier (Private) (RPG-7, PM)
1 x Assistant Grenadier (Private) (AK-74)
1 x Machinegunner (Private) (RPK-74 or PKM)
1 x Senior Rifleman (Corporal) (AK-74 with grenade launcher)
1 x Rifleman/Designated Marksman (Private) (AK-74/SVD
1 x Rifleman/Medic (Private) (AK-74)
The maximum number of troops carried per vehicle is less than the eight passengers carried by the BMP-1 (shown below) by one, but this is not too bad as both the BMP-1 and BMP-2 carry a squad of the same size. The missing seat will result in a BMP-2 platoon carrying fewer specialist personnel like medics. However, this can be remedied by removing one of the riflemen and replacing him with a specialist. Overall, the fighting efficiency of a BMP-2-based Soviet motor rifle platoon increased substantially over one based on the BMP-1, mostly thanks to the higher power of the 2A42 cannon.
The firepower of a Soviet motor rifle platoon is quite similar to a U.S Army mechanized infantry platoon in most regards. The M2 Bradley could seat nine men; six of them being dismounts. As the commander of a Bradley Fighting Vehicle (BFV) does not dismount, a BFV platoon would be numerically inferior to a BMP platoon, but the IFV would be more potent due to having a full crew. However, this can be countered by deploying a ten-man BMP squad. If ten-man squads are deployed in the BMP platoon, the disparity would be even larger, and the BMP platoon would gain additional capabilities due to having a full crew.

A BFV squad should be slightly superior in issuing lead, since they have a belt-fed squad automatic weapon (M249) rather than a magazine-fed one (RPK), but this is offset by the extra rifleman in a BMP squad. With regards to anti-armour and anti-air firepower, a BMP platoon is significantly superior. As you may recall, there is a 9P135M missile launcher mounted at the back of the turret basket of the BMP-2. This 9P135M launcher can be used alongside the missile launcher on the BMP-2 and the RPG-7 carried by the grenadier to seriously increase the anti-armour and anti-bunker capabilities of the squad. In addition to that, the BMP-2 has a means of defence against air attack, as there is an extra seat that may be occupied by a dedicated MANPADS operator. Otherwise, the seat can be used to store extra supplies. The introduction of the M2A1 Bradley equalized the difference in manpower, as it carried seven dismounts as opposed to six, but the BMP squad's advantages in anti-armour and anti-air firepower remain. It was not until much later that the BFV platoon gained a decisive advantage with the introduction of the Javelin and the wide proliferation of the M240B.
The height of the hull is 1,210mm, the width of the hull (not including the sponsons) is 2,250mm and the bench on which three people are supposed to sit on is only around 1,400mm long. After subtracting the thickness of the roof and belly armour, the internal height of the hull at the passenger compartment is 1,197mm. The height of the hull would be considered good in a tank but only because the seats are typically mounted close to the floor and the occupants are provided with a certain amount of legroom. In the case of the BMP-2 (and BMP-1), the low height of the hull forced the seats to be mounted close to the floor but the hull is too narrow to permit the passengers to stretch their legs.

With bulky body armour, personal firearms, hundreds of rounds of ammo or even winter clothing, a ride in the BMP-2 can be very oppressive indeed. For a short trip of half an hour or so, a seasoned soldier should have very little to complain about as it is certainly much better than walking, and on long marches in unattractive weather, it may even be luxurious, but the total lack of stretching room and the shoulder-to-shoulder arrangement becomes incredibly uncomfortable as time drags on. However, according to military historian Kenneth Estes, the BMP-1 actually met all U.S Army ergonomics requirements after evaluations were conducted on captured examples. It could be surmised that the designers sought to provide an acceptable level of comfort without compromising the mass and silhouette of the vehicle and succeeded.
The benches are well padded with thick cushions. The benches are mounted to the floor with a clearance of only about 20 cm, so passengers have to draw their knees up almost to chest level when seated, which is rather disconcerting, truth be told.
The real estate underneath the port side half-bench is perfectly sized for two "spam cans" of 5.45x39mm or 7.62x39mm ammo, or a crate of hand grenades, or a crate of 40mm grenades. The other half of the bench is a fuel tank with a cushion on it, so nothing can be stowed under it. The starboard side half-bench has the fuel pump underneath it, so no luck there.
The back of the seats nearest to the door are shelves. Stored inside is a fuse box, and some relay boxes. The bottom shelf is usually empty. "Spam cans" of ammunition can be stowed here. The photo below shows such a shelf in a BMP-1.
The squad leader is seated behind the driver, where the commander in a BMP-1 would be seated. The squad leader's seat is accessible through the rectangular hatch above it. The squad leader has the "privilege" of being provided with two periscopes. One aimed forward, and one aimed to the forward-left. The (low quality photo) view from the forward periscope is pictured below.

There is nothing else of interest in his station. It's worth noting, however, that being forced to use the hatch the exit the vehicle and not doors like the rest of the passengers makes the squad leader's station a poor place to be, as you'd not only take longer to dismount, you'd be exposed to all and sundry while you are on the hull roof, and you'd have to jump down from quite a height. It's also a lot harder to get out if you are wearing body armour or winter clothing. All this has made the squad leader's seat a rather unpopular one, so unsurprisingly, some BMP-2 operators have opted to cut the squad down to six men and omit the seventh passenger. Instead, his spot is used by the crew to stow their personal effects, plus extra ammunition and first aid kits and anything else that might be needed.
The passengers get one fixed TNPO-170A periscope each, aimed to the side and slightly forwards. The visibility from these periscopes is adequate for providing the passengers with a sense of their surroundings and can help them find targets to fire at from their firing ports.

Both of the rear doors have a single TNPO-170A periscope in them as well. (photo below is of Czech OT-90, but is identical)

The ventilation system of the BMP-2 is composed of four small air inlets located on the edges of the hull roof. Filtration of chemical and biological particles is accomplished by fabric-type filters inside. These ventilators are also responsible for generating an overpressure inside the vehicle when entering NBC-contaminated areas.
This ventilation system also has a heating system and directed air outlets for every passenger (Green) in front of the fume evacuation inlets (Red). The pipes for these systems can be seen here:
 |
| This is the interior of a BMP-2 "Berezhok". It lacks firing ports, so the fume evacuator hose for the passenger's weapon is missing |
As you can see, the air outlets are placed just next to a periscopes. This is approximately eye level, so each passenger gets a weak stream of cool air blown in his face. Heat for the heating system is not generated electrically, but by the circulation of water around the engine. It would get hotter when the vehicle is in motion, and less so when idling.
There is a narrow corridor between the driver's station and the passenger compartment. A similar corridor exists in the BMP-1, but that one is larger due to the smaller turret. Although it is incredibly narrow, it is still possible to pass through this corridor in the BMP-2. The corridor is useful when doing work in the vehicle, as it allows tools and parts to be transferred from the cramped driver's station to the passenger compartment, but otherwise, it is not to be used in normal operations. During combat, it should only be used in case of an emergency where exiting via the driver's hatch or the squad leader's hatch is not possible.

A similar corridor is present in the M2 Bradley.

A simple perimeter shield separates the turret from the passenger compartment, lest any accidents happen to the person sitting closest to the turret.
For the passengers in the passenger compartment, there are two entry and exit paths to choose from: the roof hatches, or the rear doors. The former option admits only one person at a time, and jumping down from almost six feet up isn't the most appealing idea when the vehicle is in motion, and even if the vehicle was static, the roof hatches are mostly used only under unusual circumsmtances, like if the vehicle is sinking in water. They are far more suitable for other things like getting fresh air, shooting at airplanes, and so on. The roof hatches are spring-loaded with torsion bar springs and locked in place with a simple lever. When a passenger turns the locking lever, the hatch springs open and it can be locked in the open position by pushing it further until it is held under spring tension. The less interesting option for dismounting the BMP-2 is, of course, the rear doors.

The infantry was perceived to be most effective if they disembarked at a range where they could use their weapons most effectively. Soviet strategists estimated the ideal disembarking distance to be between 200 and 400 meters. Stopping the vehicle to allow the infantry dismount at such a close distance to the enemy was simply not an option. The only way to stay alive in the absence of adequate cover was to keep moving, and keep shooting, so the infantry must disembark while the vehicle is doing this at a reduced speed. The current accepted convention of a ramp with a single door would not suffice, as the door would be suitable on the move, but would be (and it usually is, even in modern vehicles) too small too allow for the rapid exit of all of the passengers at a reasonable pace, and the wide ramp cannot be deployed on the move. The most optimal configuration for the expected role of the BMP as it was envisioned was a pair of wide doors.
In the entry on the Pbv 302 armoured personnel carrier in the official website of the Swedish Arsenalen museum and in the Pbv 302 article on the Ointres website by Rickard Lindstrom, it is stated that Swedish trials found that the passengers could dismount faster with two rear doors instead of a powered ramp like on the M113. Initially, an early prototype of the Pbv 302 had been fitted with a powered ramp inspired by the M113, but they were abandoned shortly afterward. The serial Pbv 302 had two rear doors, like the Soviet BMP and MT-LB.


 Driving the BMP-2 was much easier than driving Soviet tanks of the era. This is because of the motorcycle bar-style steering wheel, which is reportedly extremely responsive thanks to a very good power steering system, making it is very easy to control the BMP-2 over rough terrain.
As befitting the high speed of the BMP-2, the driver was given four TNPO-170 periscopes in order to safely control the vehicle. Three of the periscopes cover a 120 degree frontal arc and another is aimed to the left. This gives the driver a sufficiently large field of view to maneuver the vehicle confidently in densely forested areas. The one downside of the vehicle's design is that the sloped upper glacis is at such an angle for the sake of protection and hydrodynamic stability that it also creates a rather large blind spot directly in front of the vehicle for the driver. The center periscope can be removed from inside the vehicle and replaced with an nightvision periscope. The TNPO-170 periscopes offer a rather small field of vertical vision compared to what the driver of, say, an M2 Bradley gets, but the width of the periscopes is sufficient.
Oddly enough, they didn't seem to think that wipers or screen blowers were necessary. The geometry of the front slope has some positive influence on the amount of dirt and grime that ends up on the periscopes while driving, but some former BMP-2 drivers have complained of the inconvenience of not being able to wipe it off when buttoned up.


The driver can replace his TNPO-170A periscope with a TVNE-1PA infrared periscope for night driving. Used in tandem with the small infrared headlamp, the driver can see as far as 60 meters using this periscope. Not far enough to drive at 60 km/h, perhaps, but far enough that he has enough time to avoid obstacles while driving at around a crawl. The field of view from the periscope is very narrow, and the dependence on infrared light for illumination is a major weakness.

The TNP-350B periscope is used while swimming. It is 350mm tall which is tall enough to look above the trim vane when it is extended for swimming. The field of view from the TNP-350B is very limited due to the height of the periscope, so the driver cannot navigate by himself when negotiating larger bodies of water. The commander must help from his vantage point in the turret. However, the TNPO-170A periscope to the driver's left can still be used when swimming so the driver is not entirely confined to the single TNP-350B in front of him.
In terms of comfort, the driver's station is satisfactory. His station is widest at the top and narrowest at the feet because of the left hull sponson.

The driver is also supplied with a GPK-59 gyrocompass to help him navigate at night.


Some accusations have been leveled at the BMP-2 concerning its armament, its armour, and its (lack of) amenities, but its mobility has never been in question, and for very good reason.

Contrary to what some sites may claim, the BMP-2 mounts the very same UTD-20 diesel engine that powered the BMP-1, not a more powerful one. The UTD-20 or UTD-20S1 produces 300 hp at 2,600 rpm, with a maximum torque output of 981 N.m at 1,500 rpm to 1,600 rpm which is very good for the weight of the vehicle. The high torque output grants the BMP-2 excellent acceleration characteristics on challenging terrain and together with the relatively narrow tracks, allows the vehicle to steer with ease. The engine alone weighs 665 kg dry. It has a specific fuel consumption rate of around 175 g/hp.h to 178 g/hp.h. The dynamic characteristics of the UTD-20 are shown in the chart below, taken from a BMP-1 manual. The top left of the chart shows the gross power output in horsepower, the middle right of the chart shows the gross torque output in kg.f, and the bottom right of the chart shows the specific fuel consumption rate.
There are two ways to start the engine. The standard method is, of course, the electric ignition switch, but that tends to be useless in extremely cold weather. To start the engine in such conditions, the BMP-2 gets the traditional compressed air tanks commonly found on tanks since the T-34. These air tanks blast air into the combustion chambers to get the pistons working and burning diesel once more.
The engine air intake is shared with the ventilation air intake, with the common intake being located behind the turret. The air cleaner itself is in the engine compartment, below the ejector cooling system duct. The intake housing can be raised when swimming, to ensure that water does not enter the air intake ducts. Coarse and fine air filtration is accomplished by a single-stage multi-cyclone air cleaner, which ensures that the engine receives air with a purity of 99.5%. The dust collected by the multi-cyclone filters is collected in a pan, where it is blown into the exhaust stream of the engine exhaust due to the negative pressure.


The picture below shows the transmission. There is power steering. Braking is hydraulic. The transmission and the engine are built together as a single powerpack unit, thus simplifying replacements in the field.

Much has been said about the excellent speed and agility of the BMP-2, and every private owner of one would agree, but according to enlisted crewmen, there are some points about it that make the situation a little bit greyer. The main issue is that the suspension is not exactly top-notch. Due to the increased weight from the new turret, it was deemed necessary to reinforce the torsion bars for the frontmost pair of roadwheels as well as the rearmost pair, as these would experience the majority of the strain when driving into dips and dives. However, it is still too light, and the stinginess with the shock absorbers mean that the vehicle tends to oscillate more than expected from this type of vehicle. Later production model BMP-2s received an extra shock absorber on the second roadwheel, but most of them only had two; one on the last roadwheel and another on the first. The transmission isn't world class either. It's good enough, but the vehicle tends to lurch when starting off and the clutch is not very responsive. An experienced driver may find these to be very minor problems, but coupled with the substandard suspension and the common practice of slowing down to a crawl to engage targets before speeding off again, the BMP-2 is highly unsuitable for anyone prone to seasickness.

However, it's definitely not all bad news. The torque output and low speed characteristics are marvellous, so the BMP-2 has superb passability over rough terrain at average cross country speeds of 20 km/h to 35 km/h. According to private owners, the BMP-2 is also extremely agile. Its obstacle crossing capabilities are quite standard. It can climb a vertical slope of 35 degrees, traverse a side slope of 20 degrees, and climb a vertical wall 0.7 m in height, but not more, due to the overhang of the nose of the hull. The BMP-2 can cross a trench 2 .5m in width by driving over it at low speed, but it can cross much wider tranches by literally jumping over them, which isn't very difficult for it to do.
Still, keep in mind that nothing is infallible. The BMP-2 can still get stuck, just like any other vehicle, though it is definitely not anywhere close to being overweight. Its thin tracks might be a liability for some other platform, but thanks to the compressed design of the BMP-2, it only exerts a ground pressure of 0.65 kg/sq.cm when combat loaded. The Marder 1, with its much wider tracks, still cannot escape the fact that it is about 2 times heavier than the BMP-2. The Marder 1 exerts 0.83 kg/sq.cm of ground pressure.

The tracks, torsion bars and drive sprockets were not carried over from the BMP-1, despite being almost indistinguishable from one other aesthetically. Besides the frontmost and rearmost torsion bars being reinforced, the tracks are of a different type. Unlike the old type, the BMP-2's tracks can accept rubber track pads for driving on asphalt, and they have contact needles for better grounding of the radio, thus apparently reducing radio interference. Not too sure how this works, though. The roadwheels were also replaced with sturdier ones that could better handle the stress from the greater weight of the BMP-2. It should also be mentioned that the this combination of three upgrades gave the vehicle an extra 50mm of ground clearance over the BMP-1, so that the BMP-2 has a ground clearance of 420mm. This means that the vehicle can be driven with more authority over rocky or lumpy terrain, as there is less chance of the hull floor scraping against the ground.
If the BMP is stuck fast in some soft sand or in sticky mud, which is rare, it is possible for it to extricate itself with the use of the famous log. The video below demonstrates how it is done. You can see for yourself how invaluable the log can be.
More than 90% of all maintenance can be done by simply lifting the engine access panel on the upper glacis. Its lightweight aluminium construction and hinged mounting makes it into sort of an oversized bonnet. Two men could hinge it open easily. The photo below shows NVA personnel having a look under the hood of their BMP-1s.

The radiator is slightly less convenient to access. The access hatches are bolted and hinged like the engine access panel, but the size of the hatches are somewhat smaller. The entire radiator deck will have to be unbolted and lifted with a small crane in orer to replace a broken radiator.

Most would opt to lift the engine access panel to do regular scheduled maintenance, but doing that is not the only way of getting to the engine. Inspections and oil top-ups may be done without leaving the vehicle by opening the insulated bulkheads separating the engine compartment from the inhabited compartments. The small one-man turret of the BMP-1 made accessing the rear engine bulkhead hatch from the passenger compartment relatively easy, but the wider turret and the missile stowage racks made this impossible, but this is no big loss. You could still get to it just as easily from the commander's station, where it would be right in front of you, as you can see below. This hatch allows you to see the rear part of the engine, the radiator pack, and the air compressor used to fill up the compressed air tanks used for starting the engine.

The hatches on the driver's station fireproofed bulkhead allows him to inspect the engine itself. An experienced driver-mechanic can diagnose and troubleshoot a faulty powertrain directly from his station. An opened bulkhead hatch can be seen in the "Driver's Station" section.
Electricity in the vehicle is supplied by two 6STEN-140M or 6ST-140R accumulator batteries connected in series, with a combined capacity of 140 Ah. Each battery weighs 62kg.
The BMP-2 is considered an extremely dependable vehicle, despite early concerns with the BMP-1 of over complexity due to the steering system. Private owners of de-militarized BMPs have spoken of their satisfaction on hobby forums, and the BMP-2 has a very good reputation in military service.
The BMP-2 has five fuel tanks; three internal tanks and two rather infamous exterior ones - the rear doors, which we have already talked about quite a bit. The port side rear door holds 55 liters and the starboard side door holds 67 liters (the port side door has less as it has a firing port embedded in it). The main tank in the passenger compartment - which forms half of the partition splitting the passenger compartment into halves - holds 225 liters.
The D-100 fuel pump is located underneath the seat of the starboard side bench closest to the door. It is a reasonably sized pump, running on 150W. The vehicle in the photo below is a Czech OT-90, but the pump is the same model and in the same location. The fuel pump has yellow tubes running out of it.

Because the bench was shortened to seat only three passengers as opposed to four as in the BMP-1, it became necessary to add an additional two fuel tanks to compensate for the reduced main tank capacity. In some hilariously misguided attempt to store as much fuel as possible in the passenger compartment, these two tanks are made to be half of the bench on either side of the passenger space, meaning that one passenger on either bench will be seated on a fuel tank. The port side tank can be seen below:

The port side tank holds 55 liters and the starboard side tank holds 58 liters.
With all fuel tanks filled, the BMP-2 has a maximum cruising range of 600 km on paved roads. That means that if the highways were clear, you could drive from Berlin to Cologne on a single tank! But no one really expects that to happen. Indeed, armoured vehicles on the frontline don't really get to drive around much once they reach contested territory, so why carry around so much fuel? Well, a generous cargo of fuel means that a BMP-2 could fight for two to three days in a continuous, unstoppable offensive push on a single fill of fuel, giving it a great deal of independence and autonomy in the field. It becomes possible to conduct a deep penetration offensive or counterattack with minimal supporting assets like fuel trucks and bridgelayers, though obviously these assets are still very necessary, but among all the other little details and idiosyncrasies of its construction, this one is perhaps the best proof that BMP-2 was designed with just that one, single objective in mind - continental domination. One of the other details designed with the same intent in mind, as many should already know, is its amphibious capabilities.
The BMP-2 is almost as adept in the water as it is on land. In fact, several compromises had to be made to the structure of the hull for the sole purpose of improving its performance in the water, including the slight tapering of the passenger compartment (see here), which reduced the amount of stowage space for the person sitting closest to the rear doors, but also reduced drag. The short and stubby bow of the original BMP from 1966 gave the driver a good view of what was in front of the vehicle when driving, but the bow was too short to properly enter rivers from a steep bank, as the bow would tip too deeply into the water, so the bow was lengthened. This created a large blindspot in front of the BMP, but made it possible to enter bodies of water from any angle. Suffice to say, they took this requirement quite seriously.

Propulsion in water is produced by the flowing of water around the tracks being channeled rearwards with the use of a special aluminium alloy hydrodynamic grille which is placed where the rear fenders usually are. The rearwards stream of water produces forwards thrust. The faster the tracks move, the more the water that flows through the hydrodynamic grilles. This system is the same as in the M113 in principle - movement of the tracks in water - only better optimized thanks to the addition of the grilles and the more hydrodynamic shape of the hull.
As one might expect, one of the biggest dangers while swimming is that cannonfire punctures the hull and springs a leak. This is not normally possible, since the only parts of the vehicle that are liable to get hit are above water, and since they are above water, the only way water could get in is if the waves are tall enough to wash over the hull, and even then the rate of the inflow of water isn't really worth worrying about if the holes are nickel-sized, which would be how big of a hole you'd get if hit by a shaped charge grenade. Still, these are other, distinct hazards, like large caliber artillery shells exploding right next to the vehicle and rupturing weld seams. In the unlikely event of something like that occurring, the vehicle is insured by a pair of MBP-2 bilge pumps located underneath the squad leader's seat. The bilge pumps are electrically powered and run on 300W each. It is powerful enough to suck in water from the floor of the hull and eject it out through a small valve on the belly of the hull. If it is not enough to keep the vehicle afloat until it reaches the shore, the bilge pumps can at least buy the passengers and crew enough time to bail out through the various hatches on the roof of the vehicle and swim to safety.
Just as with the BMP-1, the ventilator must be erected and the trim vane must be extended before entering water. The ventilator is telescopic, allowing it to be taller than the turret when fully extended while keeping deck penetration at a minimum.

The ventilator tube is tall enough that the air inlet will remain dry even in rough seas.

Because the hull design of the BMP-2 was not altered despite the weight gain, it became necessary to revise the fenders and sideskirts to add foam filled flotation aids to boost the vehicle's buoyancy.

Here is proof that the fenders and skirts are in fact solid:


Thanks to full two-plane stabilization for the 2A42 cannon and its inherent adeptness at providing suppressive fire, the BMP-2 can launch an accurate and relentless attack on coastal or riverbank targets with all weapons (including the ATGM) while swimming, which may contribute to ensuring a successful landing operation. It is also possible for the passengers to fire out of their firing ports, which is somewhat more effective in water than on land since the vehicle really can't possibly go much faster than 7 km/h, and if the water is not still enough to use the firing ports, it is not safe for the BMP-2 to swim in that water.

Testing of the speed at which the BMP-1 could cross water obstacles was brutal. There was an incident where during a high speed water entry, the BMP flew into the water, bellyflopped, and burst the floor. Water rushed into the vehicle and sank it. After that, the floor was reinforced with additional ribs to improve structural strength. This is why the BMP can safely do this (skip to 1:36):

Thanks to bureaucratic depravity, the BMP-2 was introduced far later than it could have, and should have been, and that impacted the number of units the USSR managed to churn out prior to its disintegration. Still, as I've already said in the introduction, Kurganmashzavod produced about 14,000 BMP-2s in the space of 9 years, that is, from 1980 to 1989. At the peak of production in 1989, between 1,800 to 2,000 units exited factory gates, three times higher than the highest ever annual rate of production of the M2 Bradley. This information comes courtesy of a declassified CIA report available here (link). According to Forecast International, serial production of the BMP-2 was wrapped up in the Russian Federation and in Slovakia in 2008. No new units have been produced by any major contractor since then, but modernization efforts have been ongoing in India and other operator nations for years. Forecast International estimates that a sum total of 33,939 BMP-2 and BMP-2 variants have been produced since its inception in 1980. According to them, a new-production Russian BMP-2 costs $404,000 in 2007 U.S Dollars, and used Russian BMP-2s are available at the jaw-dropping price of $78,000. India's domestically produced "Sarath" costs $398,000 apiece.
In some ways, the BMP-2 can be considered the "T-72 of IFVs". They are a close second to the most mass-produced vehicle of its type (the BMP-1), just like the T-72, and just like the T-72, the BMP-2 is obsolete, but still very, very capable even in this day and age, and even more so if upgraded and evolved a la T-90A. Speaking of the BMP-1, it should be mentioned that although the production of the BMP-2 was deliberately curtailed by internal strife, it still managed to end up to compete closely with its predecessor in numerical strength within the ranks of the Red Army, though came as close as it is only in recent years. Production of the BMP-1 ended very soon after the introduction of the BMP-2 - a development catalyzed by the superior combat performance of the latter in Afghanistan.
The fact that a whopping 34 nations are operators of the BMP-2 says something about its desirability, and also the eagerness of the Soviet Union to sell to whomever they could. These sales were often for political reasons, sometimes with trade agreements on the side and promises of "enduring friendship", but discounts and package promotions are simply not the only reason for the popularity of the BMP-2. If this is not evident to you after reading this article, feel free to talk about it in the comments section below.
In terms of size, the doors are comparable to commercial automobiles. They measure 0.865 meters tall and 0.8 meters wide, almost as tall and almost as wide as the doors of a Lada Riva, and almost as tall as the doors on a Volkswagen Golf.

The interior volume of the BMP-2 is small, so the amount of space relegated to stowage is also small. There is practical no surplus at all. All available spaces are used efficiently. The backrest of the seat closest to the door is designed with a shelf inside it. Here, a predetermined quantity of ammunition and grenades can be stowed. These are twelve F-1 defensive hand grenades, 700 rounds of 7.62x39mm rounds, a single 200-round box for a PKM machine gun and a single container of loose 440 rounds of 7.62x54mm rounds. There is also a hook to hang a bag of rocket grenades for the RPG-7, and as mentioned in earlier, there are racks for a single RPG-7 and a single Strela or Igla MANPADS launcher.

The driver's seat is well-cushioned and it can be adjusted in height to enable the driver to remain below the hatch or to drive with his head out. The backrest is adjustable in the angle of inclination and it can be folded out flat so that it does not obstruct the driver's path to the passenger's station behind him.

Overall, the dimensions of the driver's station are adequate, though it may feel narrow depending on the bulkiness of the driver's clothing. The length and height of the station are more than adequate, and the layout of the controls is convenient.

The interior volume of the BMP-2 is small, so the amount of space relegated to stowage is also small. There is practical no surplus at all. All available spaces are used efficiently. The backrest of the seat closest to the door is designed with a shelf inside it. Here, a predetermined quantity of ammunition and grenades can be stowed. These are twelve F-1 defensive hand grenades, 700 rounds of 7.62x39mm rounds, a single 200-round box for a PKM machine gun and a single container of loose 440 rounds of 7.62x54mm rounds. There is also a hook to hang a bag of rocket grenades for the RPG-7, and as mentioned in earlier, there are racks for a single RPG-7 and a single Strela or Igla MANPADS launcher.
DRIVER'S STATION

The driver's seat is well-cushioned and it can be adjusted in height to enable the driver to remain below the hatch or to drive with his head out. The backrest is adjustable in the angle of inclination and it can be folded out flat so that it does not obstruct the driver's path to the passenger's station behind him.


 Driving the BMP-2 was much easier than driving Soviet tanks of the era. This is because of the motorcycle bar-style steering wheel, which is reportedly extremely responsive thanks to a very good power steering system, making it is very easy to control the BMP-2 over rough terrain.
As befitting the high speed of the BMP-2, the driver was given four TNPO-170 periscopes in order to safely control the vehicle. Three of the periscopes cover a 120 degree frontal arc and another is aimed to the left. This gives the driver a sufficiently large field of view to maneuver the vehicle confidently in densely forested areas. The one downside of the vehicle's design is that the sloped upper glacis is at such an angle for the sake of protection and hydrodynamic stability that it also creates a rather large blind spot directly in front of the vehicle for the driver. The center periscope can be removed from inside the vehicle and replaced with an nightvision periscope. The TNPO-170 periscopes offer a rather small field of vertical vision compared to what the driver of, say, an M2 Bradley gets, but the width of the periscopes is sufficient.
Oddly enough, they didn't seem to think that wipers or screen blowers were necessary. The geometry of the front slope has some positive influence on the amount of dirt and grime that ends up on the periscopes while driving, but some former BMP-2 drivers have complained of the inconvenience of not being able to wipe it off when buttoned up.


The driver can replace his TNPO-170A periscope with a TVNE-1PA infrared periscope for night driving. Used in tandem with the small infrared headlamp, the driver can see as far as 60 meters using this periscope. Not far enough to drive at 60 km/h, perhaps, but far enough that he has enough time to avoid obstacles while driving at around a crawl. The field of view from the periscope is very narrow, and the dependence on infrared light for illumination is a major weakness.
The TNP-350B periscope is used while swimming. It is 350mm tall which is tall enough to look above the trim vane when it is extended for swimming. The field of view from the TNP-350B is very limited due to the height of the periscope, so the driver cannot navigate by himself when negotiating larger bodies of water. The commander must help from his vantage point in the turret. However, the TNPO-170A periscope to the driver's left can still be used when swimming so the driver is not entirely confined to the single TNP-350B in front of him.
In terms of comfort, the driver's station is satisfactory. His station is widest at the top and narrowest at the feet because of the left hull sponson.

The driver is also supplied with a GPK-59 gyrocompass to help him navigate at night.

ENGINE, TRANSMISSION, SUSPENSION, MAINTENANCE

Some accusations have been leveled at the BMP-2 concerning its armament, its armour, and its (lack of) amenities, but its mobility has never been in question, and for very good reason.

Contrary to what some sites may claim, the BMP-2 mounts the very same UTD-20 diesel engine that powered the BMP-1, not a more powerful one. The UTD-20 or UTD-20S1 produces 300 hp at 2,600 rpm, with a maximum torque output of 981 N.m at 1,500 rpm to 1,600 rpm which is very good for the weight of the vehicle. The high torque output grants the BMP-2 excellent acceleration characteristics on challenging terrain and together with the relatively narrow tracks, allows the vehicle to steer with ease. The engine alone weighs 665 kg dry. It has a specific fuel consumption rate of around 175 g/hp.h to 178 g/hp.h. The dynamic characteristics of the UTD-20 are shown in the chart below, taken from a BMP-1 manual. The top left of the chart shows the gross power output in horsepower, the middle right of the chart shows the gross torque output in kg.f, and the bottom right of the chart shows the specific fuel consumption rate.

There are two ways to start the engine. The standard method is, of course, the electric ignition switch, but that tends to be useless in extremely cold weather. To start the engine in such conditions, the BMP-2 gets the traditional compressed air tanks commonly found on tanks since the T-34. These air tanks blast air into the combustion chambers to get the pistons working and burning diesel once more.
The engine air intake is shared with the ventilation air intake, with the common intake being located behind the turret. The air cleaner itself is in the engine compartment, below the ejector cooling system duct. The intake housing can be raised when swimming, to ensure that water does not enter the air intake ducts. Coarse and fine air filtration is accomplished by a single-stage multi-cyclone air cleaner, which ensures that the engine receives air with a purity of 99.5%. The dust collected by the multi-cyclone filters is collected in a pan, where it is blown into the exhaust stream of the engine exhaust due to the negative pressure.


The ejector duct is where the air flow through the radiators, the exhaust, and the dusty air from the filters will mix together and flow out. The exhaust manifolds from the engine, represented by the mark (12) in the diagram below, provide a flow of high-velocity, hot exhaust, which generates a strong negative pressure in the duct. This draws atmospheric air through the radiators placed above the exhaust. From there, the mixture is expelled through a specially shaped duct. Due to the shape of the duct, the angle of the exhaust vents, and the constant supply of exhaust from a running engine, there is effectively no danger of engine flooding from natural sources of water ingress, including rain and waves (when the BMP is swimming). Water is not allowed to pool at the bottom of the duct, as the flow of air will rapidly blow it out. Similarly, flaming liquids, such as burning fuel, do not have any entrypoint to the drivetrain. If the engine stops and the flow of exhaust gasses cease, the engine is protected by exhaust manifold valves.

When the BMP has been parked in the rain without a radiator and exhaust cover, water can pool up inside the ejector duct. Before starting the engine, the water must be drained from the duct using the drainage port, marked (32) in the image above.
The picture below shows the transmission. There is power steering. Braking is hydraulic. The transmission and the engine are built together as a single powerpack unit, thus simplifying replacements in the field.

However, it's definitely not all bad news. The torque output and low speed characteristics are marvellous, so the BMP-2 has superb passability over rough terrain at average cross country speeds of 20 km/h to 35 km/h. According to private owners, the BMP-2 is also extremely agile. Its obstacle crossing capabilities are quite standard. It can climb a vertical slope of 35 degrees, traverse a side slope of 20 degrees, and climb a vertical wall 0.7 m in height, but not more, due to the overhang of the nose of the hull. The BMP-2 can cross a trench 2 .5m in width by driving over it at low speed, but it can cross much wider tranches by literally jumping over them, which isn't very difficult for it to do.
Still, keep in mind that nothing is infallible. The BMP-2 can still get stuck, just like any other vehicle, though it is definitely not anywhere close to being overweight. Its thin tracks might be a liability for some other platform, but thanks to the compressed design of the BMP-2, it only exerts a ground pressure of 0.65 kg/sq.cm when combat loaded. The Marder 1, with its much wider tracks, still cannot escape the fact that it is about 2 times heavier than the BMP-2. The Marder 1 exerts 0.83 kg/sq.cm of ground pressure.

The tracks, torsion bars and drive sprockets were not carried over from the BMP-1, despite being almost indistinguishable from one other aesthetically. Besides the frontmost and rearmost torsion bars being reinforced, the tracks are of a different type. Unlike the old type, the BMP-2's tracks can accept rubber track pads for driving on asphalt, and they have contact needles for better grounding of the radio, thus apparently reducing radio interference. Not too sure how this works, though. The roadwheels were also replaced with sturdier ones that could better handle the stress from the greater weight of the BMP-2. It should also be mentioned that the this combination of three upgrades gave the vehicle an extra 50mm of ground clearance over the BMP-1, so that the BMP-2 has a ground clearance of 420mm. This means that the vehicle can be driven with more authority over rocky or lumpy terrain, as there is less chance of the hull floor scraping against the ground.
If the BMP is stuck fast in some soft sand or in sticky mud, which is rare, it is possible for it to extricate itself with the use of the famous log. The video below demonstrates how it is done. You can see for yourself how invaluable the log can be.
MAINTENANCE
More than 90% of all maintenance can be done by simply lifting the engine access panel on the upper glacis. Its lightweight aluminium construction and hinged mounting makes it into sort of an oversized bonnet. Two men could hinge it open easily. The photo below shows NVA personnel having a look under the hood of their BMP-1s.

The radiator is slightly less convenient to access. The access hatches are bolted and hinged like the engine access panel, but the size of the hatches are somewhat smaller. The entire radiator deck will have to be unbolted and lifted with a small crane in orer to replace a broken radiator.

Most would opt to lift the engine access panel to do regular scheduled maintenance, but doing that is not the only way of getting to the engine. Inspections and oil top-ups may be done without leaving the vehicle by opening the insulated bulkheads separating the engine compartment from the inhabited compartments. The small one-man turret of the BMP-1 made accessing the rear engine bulkhead hatch from the passenger compartment relatively easy, but the wider turret and the missile stowage racks made this impossible, but this is no big loss. You could still get to it just as easily from the commander's station, where it would be right in front of you, as you can see below. This hatch allows you to see the rear part of the engine, the radiator pack, and the air compressor used to fill up the compressed air tanks used for starting the engine.

The hatches on the driver's station fireproofed bulkhead allows him to inspect the engine itself. An experienced driver-mechanic can diagnose and troubleshoot a faulty powertrain directly from his station. An opened bulkhead hatch can be seen in the "Driver's Station" section.
Electricity in the vehicle is supplied by two 6STEN-140M or 6ST-140R accumulator batteries connected in series, with a combined capacity of 140 Ah. Each battery weighs 62kg.
The BMP-2 is considered an extremely dependable vehicle, despite early concerns with the BMP-1 of over complexity due to the steering system. Private owners of de-militarized BMPs have spoken of their satisfaction on hobby forums, and the BMP-2 has a very good reputation in military service.
FUEL ENDURANCE
The BMP-2 has five fuel tanks; three internal tanks and two rather infamous exterior ones - the rear doors, which we have already talked about quite a bit. The port side rear door holds 55 liters and the starboard side door holds 67 liters (the port side door has less as it has a firing port embedded in it). The main tank in the passenger compartment - which forms half of the partition splitting the passenger compartment into halves - holds 225 liters.
The D-100 fuel pump is located underneath the seat of the starboard side bench closest to the door. It is a reasonably sized pump, running on 150W. The vehicle in the photo below is a Czech OT-90, but the pump is the same model and in the same location. The fuel pump has yellow tubes running out of it.

Because the bench was shortened to seat only three passengers as opposed to four as in the BMP-1, it became necessary to add an additional two fuel tanks to compensate for the reduced main tank capacity. In some hilariously misguided attempt to store as much fuel as possible in the passenger compartment, these two tanks are made to be half of the bench on either side of the passenger space, meaning that one passenger on either bench will be seated on a fuel tank. The port side tank can be seen below:

The port side tank holds 55 liters and the starboard side tank holds 58 liters.
With all fuel tanks filled, the BMP-2 has a maximum cruising range of 600 km on paved roads. That means that if the highways were clear, you could drive from Berlin to Cologne on a single tank! But no one really expects that to happen. Indeed, armoured vehicles on the frontline don't really get to drive around much once they reach contested territory, so why carry around so much fuel? Well, a generous cargo of fuel means that a BMP-2 could fight for two to three days in a continuous, unstoppable offensive push on a single fill of fuel, giving it a great deal of independence and autonomy in the field. It becomes possible to conduct a deep penetration offensive or counterattack with minimal supporting assets like fuel trucks and bridgelayers, though obviously these assets are still very necessary, but among all the other little details and idiosyncrasies of its construction, this one is perhaps the best proof that BMP-2 was designed with just that one, single objective in mind - continental domination. One of the other details designed with the same intent in mind, as many should already know, is its amphibious capabilities.
WATER OBSTACLES
The BMP-2 is almost as adept in the water as it is on land. In fact, several compromises had to be made to the structure of the hull for the sole purpose of improving its performance in the water, including the slight tapering of the passenger compartment (see here), which reduced the amount of stowage space for the person sitting closest to the rear doors, but also reduced drag. The short and stubby bow of the original BMP from 1966 gave the driver a good view of what was in front of the vehicle when driving, but the bow was too short to properly enter rivers from a steep bank, as the bow would tip too deeply into the water, so the bow was lengthened. This created a large blindspot in front of the BMP, but made it possible to enter bodies of water from any angle. Suffice to say, they took this requirement quite seriously.
Propulsion in water is produced by the flowing of water around the tracks being channeled rearwards with the use of a special aluminium alloy hydrodynamic grille which is placed where the rear fenders usually are. The rearwards stream of water produces forwards thrust. The faster the tracks move, the more the water that flows through the hydrodynamic grilles. This system is the same as in the M113 in principle - movement of the tracks in water - only better optimized thanks to the addition of the grilles and the more hydrodynamic shape of the hull.
As one might expect, one of the biggest dangers while swimming is that cannonfire punctures the hull and springs a leak. This is not normally possible, since the only parts of the vehicle that are liable to get hit are above water, and since they are above water, the only way water could get in is if the waves are tall enough to wash over the hull, and even then the rate of the inflow of water isn't really worth worrying about if the holes are nickel-sized, which would be how big of a hole you'd get if hit by a shaped charge grenade. Still, these are other, distinct hazards, like large caliber artillery shells exploding right next to the vehicle and rupturing weld seams. In the unlikely event of something like that occurring, the vehicle is insured by a pair of MBP-2 bilge pumps located underneath the squad leader's seat. The bilge pumps are electrically powered and run on 300W each. It is powerful enough to suck in water from the floor of the hull and eject it out through a small valve on the belly of the hull. If it is not enough to keep the vehicle afloat until it reaches the shore, the bilge pumps can at least buy the passengers and crew enough time to bail out through the various hatches on the roof of the vehicle and swim to safety.
Just as with the BMP-1, the ventilator must be erected and the trim vane must be extended before entering water. The ventilator is telescopic, allowing it to be taller than the turret when fully extended while keeping deck penetration at a minimum.
The ventilator tube is tall enough that the air inlet will remain dry even in rough seas.

Because the hull design of the BMP-2 was not altered despite the weight gain, it became necessary to revise the fenders and sideskirts to add foam filled flotation aids to boost the vehicle's buoyancy.

Here is proof that the fenders and skirts are in fact solid:


Thanks to full two-plane stabilization for the 2A42 cannon and its inherent adeptness at providing suppressive fire, the BMP-2 can launch an accurate and relentless attack on coastal or riverbank targets with all weapons (including the ATGM) while swimming, which may contribute to ensuring a successful landing operation. It is also possible for the passengers to fire out of their firing ports, which is somewhat more effective in water than on land since the vehicle really can't possibly go much faster than 7 km/h, and if the water is not still enough to use the firing ports, it is not safe for the BMP-2 to swim in that water.

Testing of the speed at which the BMP-1 could cross water obstacles was brutal. There was an incident where during a high speed water entry, the BMP flew into the water, bellyflopped, and burst the floor. Water rushed into the vehicle and sank it. After that, the floor was reinforced with additional ribs to improve structural strength. This is why the BMP can safely do this (skip to 1:36):
DISTRIBUTION
Thanks to bureaucratic depravity, the BMP-2 was introduced far later than it could have, and should have been, and that impacted the number of units the USSR managed to churn out prior to its disintegration. Still, as I've already said in the introduction, Kurganmashzavod produced about 14,000 BMP-2s in the space of 9 years, that is, from 1980 to 1989. At the peak of production in 1989, between 1,800 to 2,000 units exited factory gates, three times higher than the highest ever annual rate of production of the M2 Bradley. This information comes courtesy of a declassified CIA report available here (link). According to Forecast International, serial production of the BMP-2 was wrapped up in the Russian Federation and in Slovakia in 2008. No new units have been produced by any major contractor since then, but modernization efforts have been ongoing in India and other operator nations for years. Forecast International estimates that a sum total of 33,939 BMP-2 and BMP-2 variants have been produced since its inception in 1980. According to them, a new-production Russian BMP-2 costs $404,000 in 2007 U.S Dollars, and used Russian BMP-2s are available at the jaw-dropping price of $78,000. India's domestically produced "Sarath" costs $398,000 apiece.
In some ways, the BMP-2 can be considered the "T-72 of IFVs". They are a close second to the most mass-produced vehicle of its type (the BMP-1), just like the T-72, and just like the T-72, the BMP-2 is obsolete, but still very, very capable even in this day and age, and even more so if upgraded and evolved a la T-90A. Speaking of the BMP-1, it should be mentioned that although the production of the BMP-2 was deliberately curtailed by internal strife, it still managed to end up to compete closely with its predecessor in numerical strength within the ranks of the Red Army, though came as close as it is only in recent years. Production of the BMP-1 ended very soon after the introduction of the BMP-2 - a development catalyzed by the superior combat performance of the latter in Afghanistan.
The fact that a whopping 34 nations are operators of the BMP-2 says something about its desirability, and also the eagerness of the Soviet Union to sell to whomever they could. These sales were often for political reasons, sometimes with trade agreements on the side and promises of "enduring friendship", but discounts and package promotions are simply not the only reason for the popularity of the BMP-2. If this is not evident to you after reading this article, feel free to talk about it in the comments section below.